Vendor Hub System Guide

Everything your team needs to know about using the GPR Field Services platform — from logging in to tracking quotes, managing prospects, and delivering proposals to your clients.

📌 vendor.gprfieldservices.com
👥 Ramaker & Associates
📅 Updated March 2026
Introduction

How the System Works

The GPR Field Services Vendor Hub is a private web portal for Ramaker & Associates team members. It centralizes your client apps, active projects, quoting workflow, and proposal tracking in one place.

Client Apps

Completed project deliverables — mobile apps with maps, GPR data, gallery, and timeline. Delivered directly to each cemetery client.

In Production

Projects actively in progress — job has been won, app is being built, not yet delivered to client.

Prospects

Cemeteries that have received a proposal but haven't been won yet. Tracks proposal status and pipeline stage.

Quotes & Proposals

Create a detailed project quote using the mapping tool, then convert it into a formal PDF proposal sent directly to the prospect.
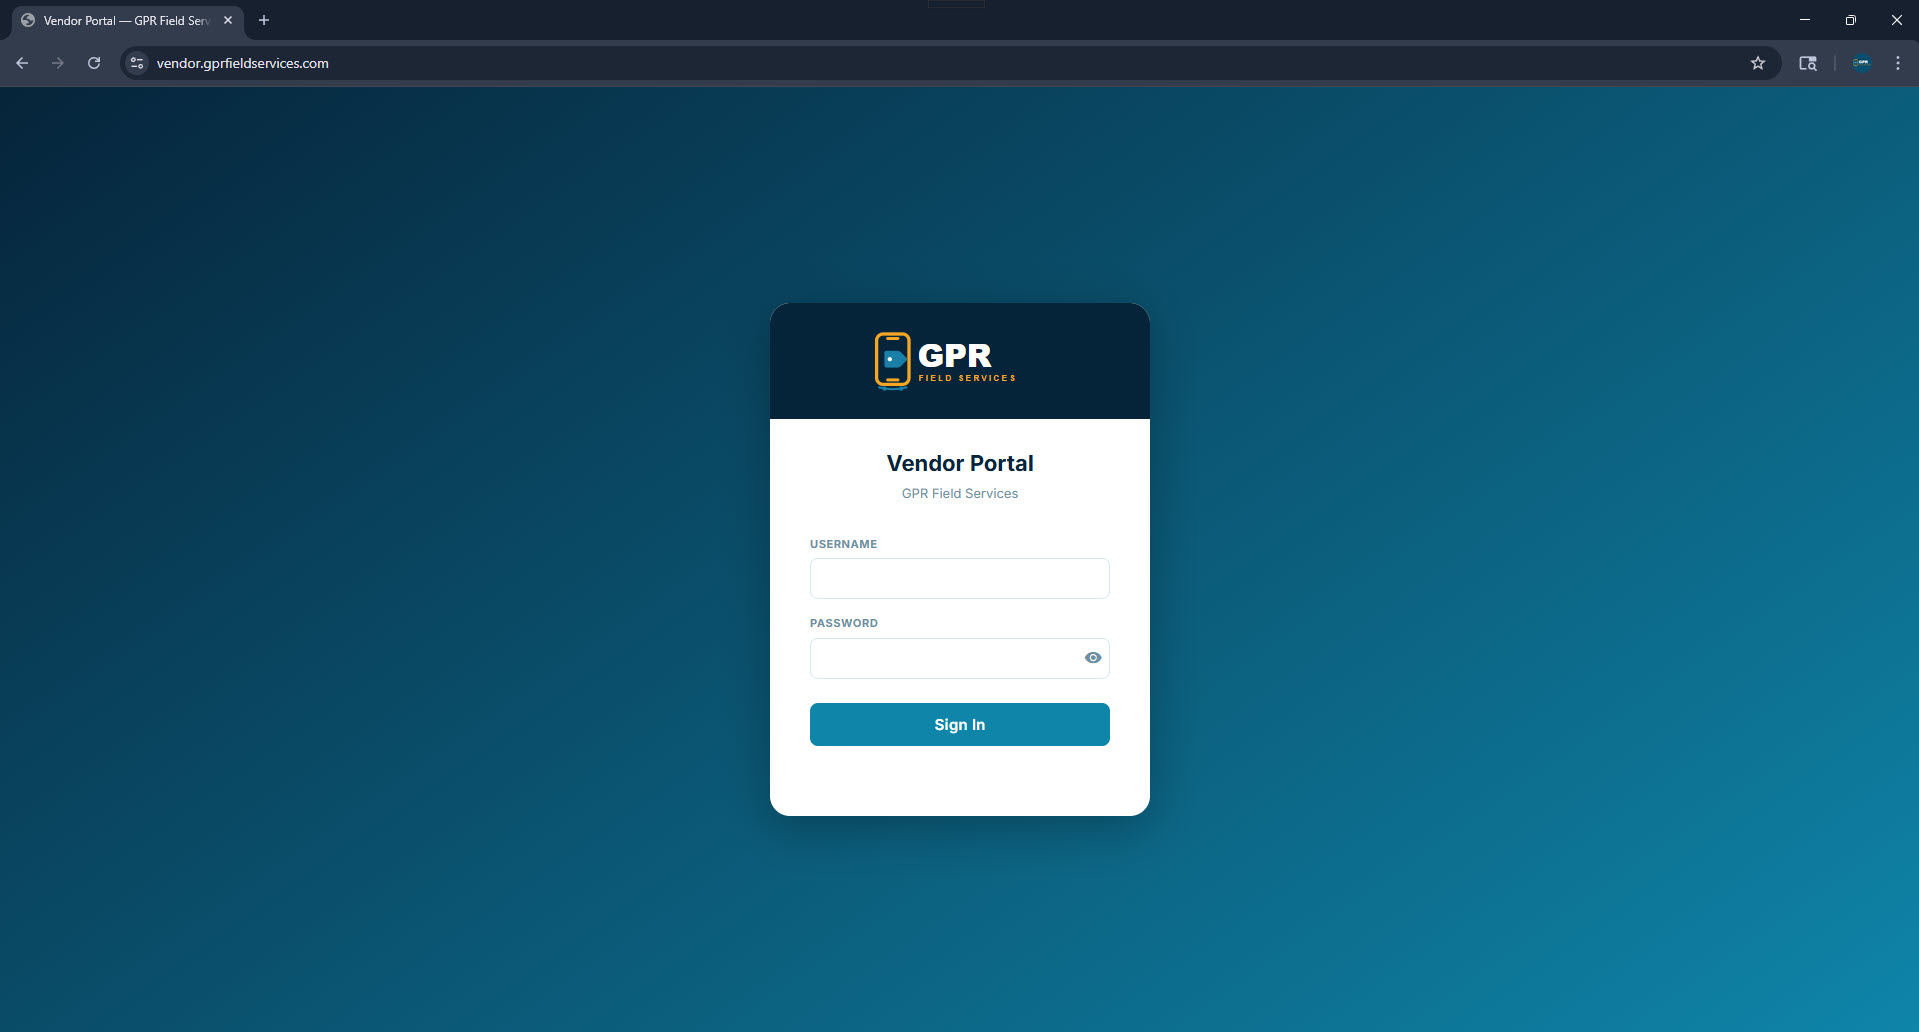
🔒
Access is by invitation only. Each team member has their own login. The Manager role has additional permissions including creating quotes and deleting records.
1
Getting Started

Logging In

Visit vendor.gprfieldservices.com in any browser. Enter your username and password provided by your manager.

vendor.gprfieldservices.com — Login
Vendor Hub login screen
1
Enter your username and password Credentials are provided by your team manager. Each person has their own unique login.
2
Auto Sign-In toggle When enabled (found at the bottom of the sidebar after login), your client apps open without requiring a separate login — convenient access.
💡
The Vendor Hub works on any device — desktop, tablet, or phone. No app download needed.
2
Navigation

Home Dashboard

After logging in, you land on the Home Dashboard — a quick-access overview of every section in the platform. Click any card to jump directly to that section.

Home Dashboard — 6 navigation cards
Home Dashboard with 6 cards
Clients

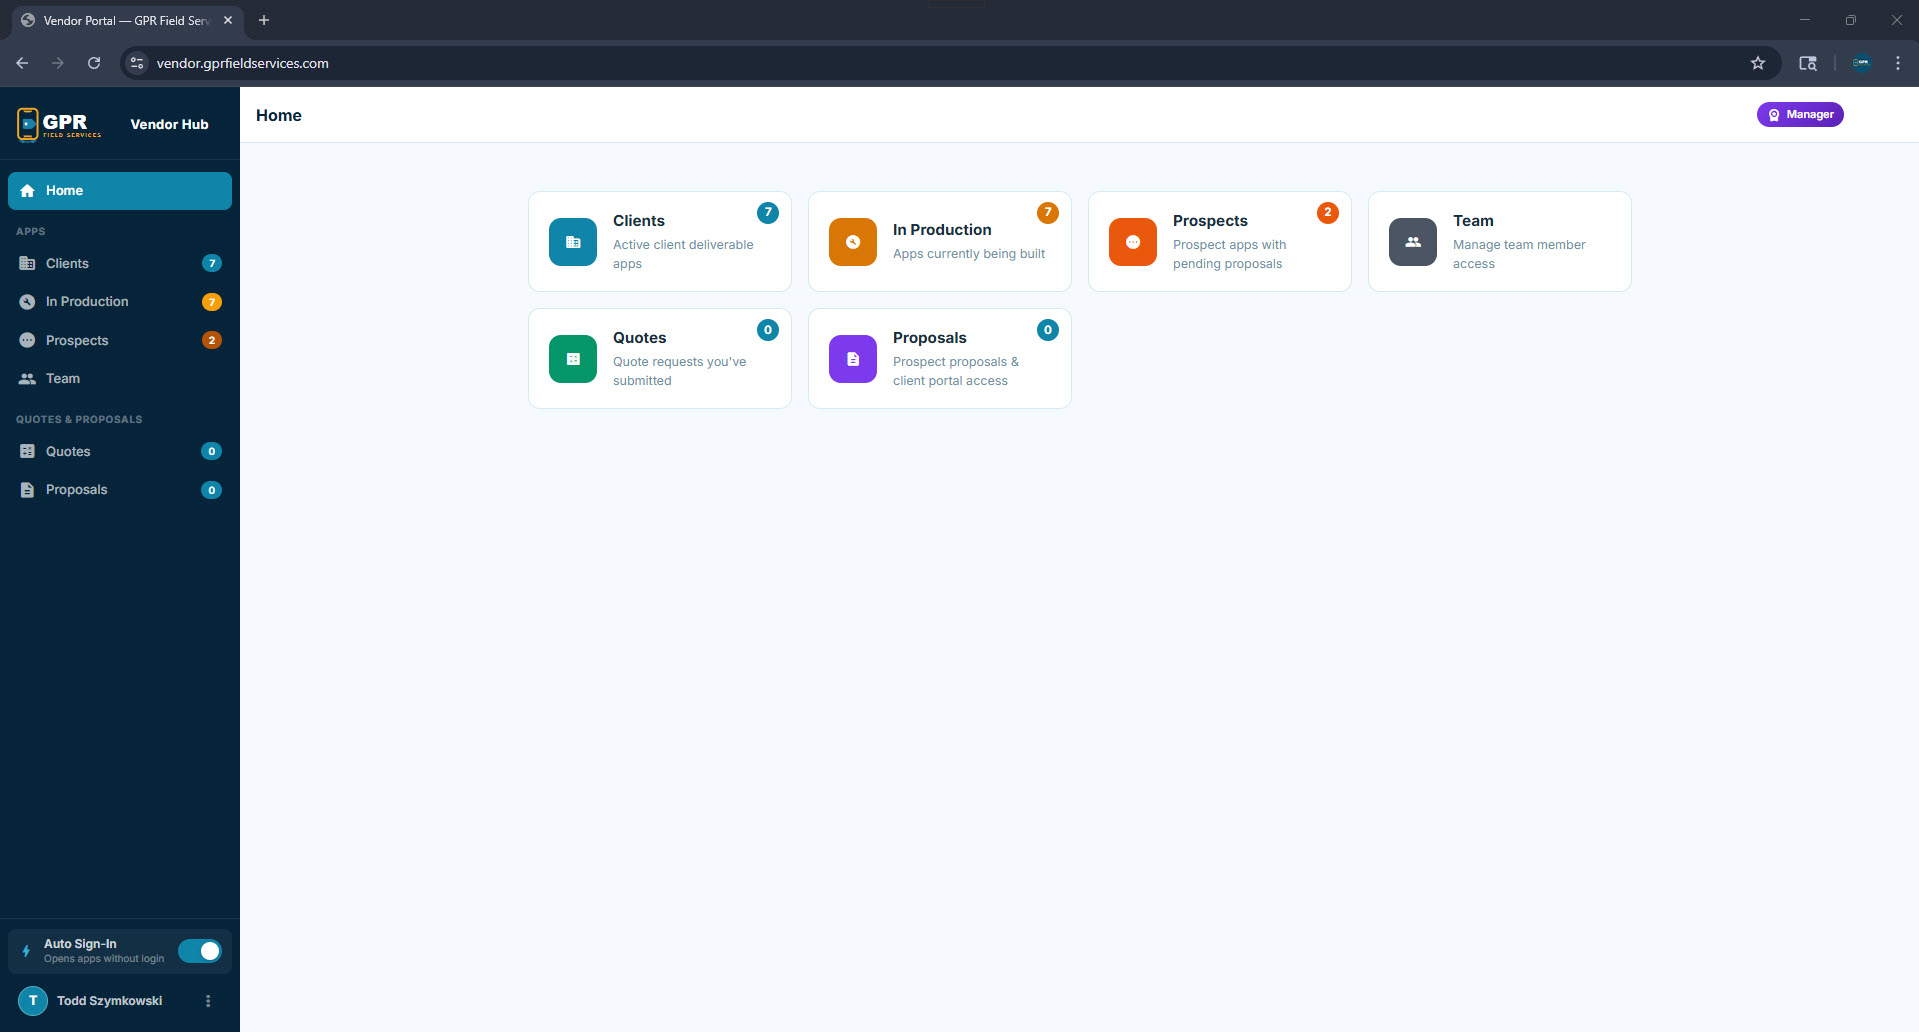
Delivered project apps. Each client received a private mobile app with their GPR survey results.

In Production

Projects actively being processed — GPR data collected, app being built.

Prospects

Cemeteries that have received proposals. Track their status through the sales pipeline.

Team

View all team members and their access roles (Manager vs. Employee).

Quotes

Create and manage project quotes using the satellite mapping quoting tool.

Proposals

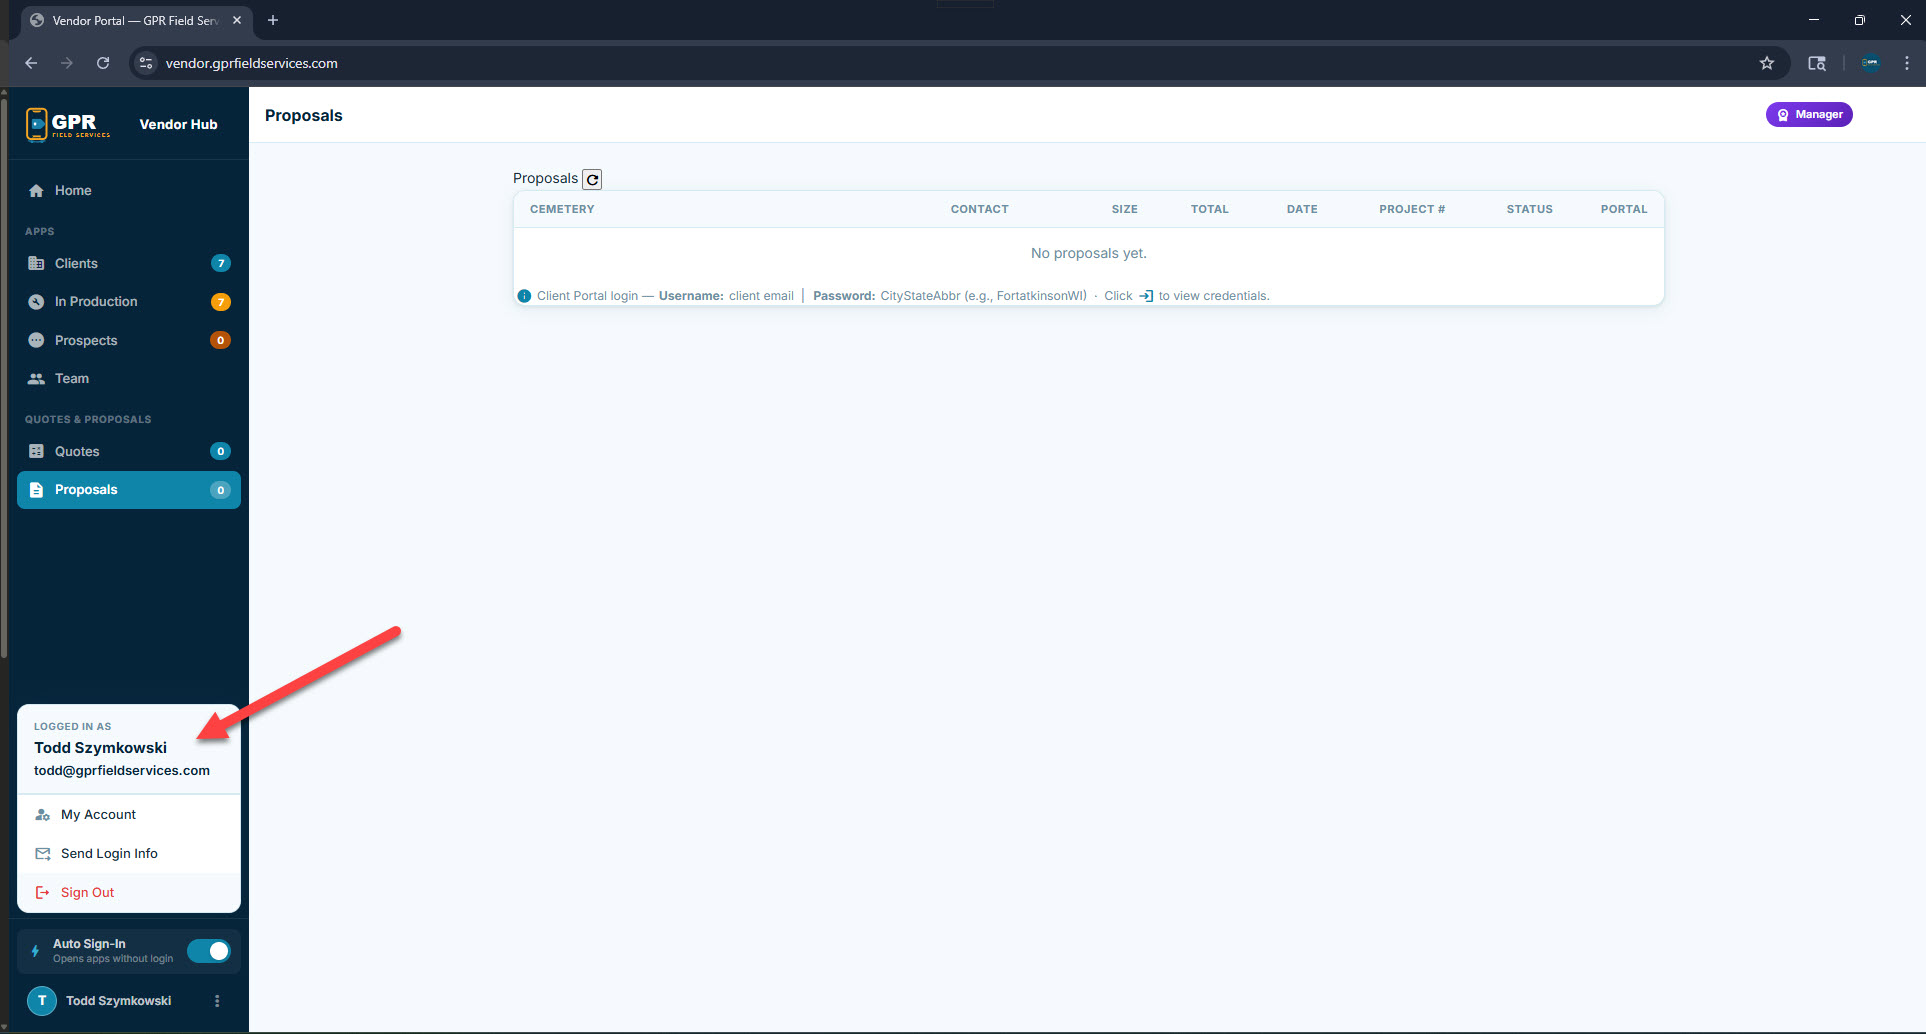
View all formal proposals that have been generated and sent to prospects.

3
Project Apps

Clients & In Production

These two tabs show all of your project apps. Clients are fully delivered apps in the hands of the cemetery. In Production are apps actively being built after a job is won.

Clients tab
Clients tab
In Production tab
In Production tab

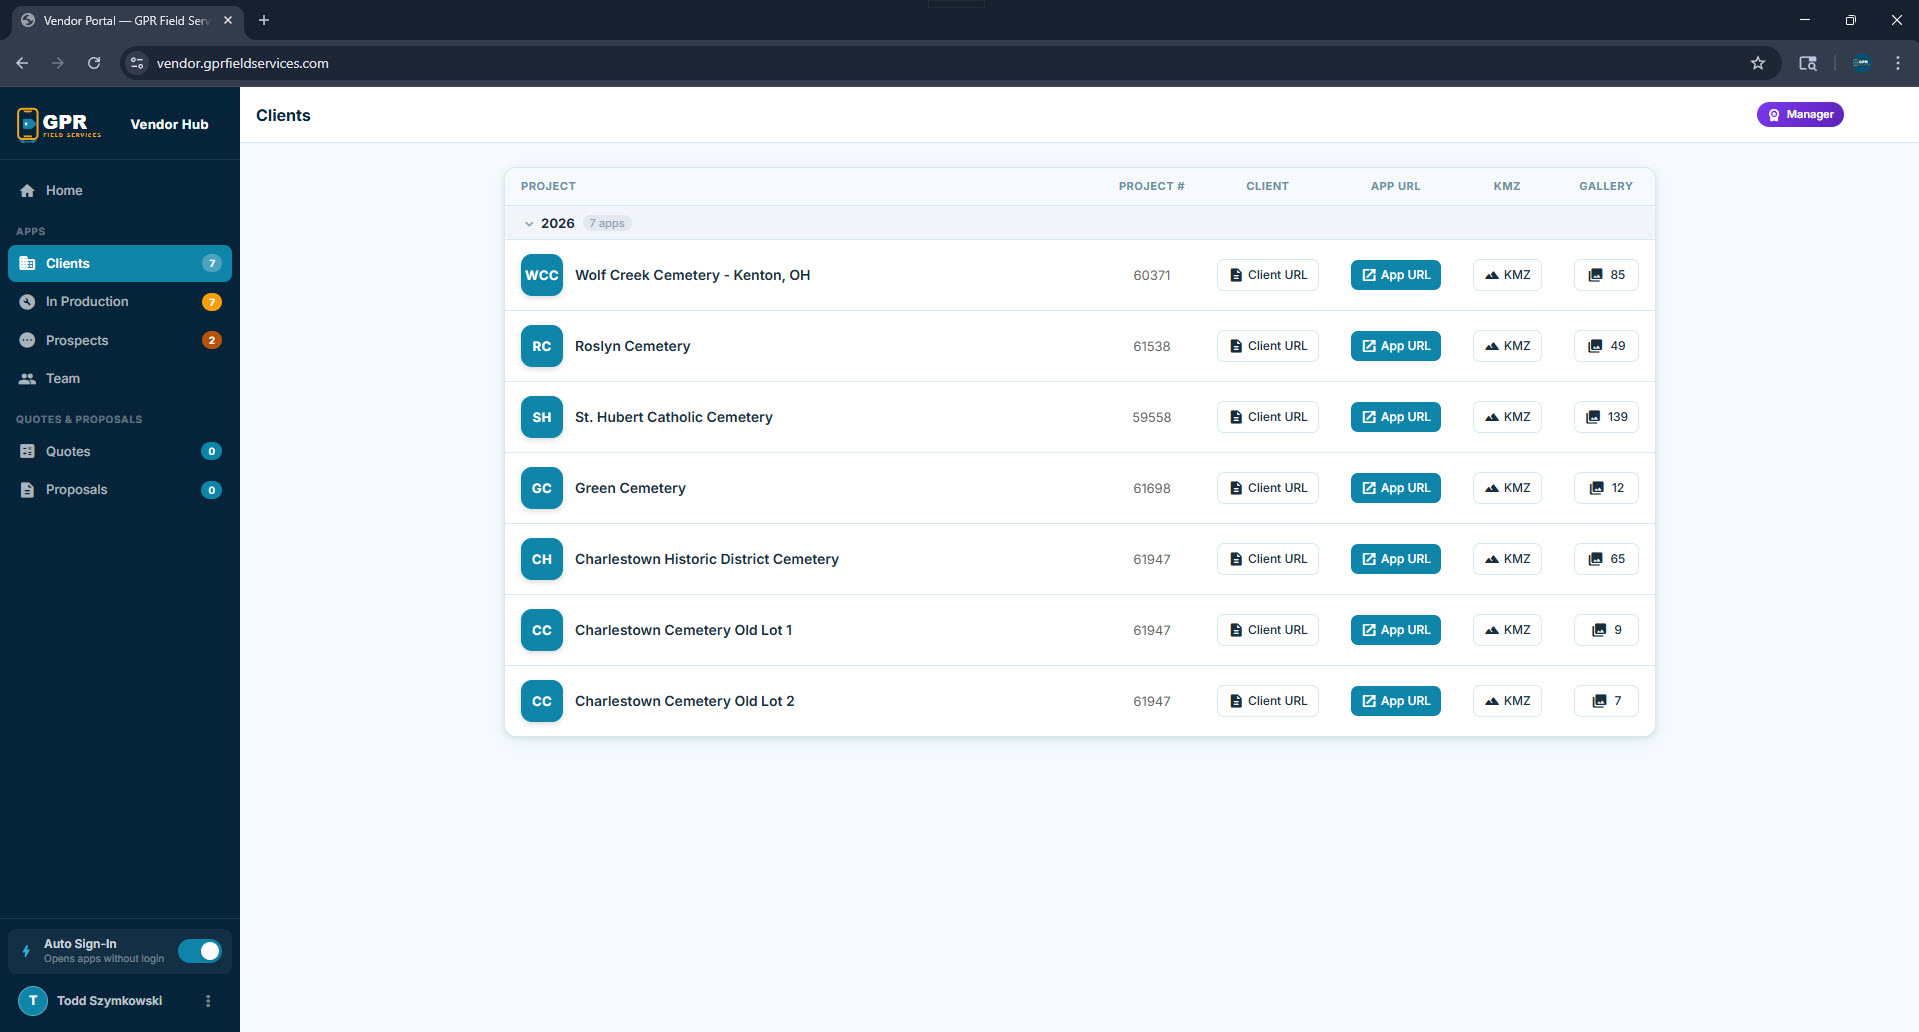
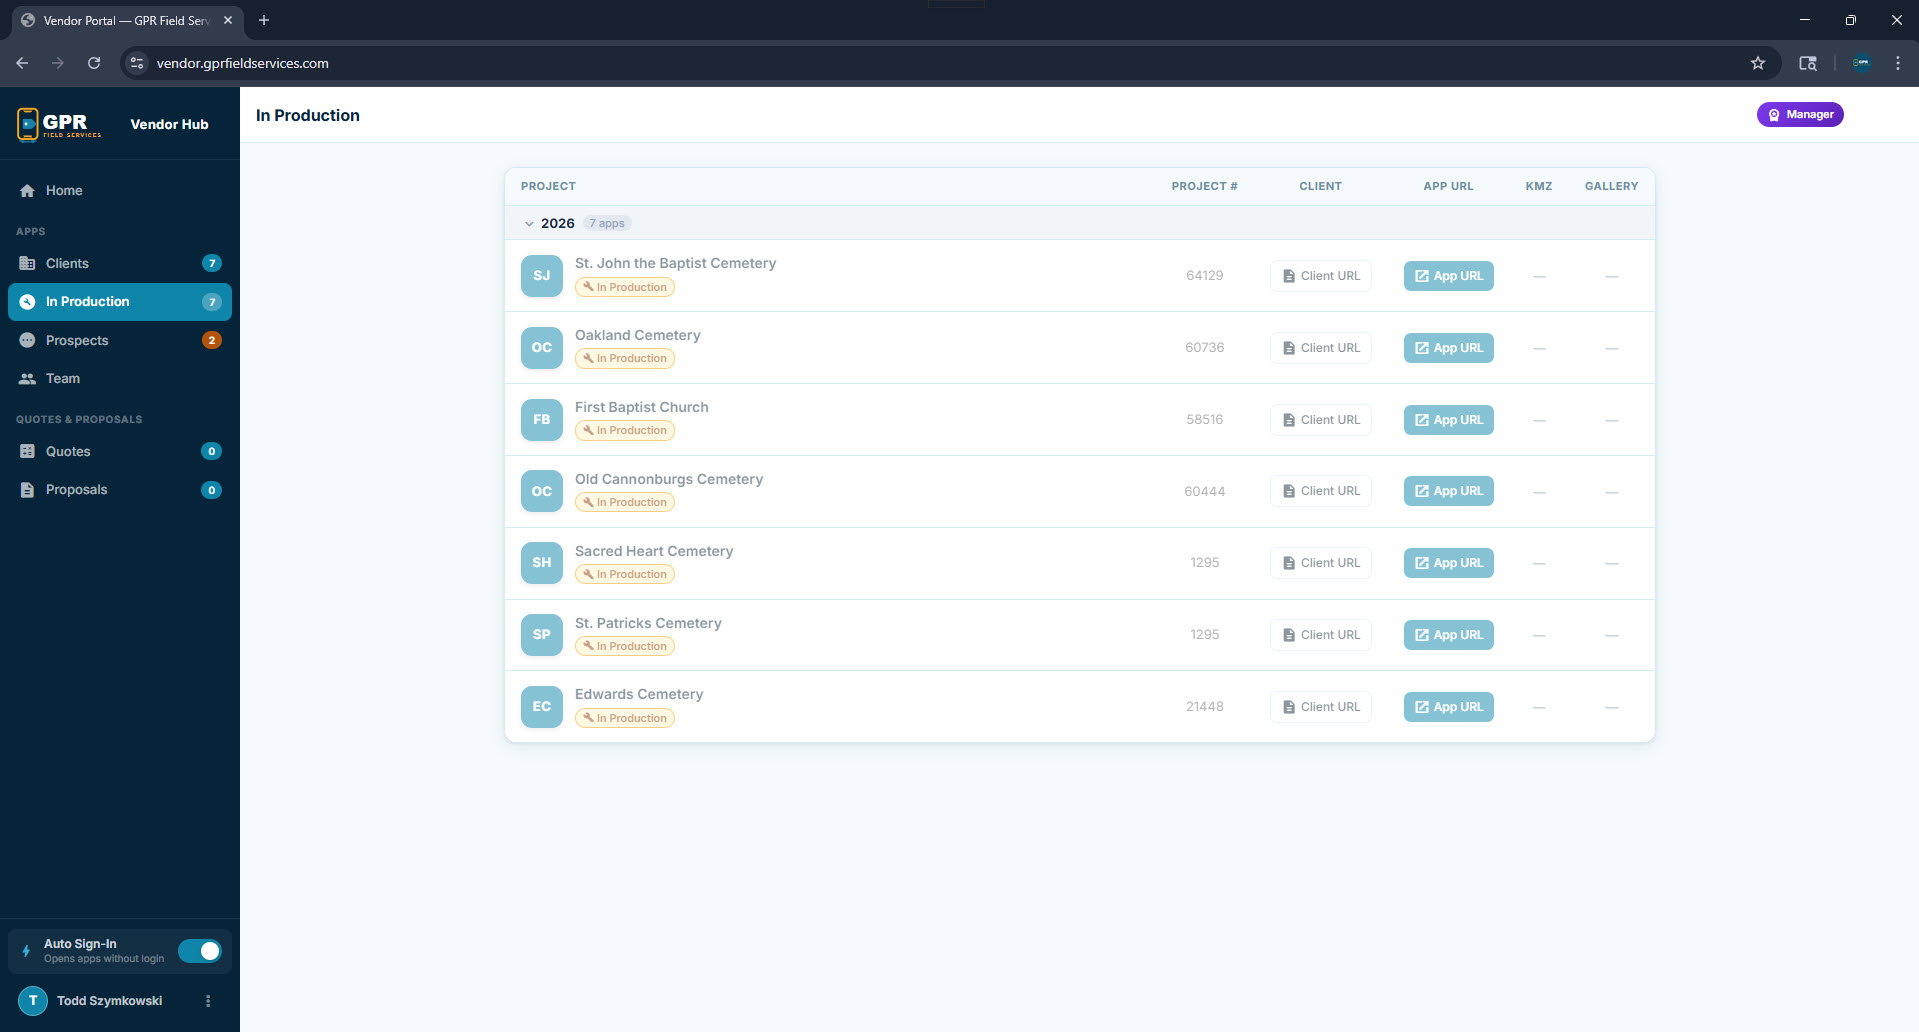
Each row shows the app name, client, current status, number of KMZ map files uploaded, and number of gallery photos. Click the app icon to open the live client mobile app.

Delivered In Production Archived
📱
Each client app is a mobile-first PWA (Progressive Web App) — it can be installed on a phone directly from the browser, no App Store required. Clients get their own login credentials to access their project data.
4
Sales Pipeline

Prospects

Prospects are cemeteries that have received a formal proposal from Ramaker. Once a quote becomes a proposal, the prospect appears here automatically.

Prospects panel — proposal tracking
Prospects tab
Proposal Status

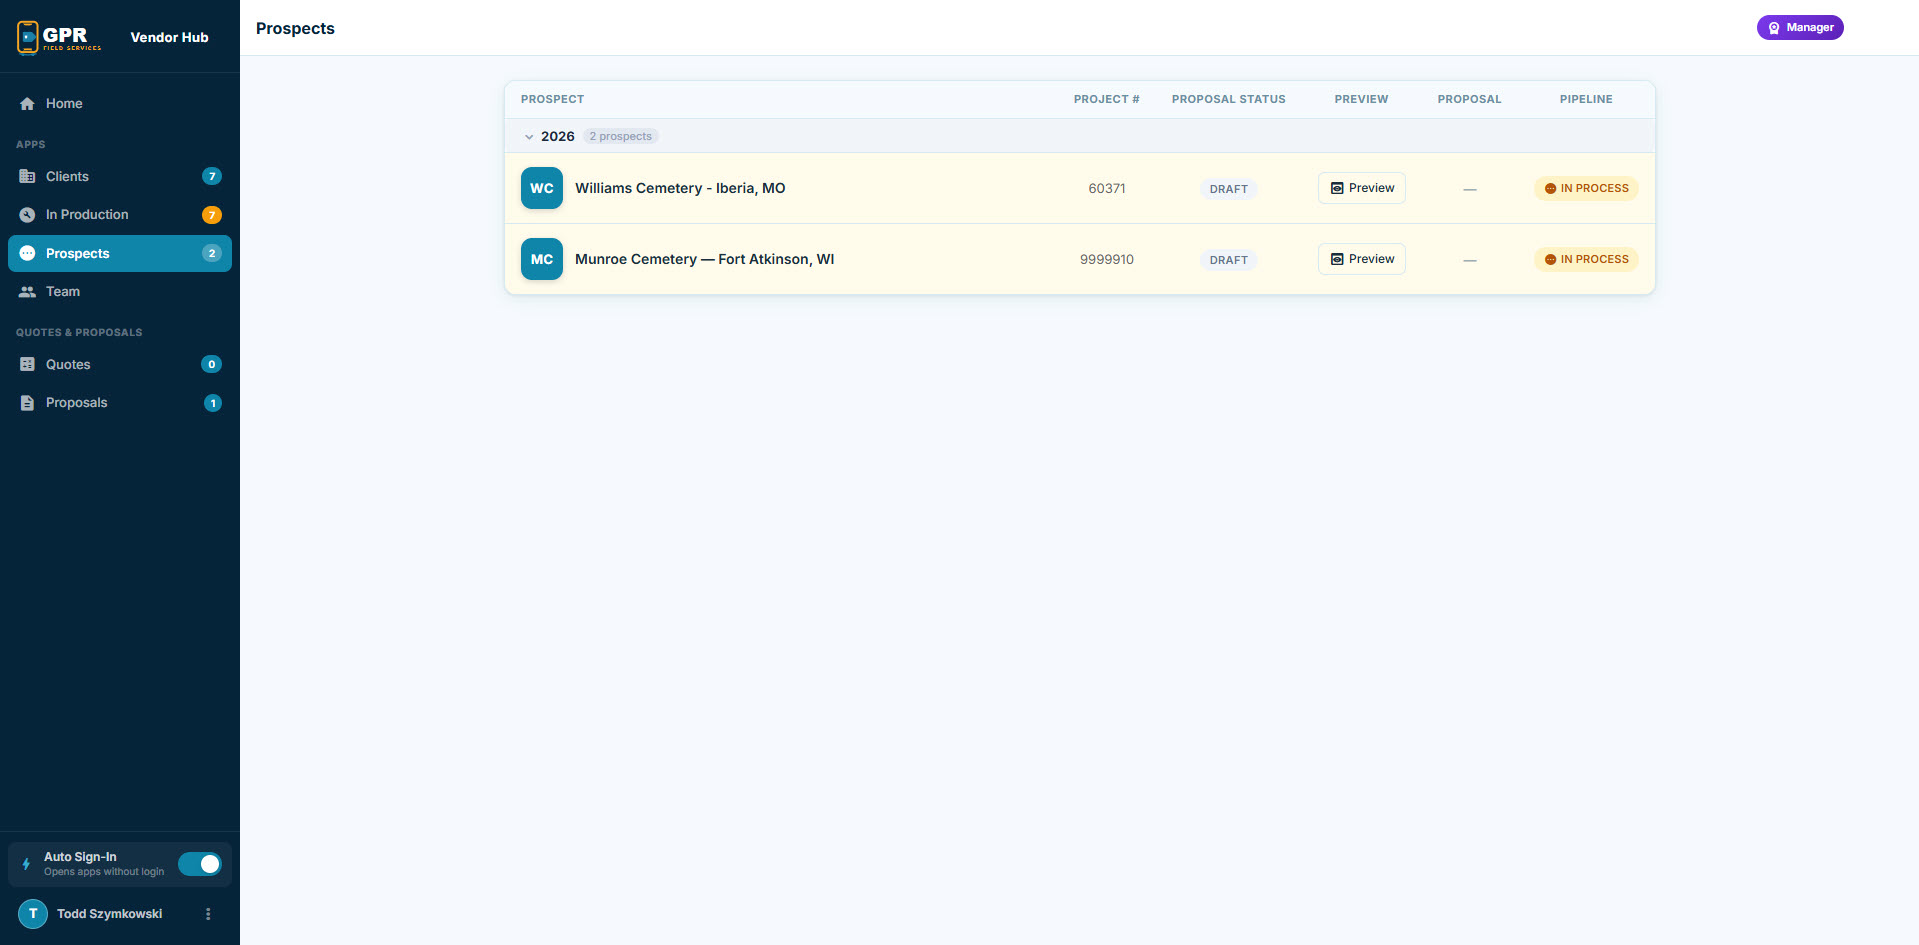
Tracks where the prospect is in the review process: New, Sent, Viewed, Accepted, Won, or Lost.

Preview

Opens the proposal in read-only preview mode so you can see exactly what the client sees.

Portal

Opens the client login portal — where the prospect views their proposal, downloads the PDF, and ultimately signs off.

Project Number

Assigned by your manager when a prospect converts to an active job. Appears on the proposal and in the client portal once set.

📌
Once a prospect becomes a won client, their record moves to In Production and eventually Clients as the project progresses.
5
Access Control

Team Access

The Team panel shows all Ramaker team members with access to the Vendor Hub. Members are either Manager or standard users.

Team panel — member access list
Team Access panel
Manager Employee
Manager Role

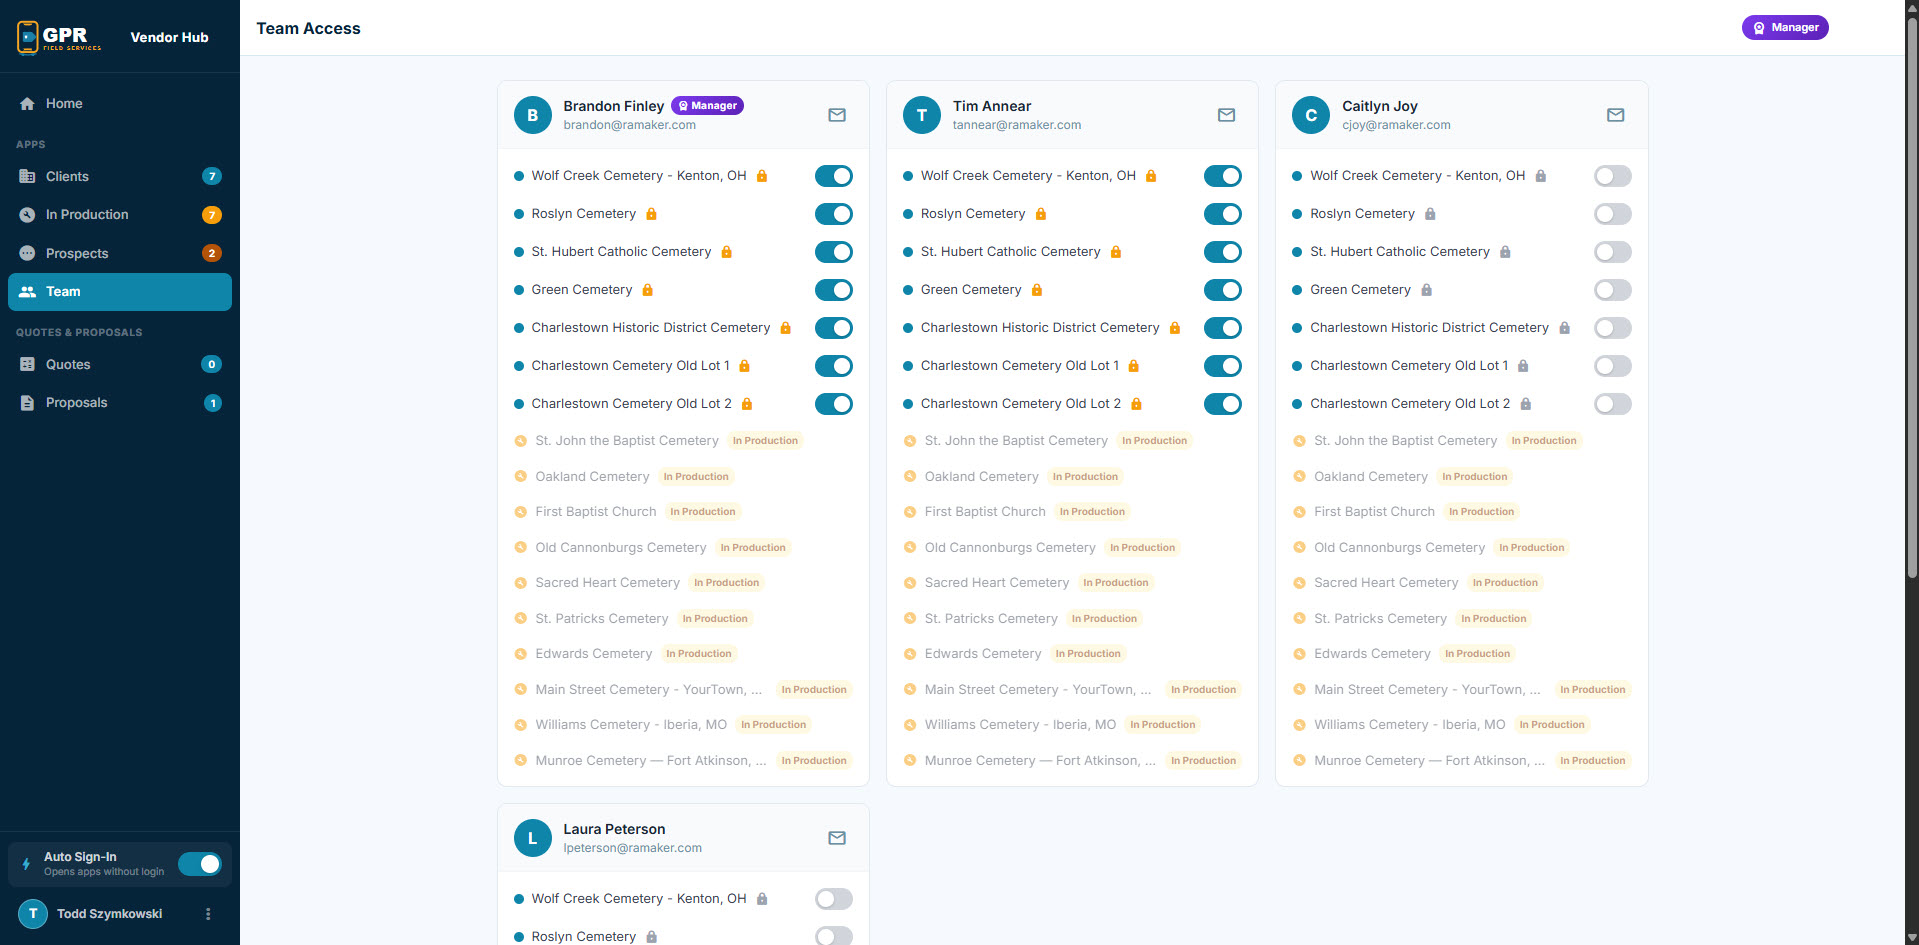
Can create quotes, generate proposals, delete prospects, and manage all records in the system.

Standard Access

Can view all panels and access client apps, but cannot create, modify, or delete records.
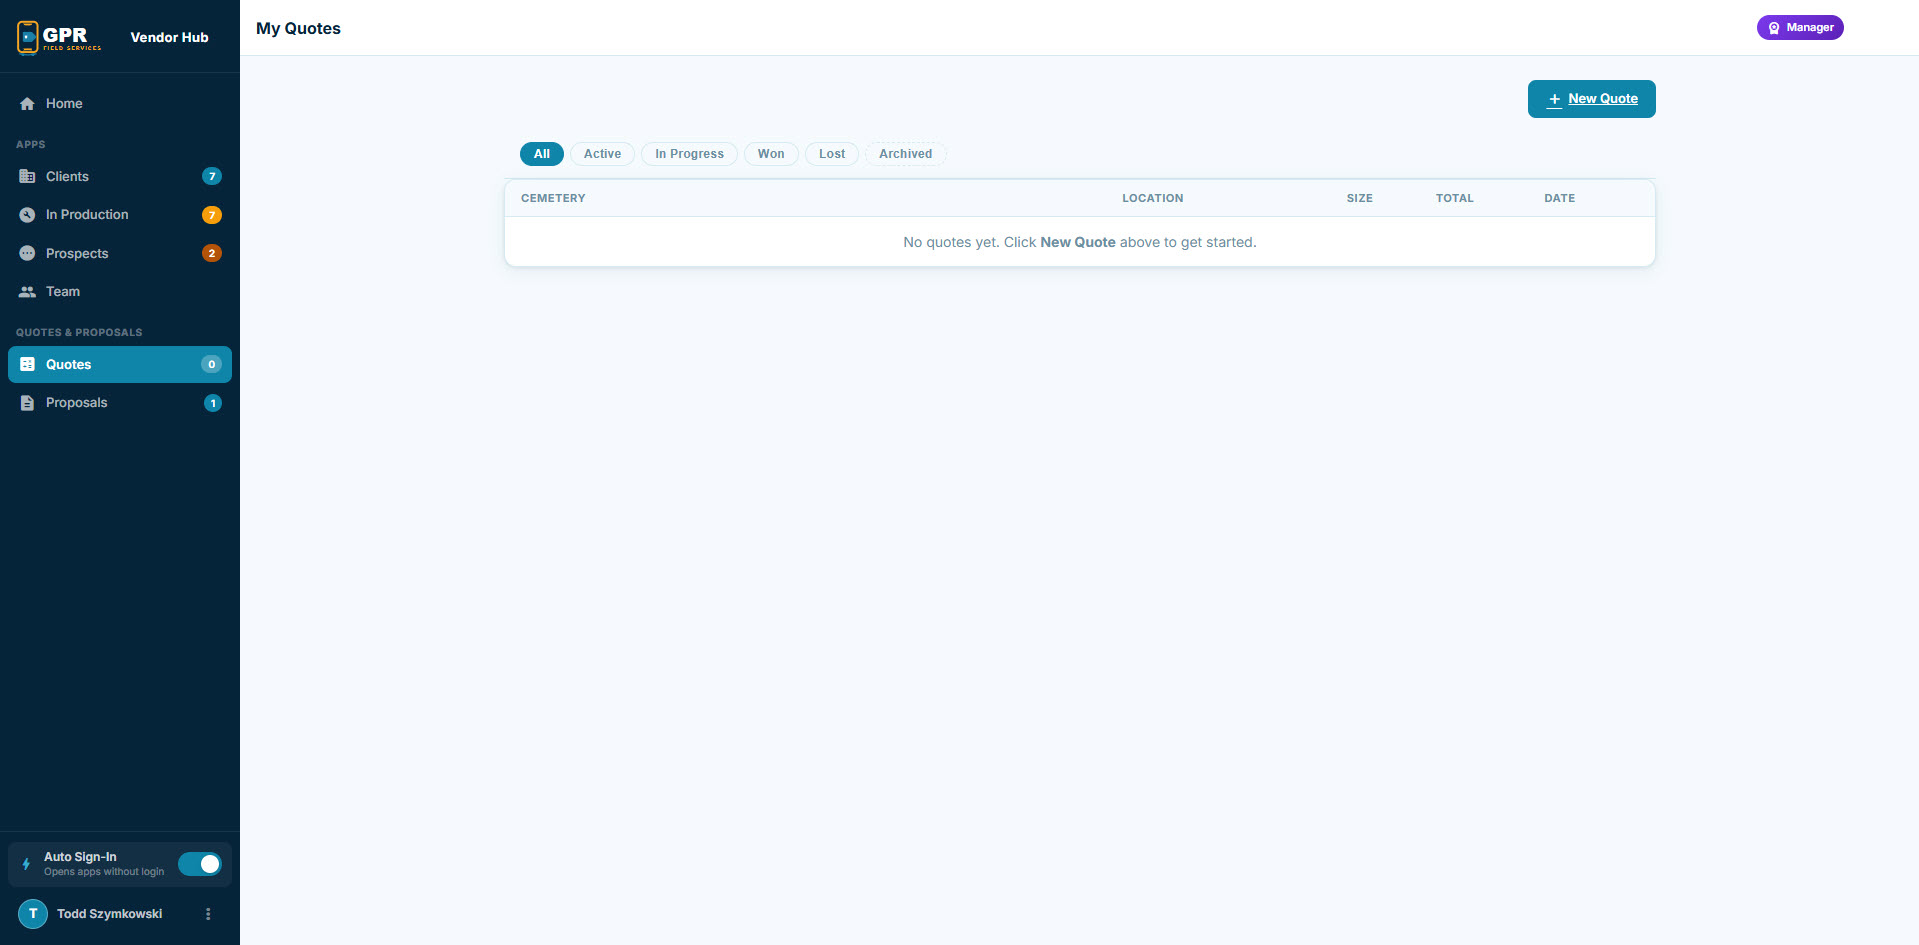
🔐
New team members are added by the GPR Field Services admin. Contact Todd at GPR Field Services to add or remove team members.
6
Quoting

My Quotes

The Quotes panel is your personal workspace for building project estimates. Each quote you create is saved here and can be expanded to review the satellite map, acreage, selected services, and total.

Quotes — empty state
My Quotes empty state
Quotes — saved quote with map preview
Saved quote with map detail

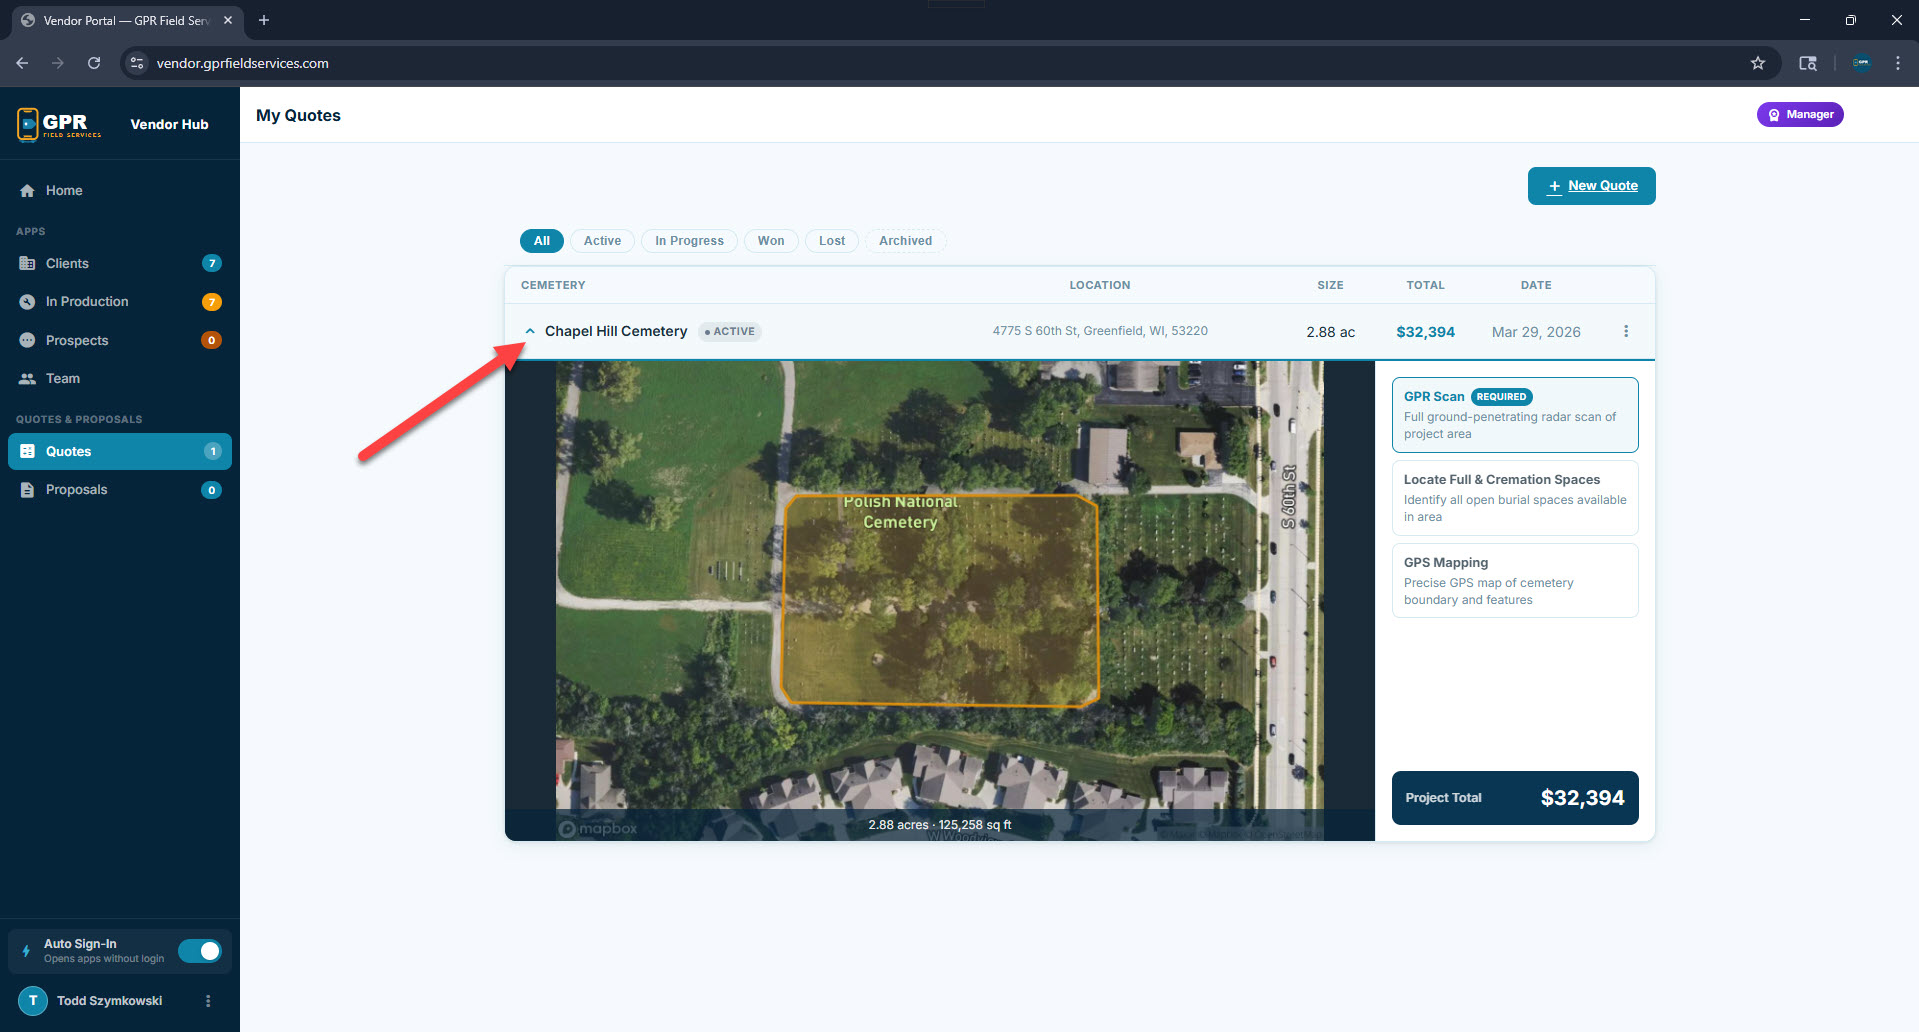
Click + New Quote to open the GPR Quoting Tool. Once saved, click a quote row to expand the satellite map view showing the measured project boundary, selected services, and project total.

Each quote has a ⋮ actions menu on the right side of its row. Use it to update the quote's status, archive it, edit the project map, or delete it.

Edit Map — Re-opens the quoting tool with your saved boundary pre-loaded on the map. Adjust the polygon, recalculate the area, and confirm the new total. Useful when speaking with a client and refining the project scope in real time.
Active In Progress Won Lost Archived
📋
Quotes are personal to each team member — you only see quotes you created. A Manager can convert any quote into a formal proposal that gets sent to the prospect.
7
Quote Creation

GPR Quoting Tool

The GPR Quoting Tool is a 3-step wizard that walks you through capturing project details, measuring the cemetery boundary on a live satellite map, and pricing the selected services.

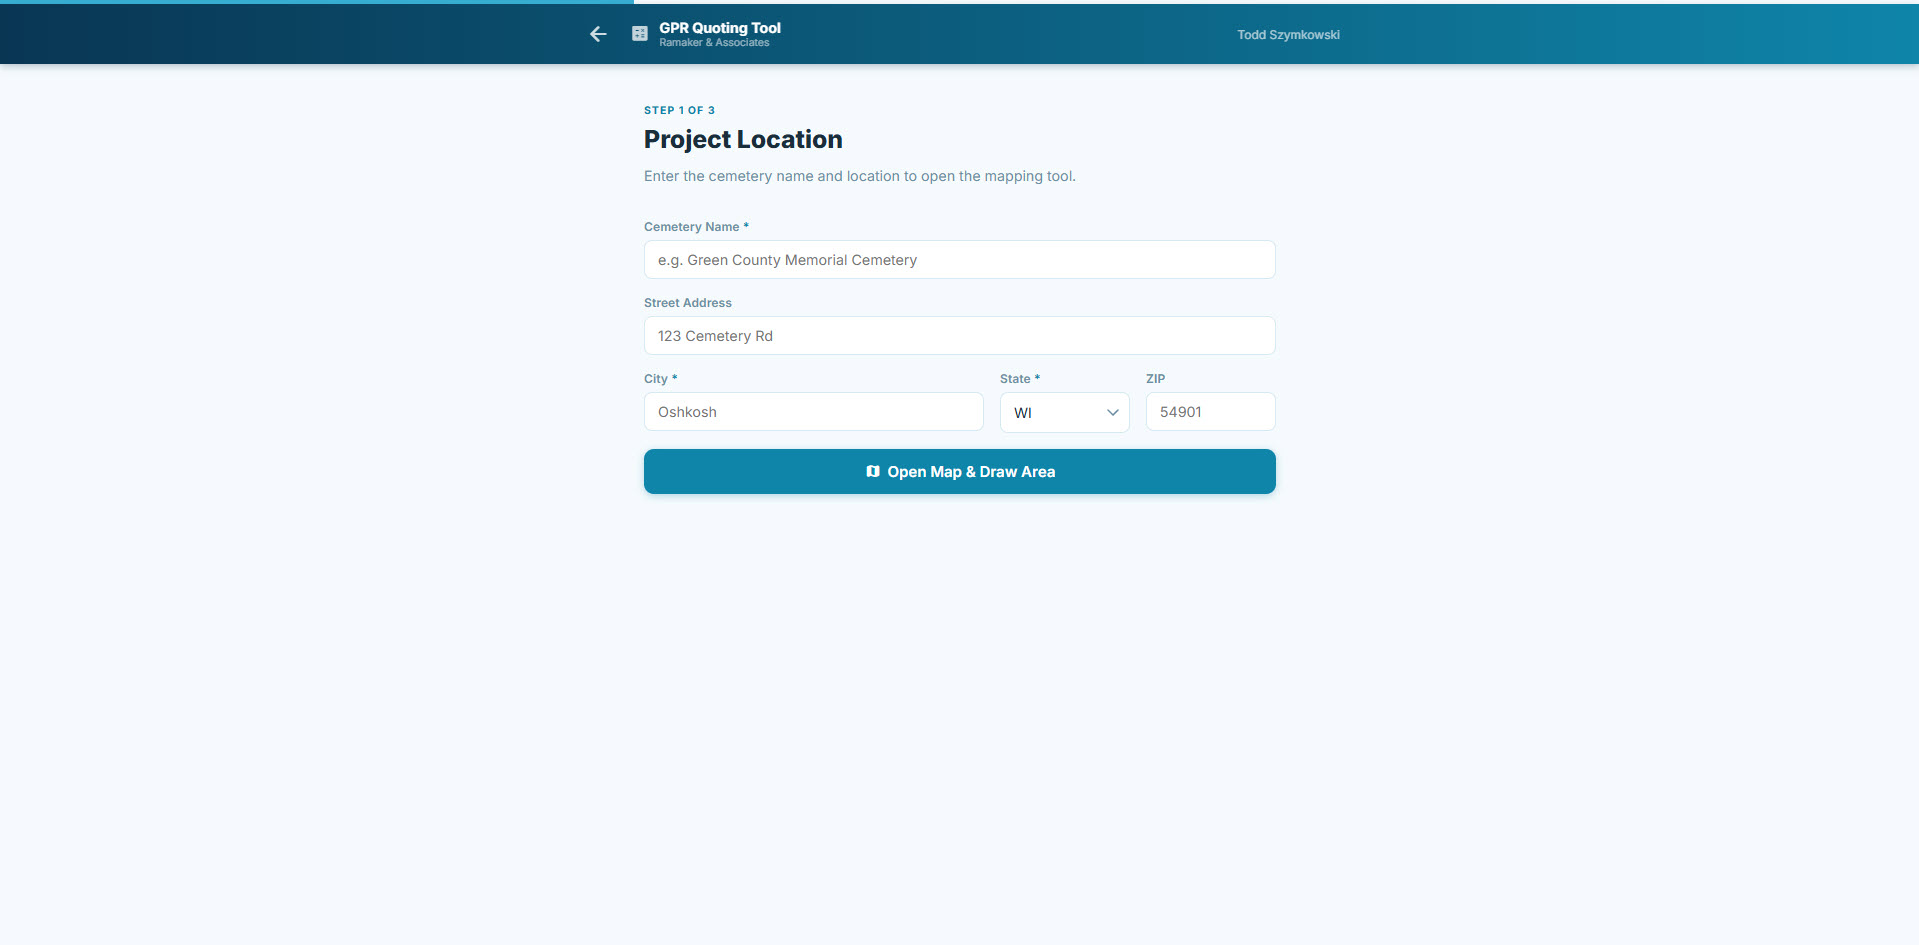
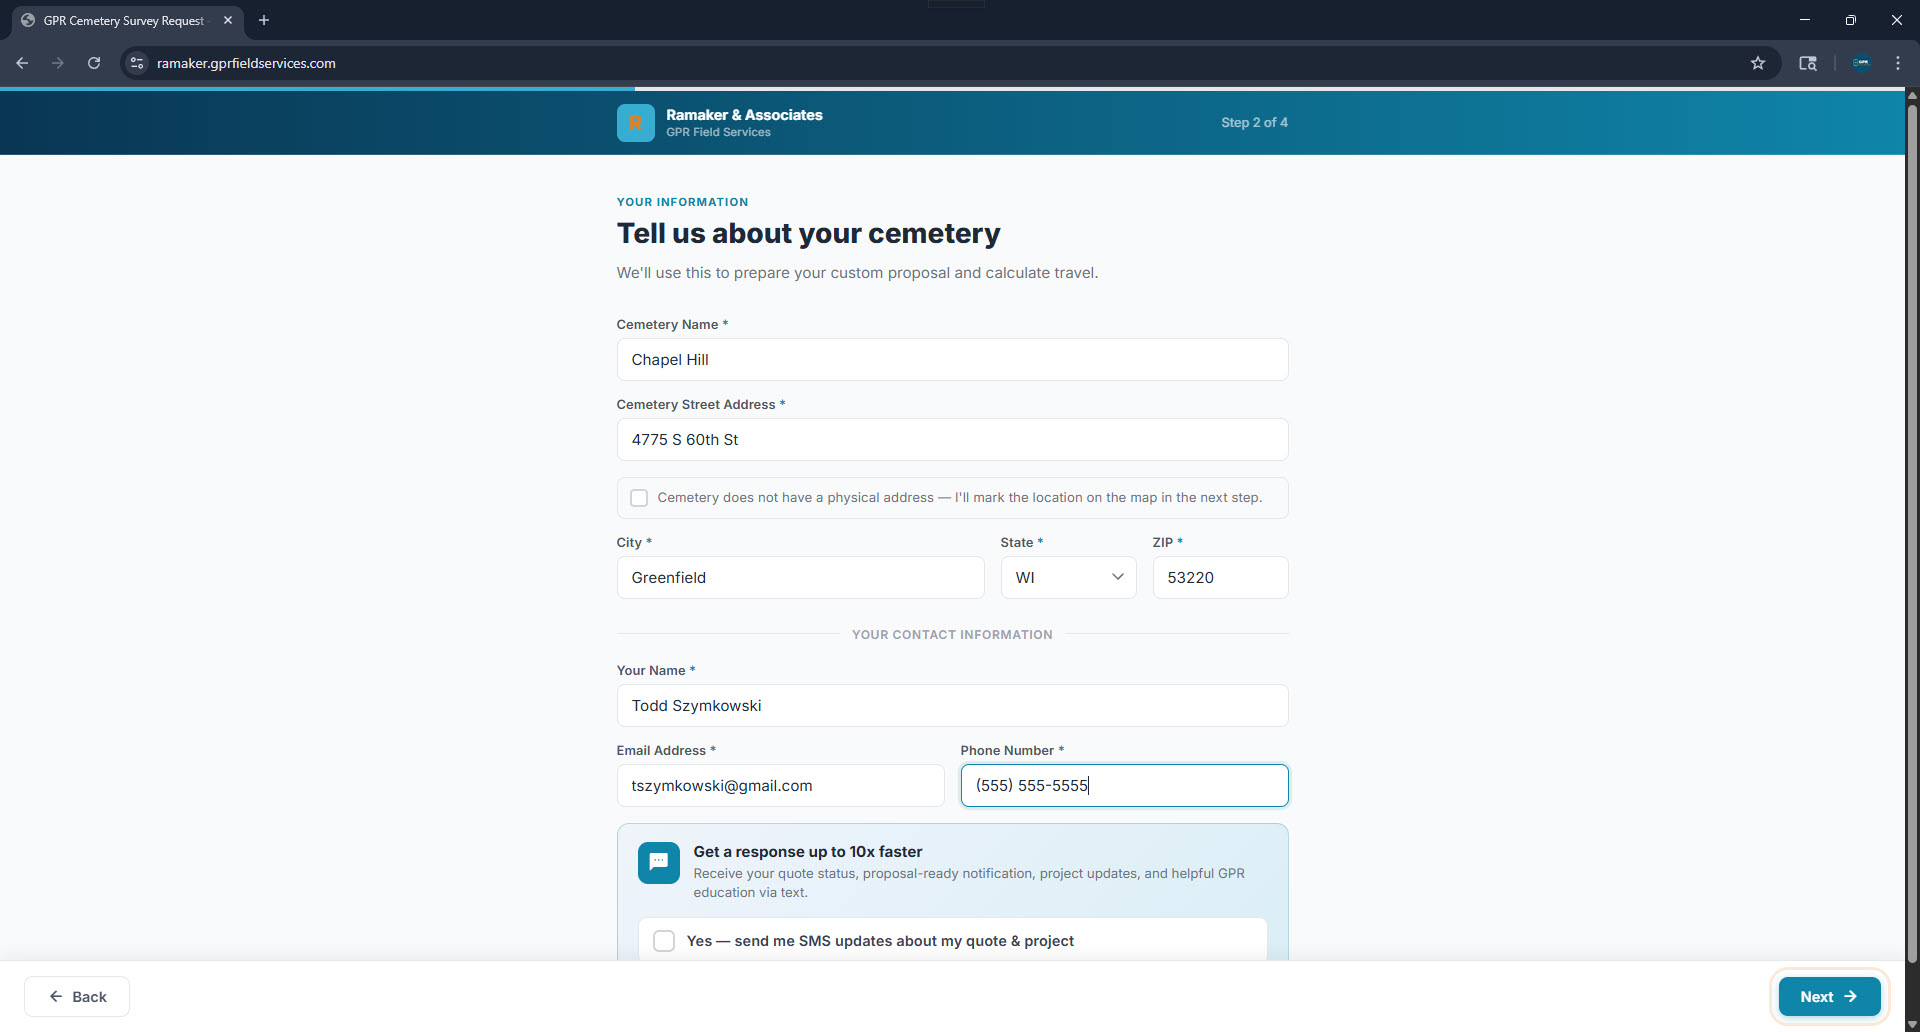
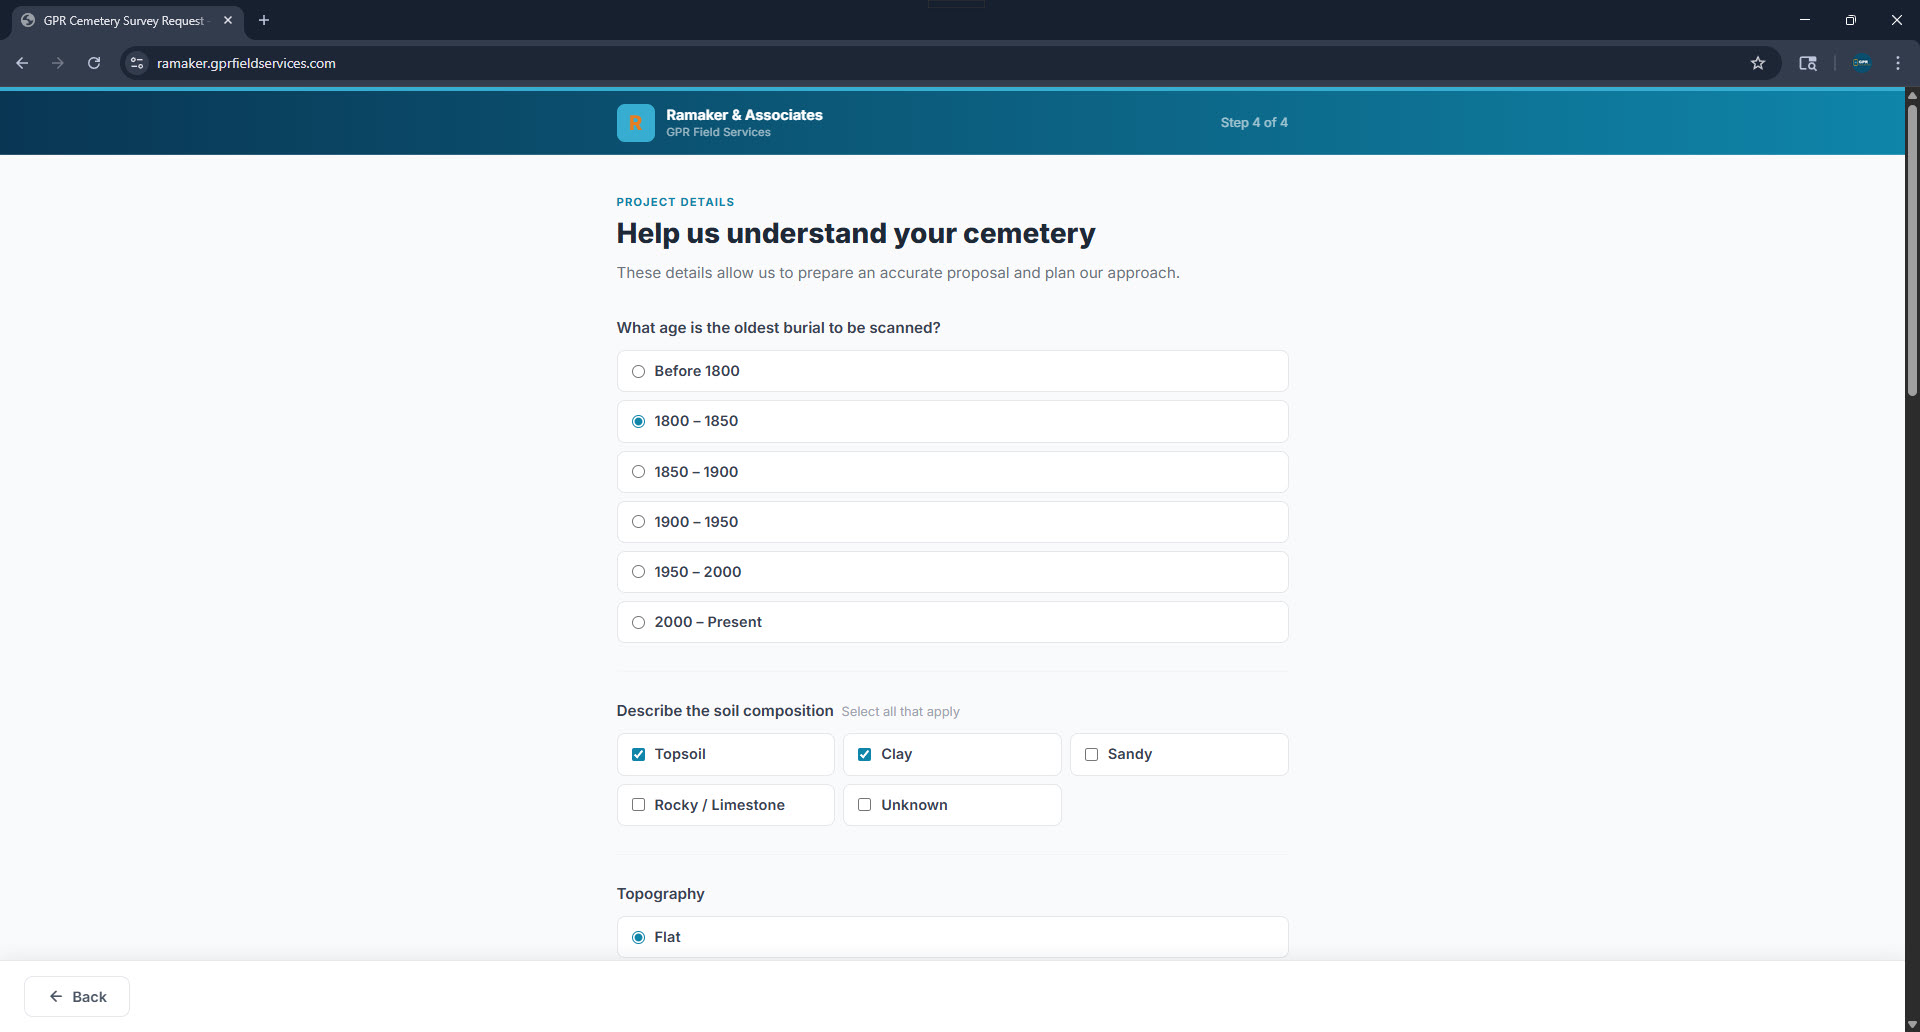
Step 1 — Project Information

Enter the cemetery name, street address, and your contact information. The address is used to pull up the live satellite map in the next step.

Step 1 of 3 — Project location form
Quoting Tool Step 1 - project info

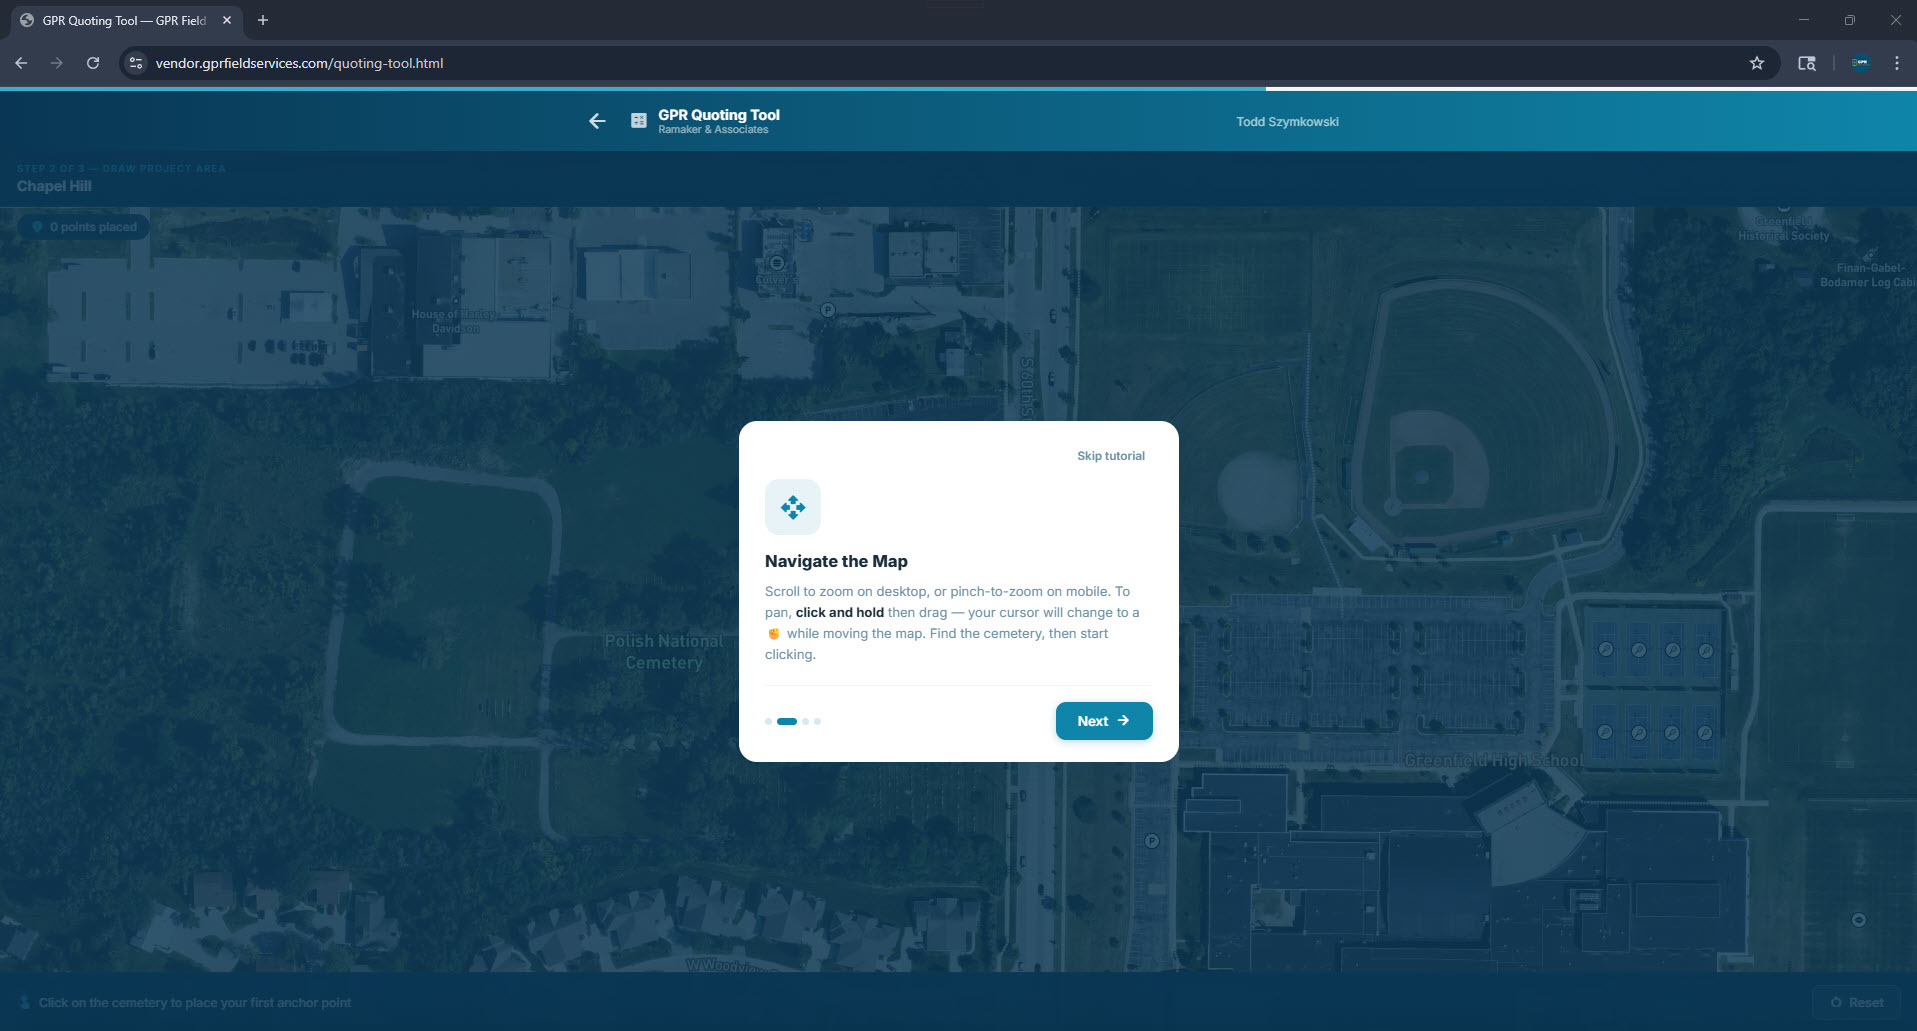
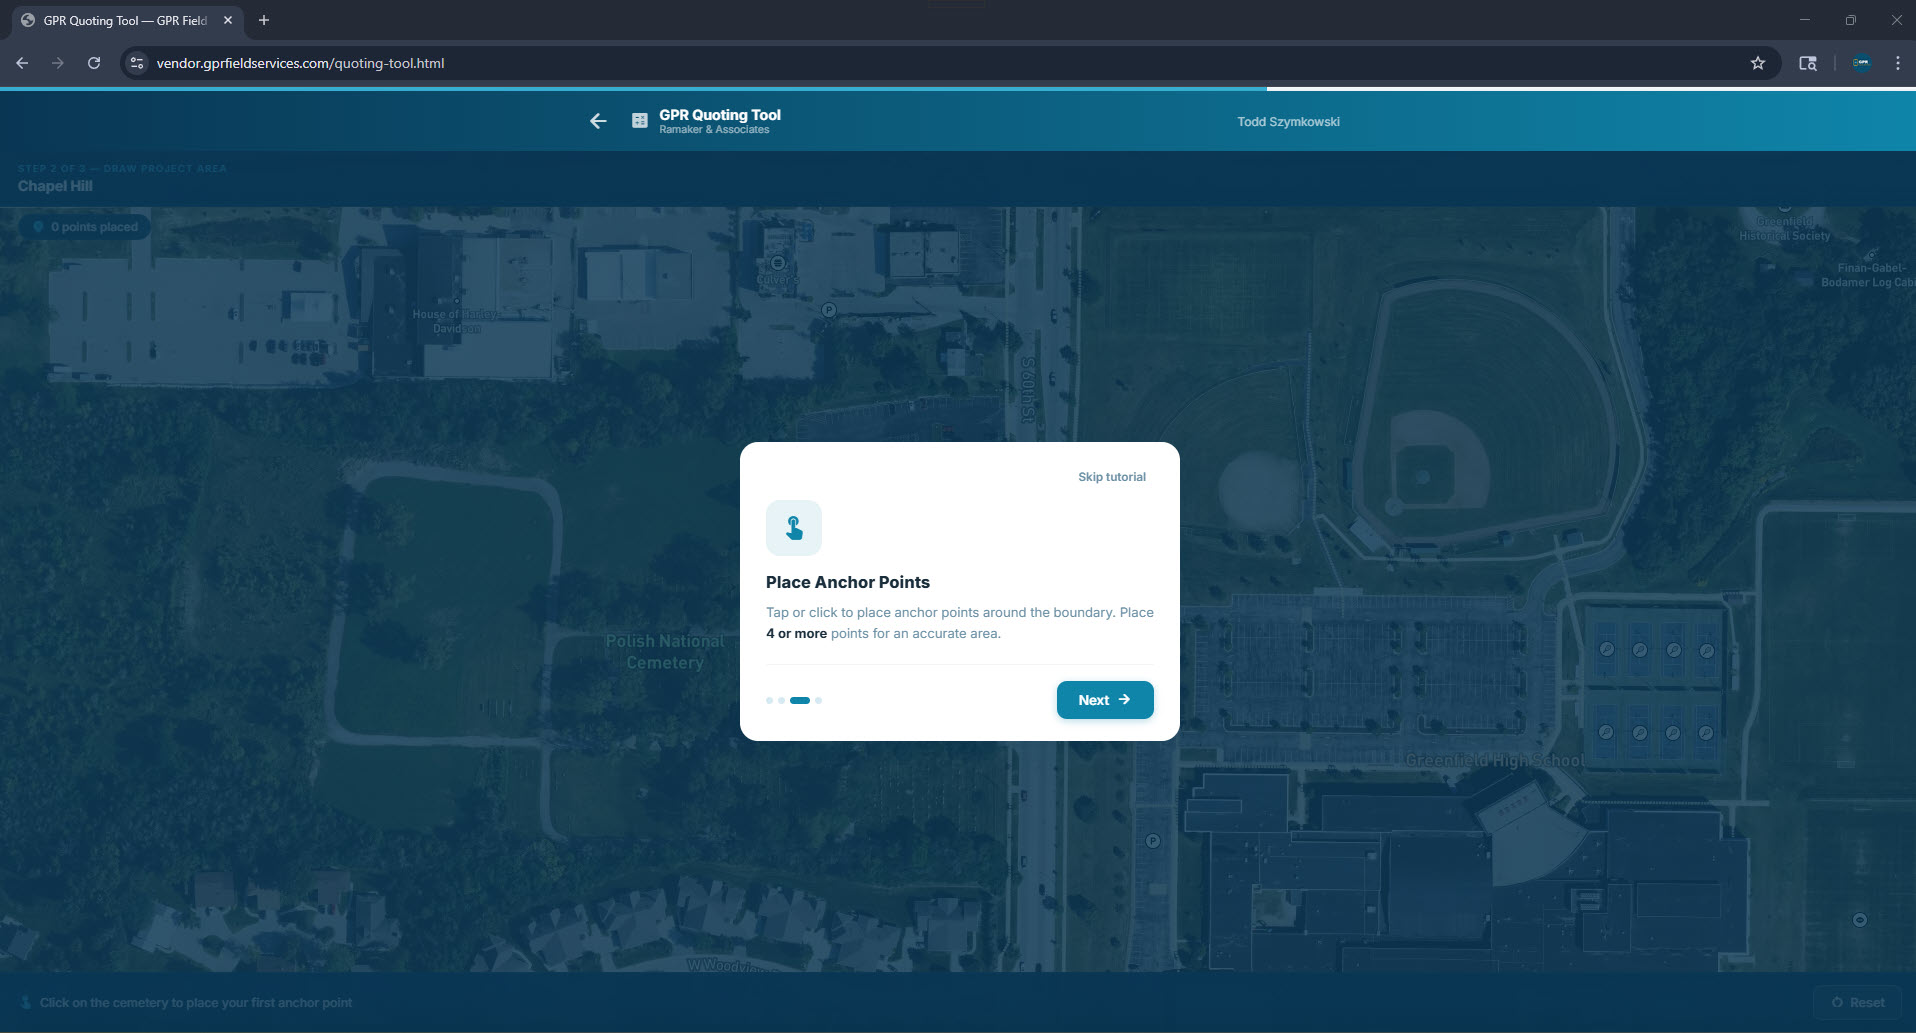
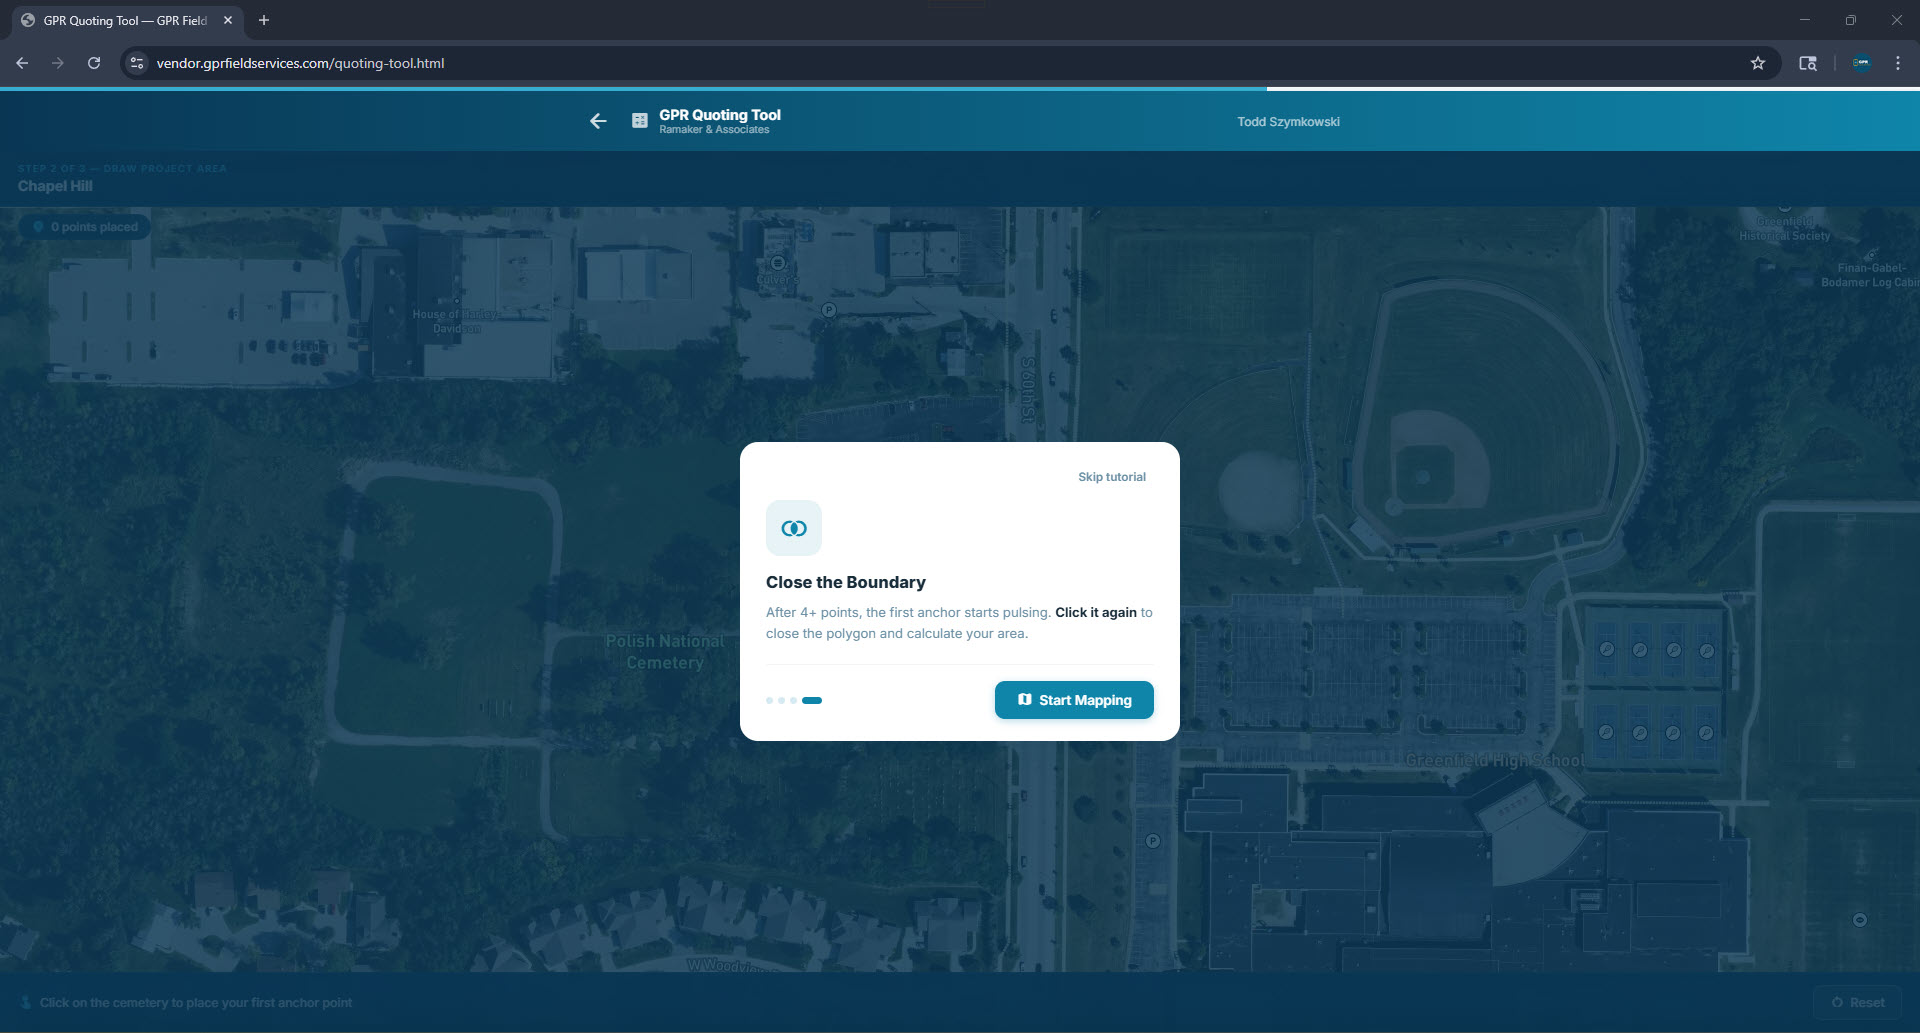
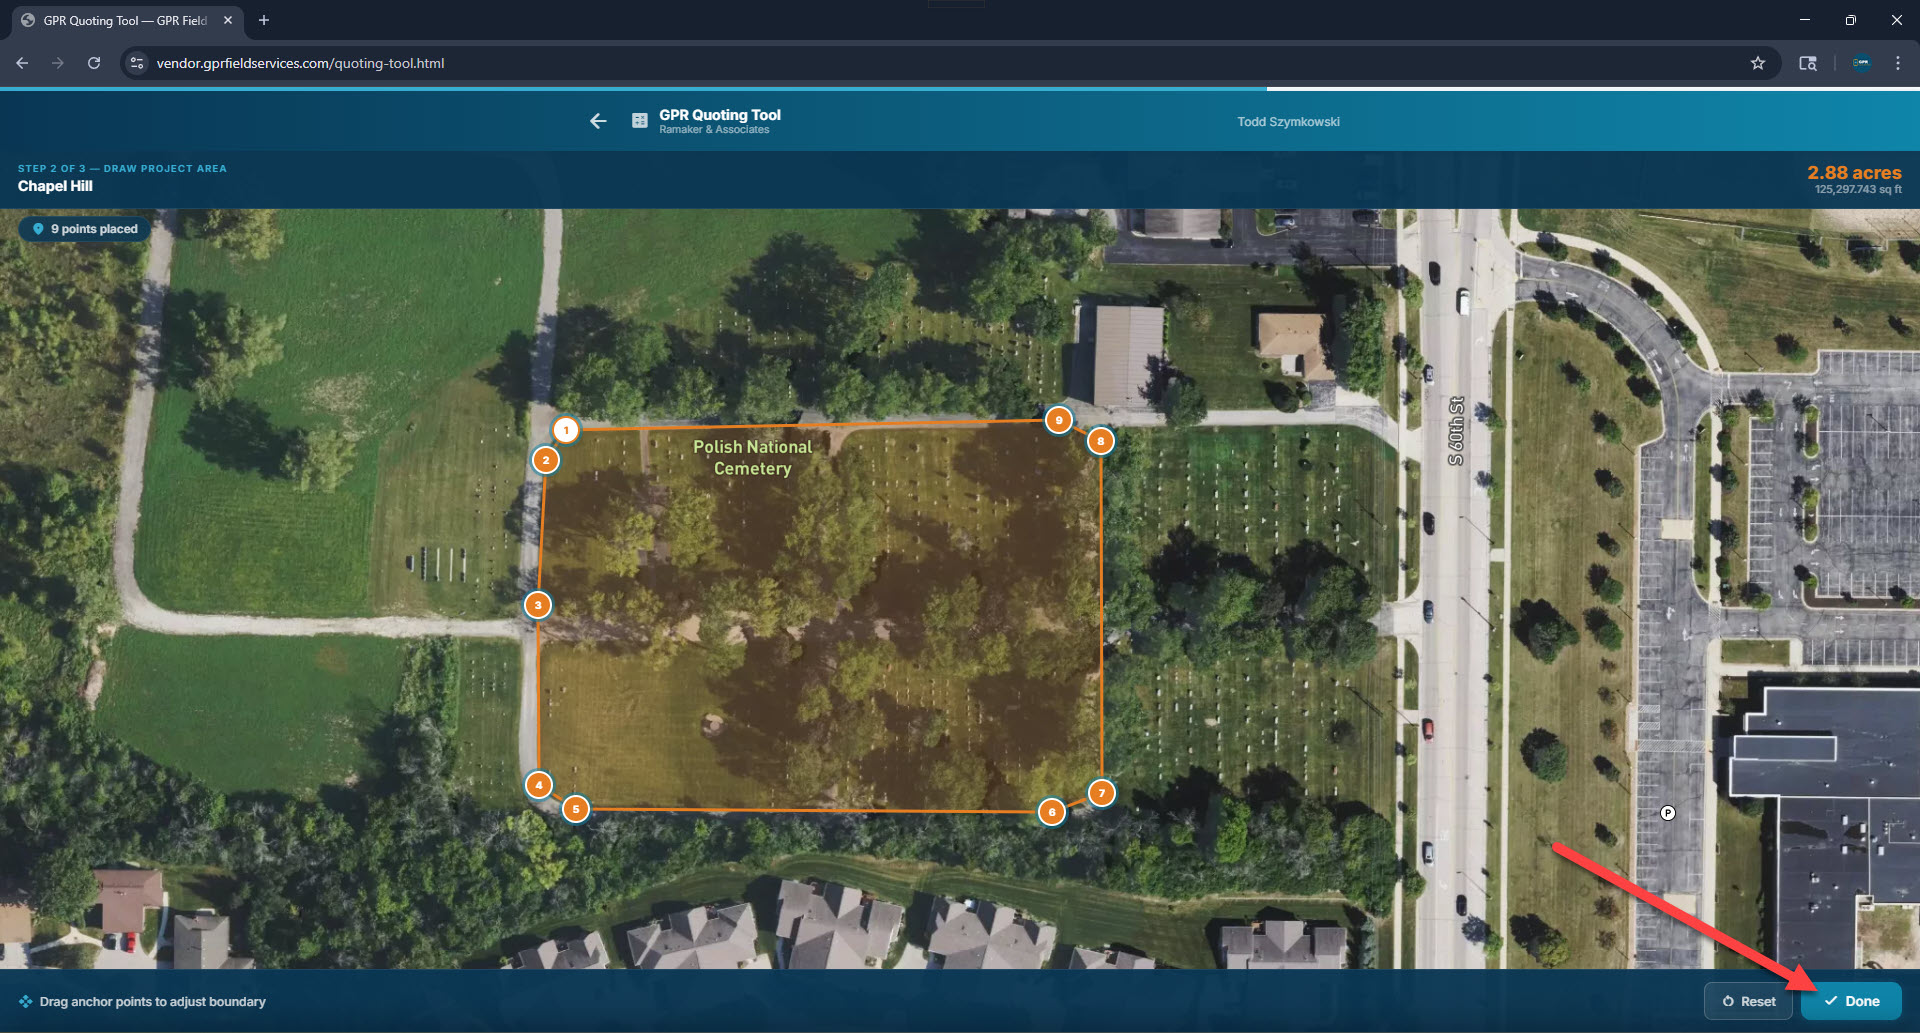
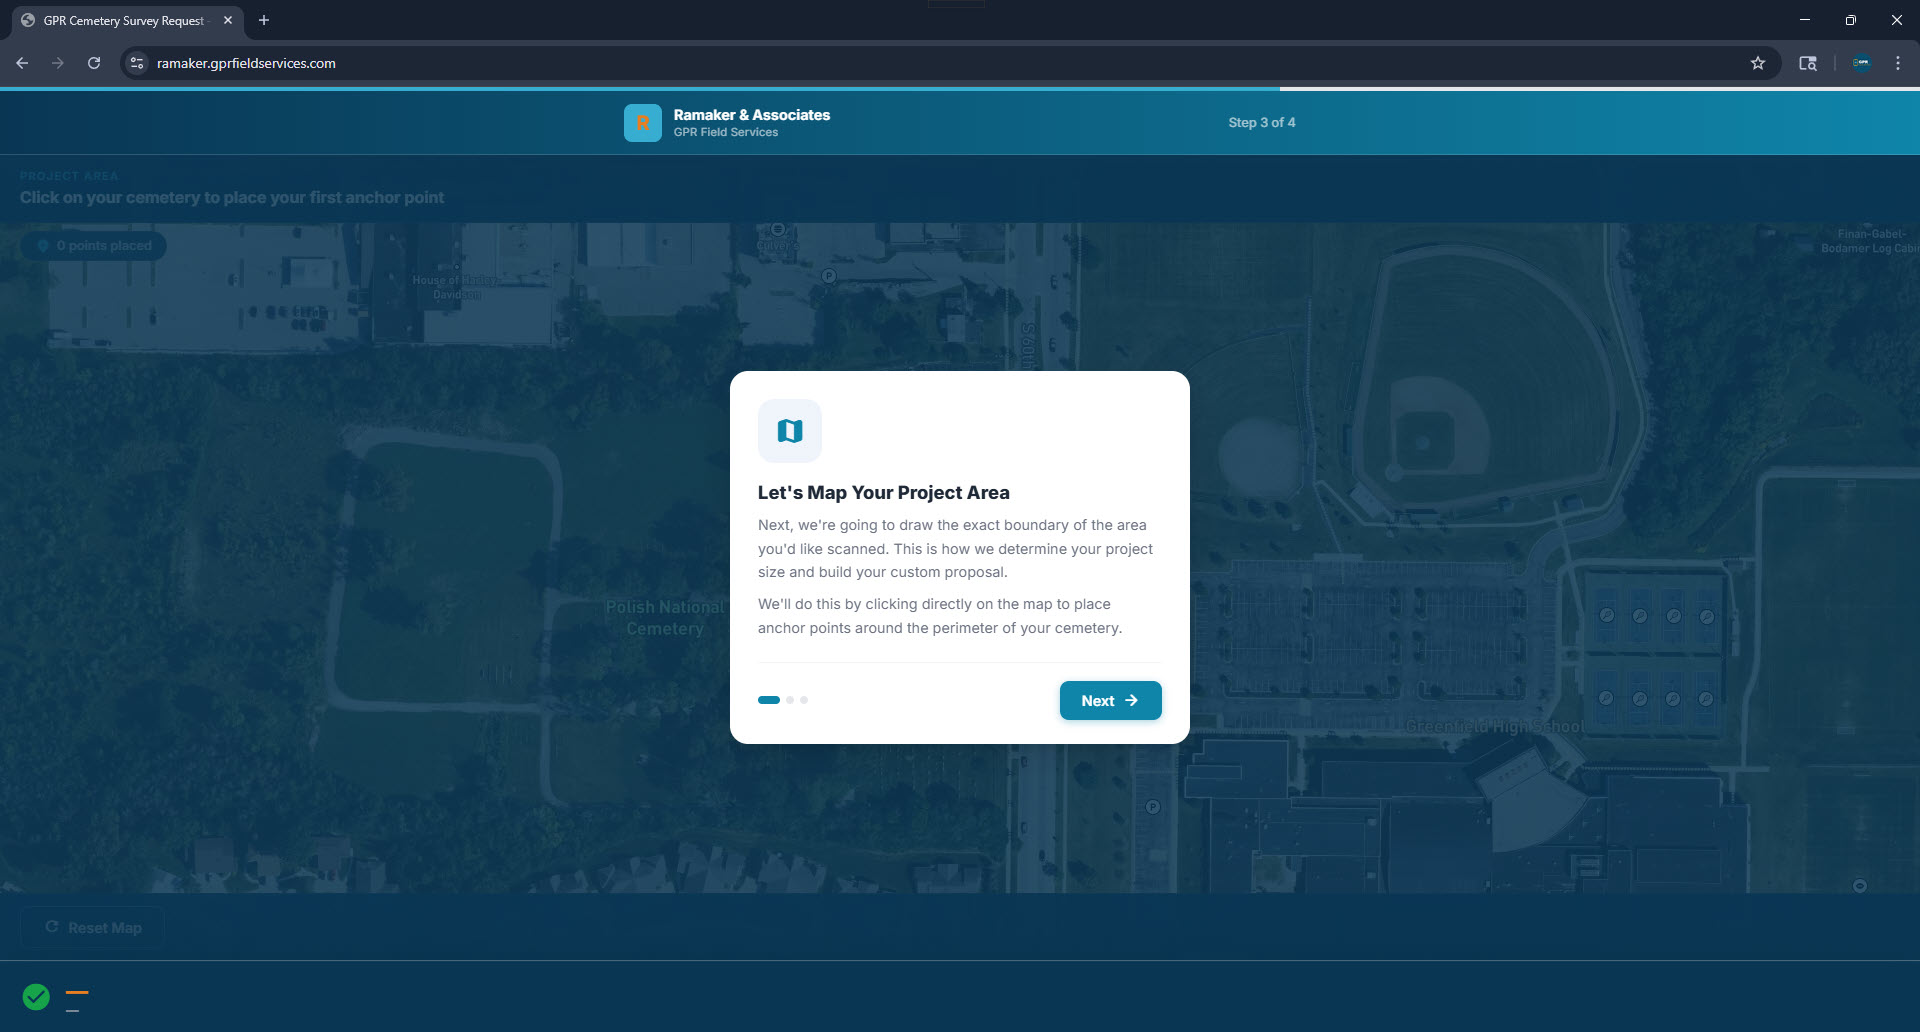
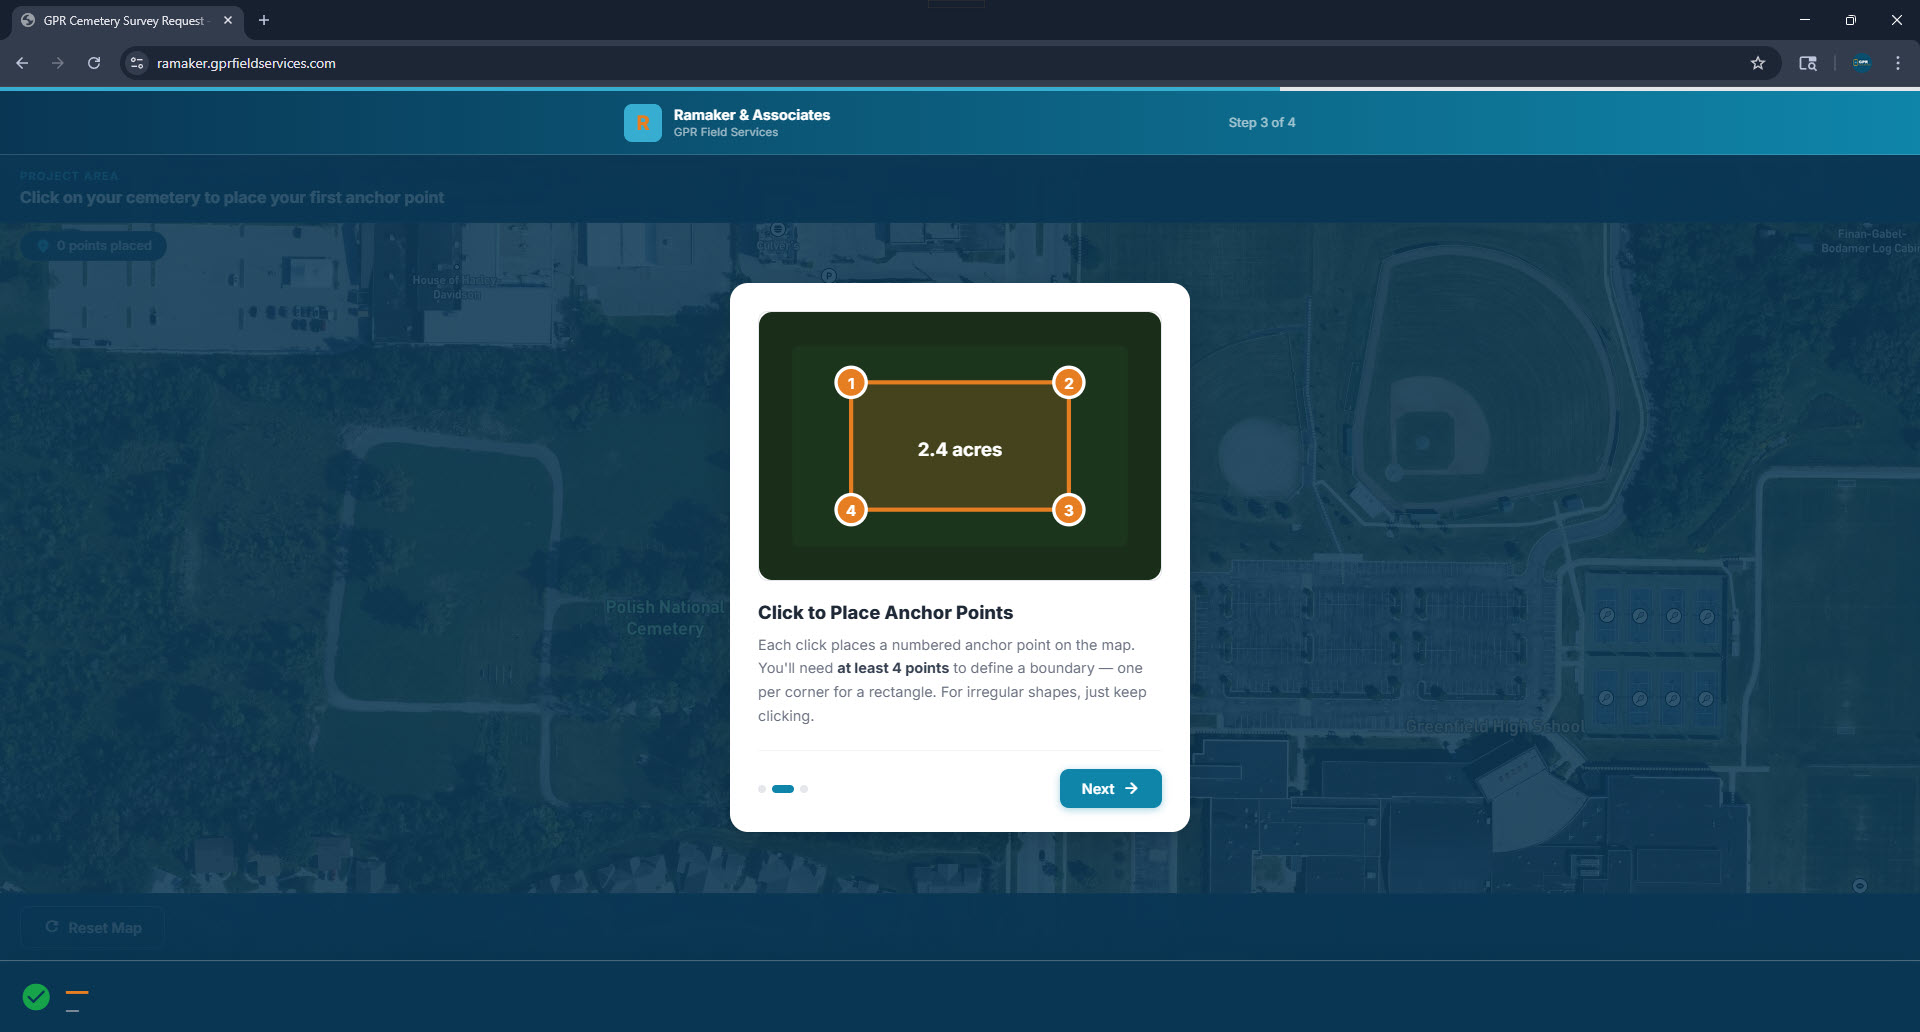
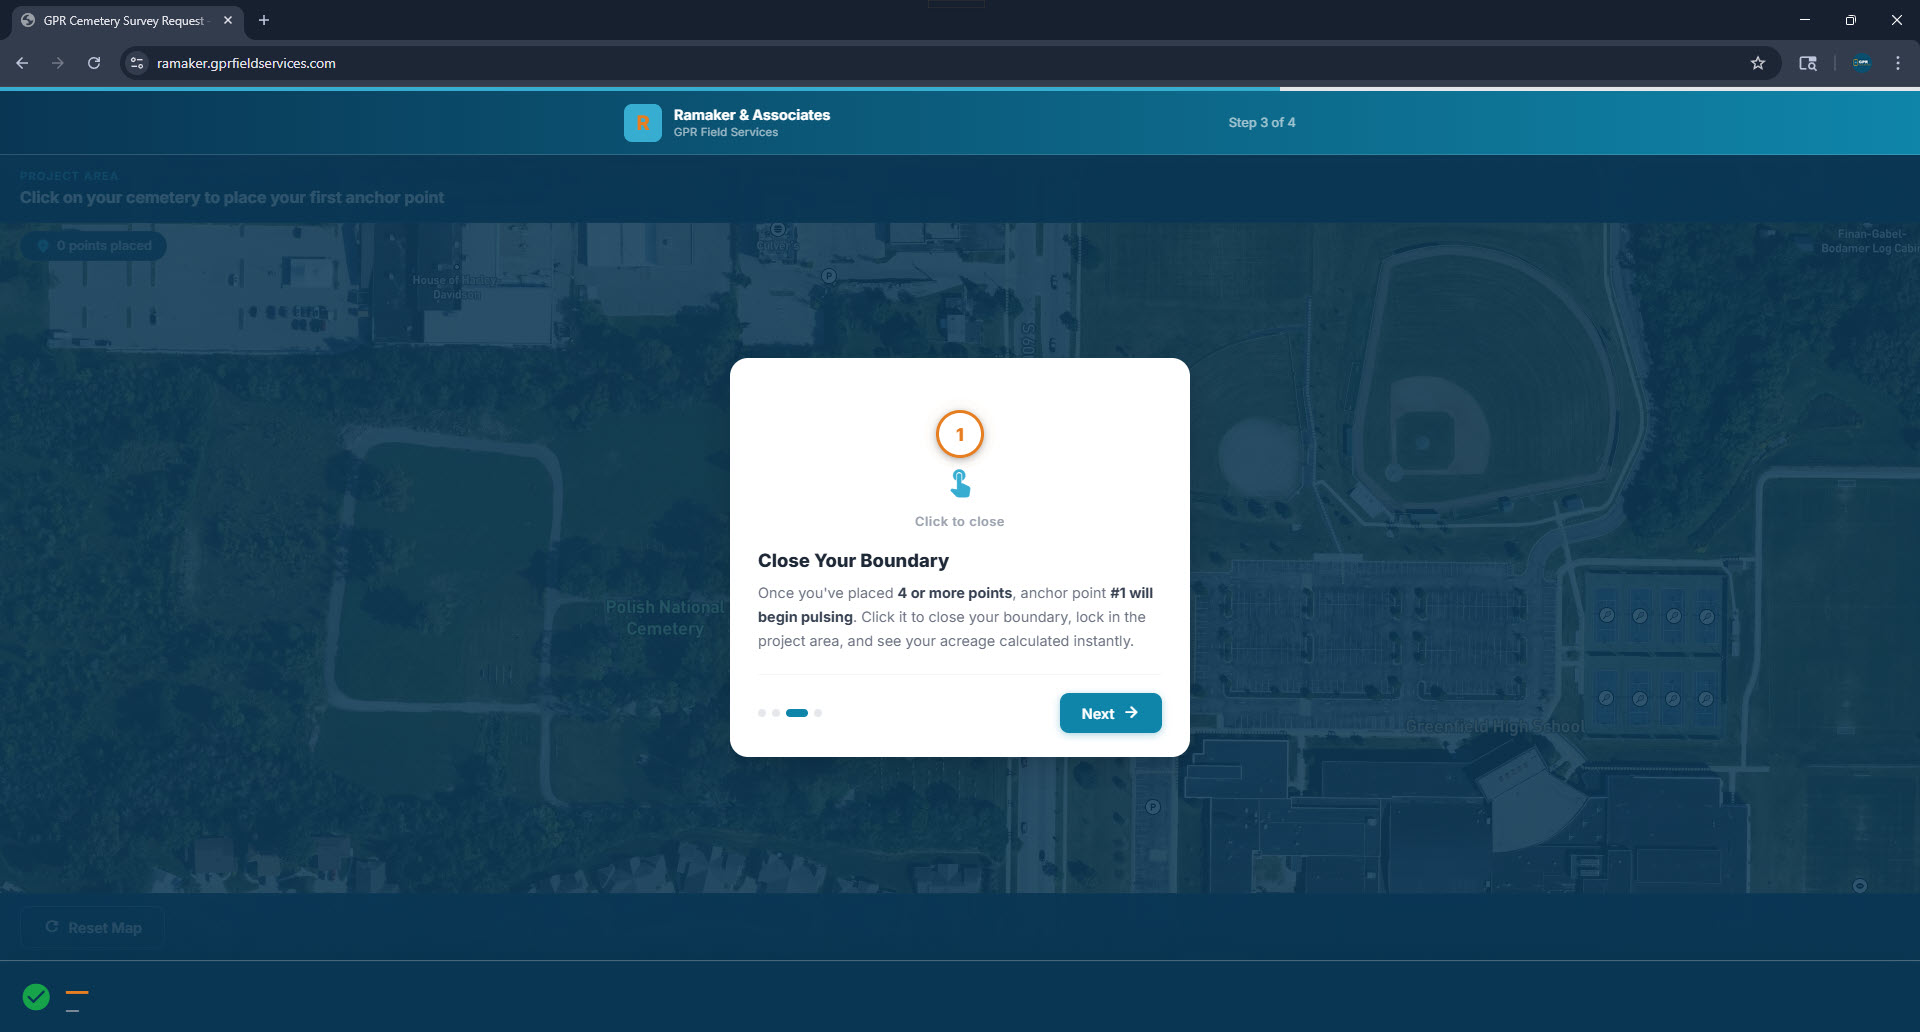
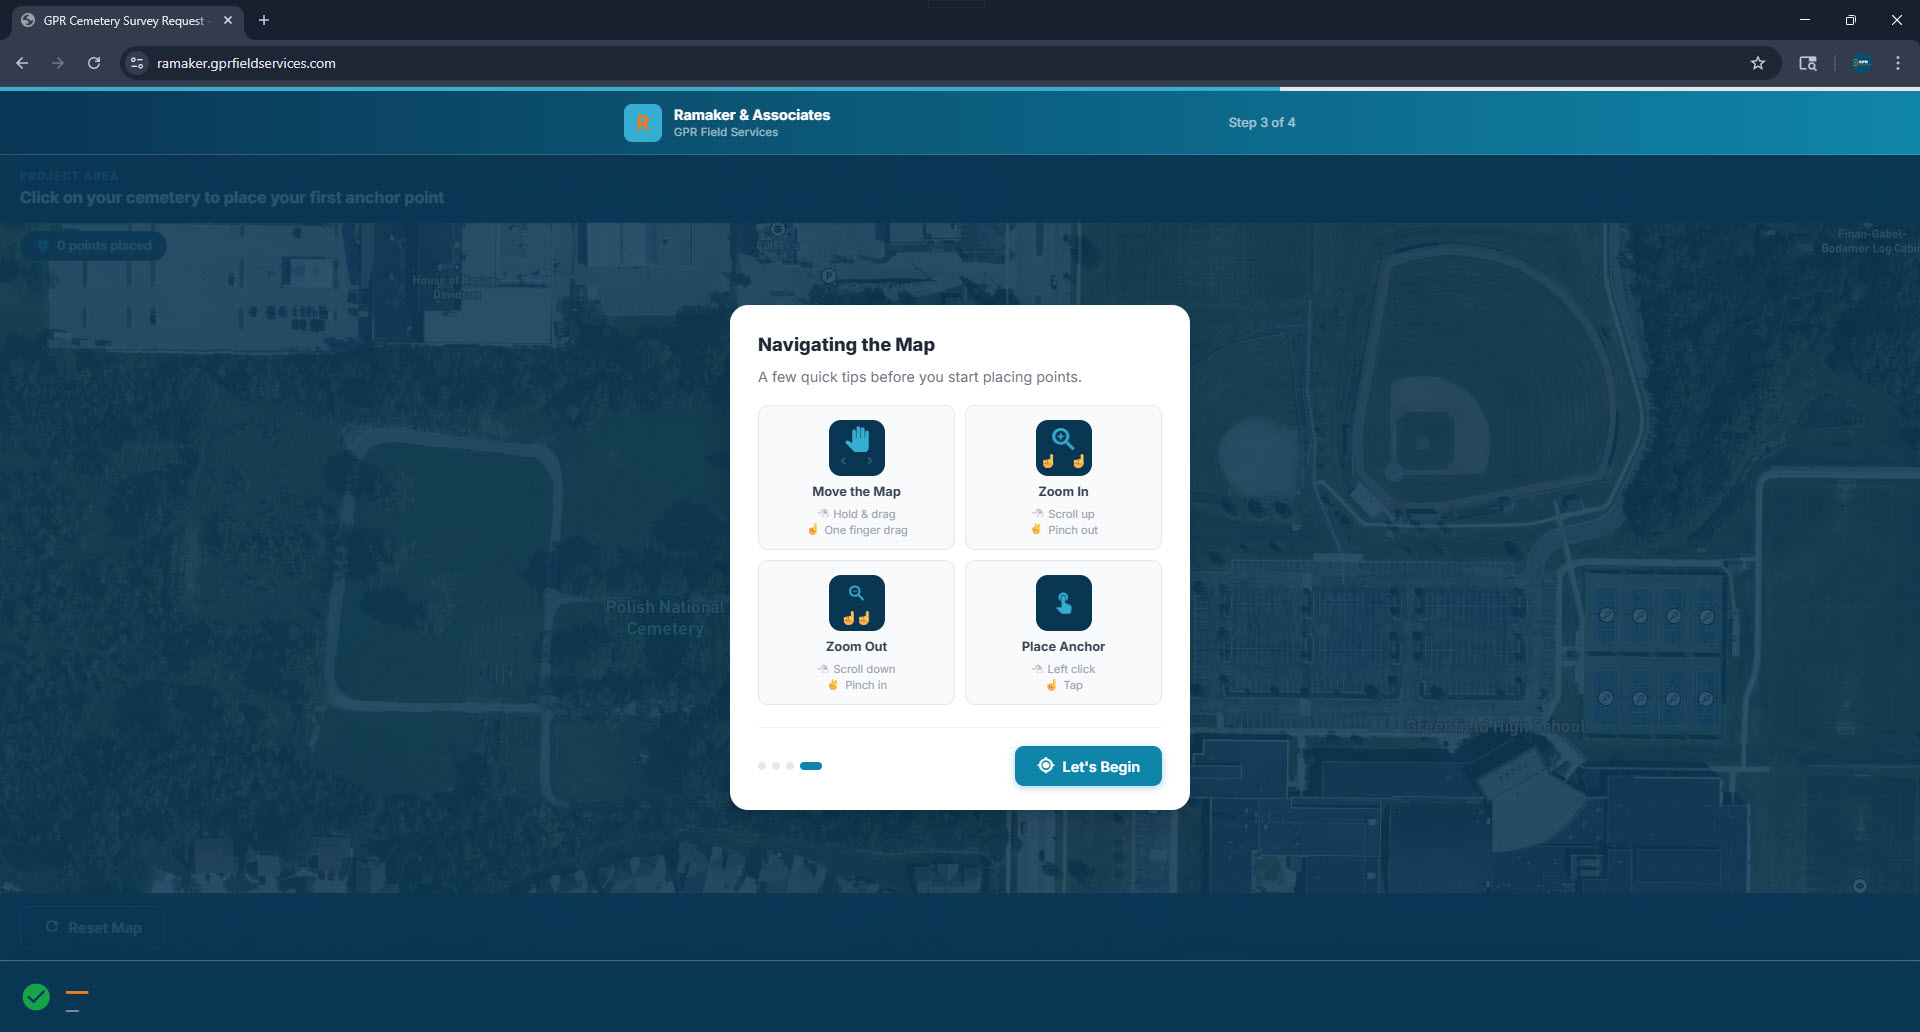
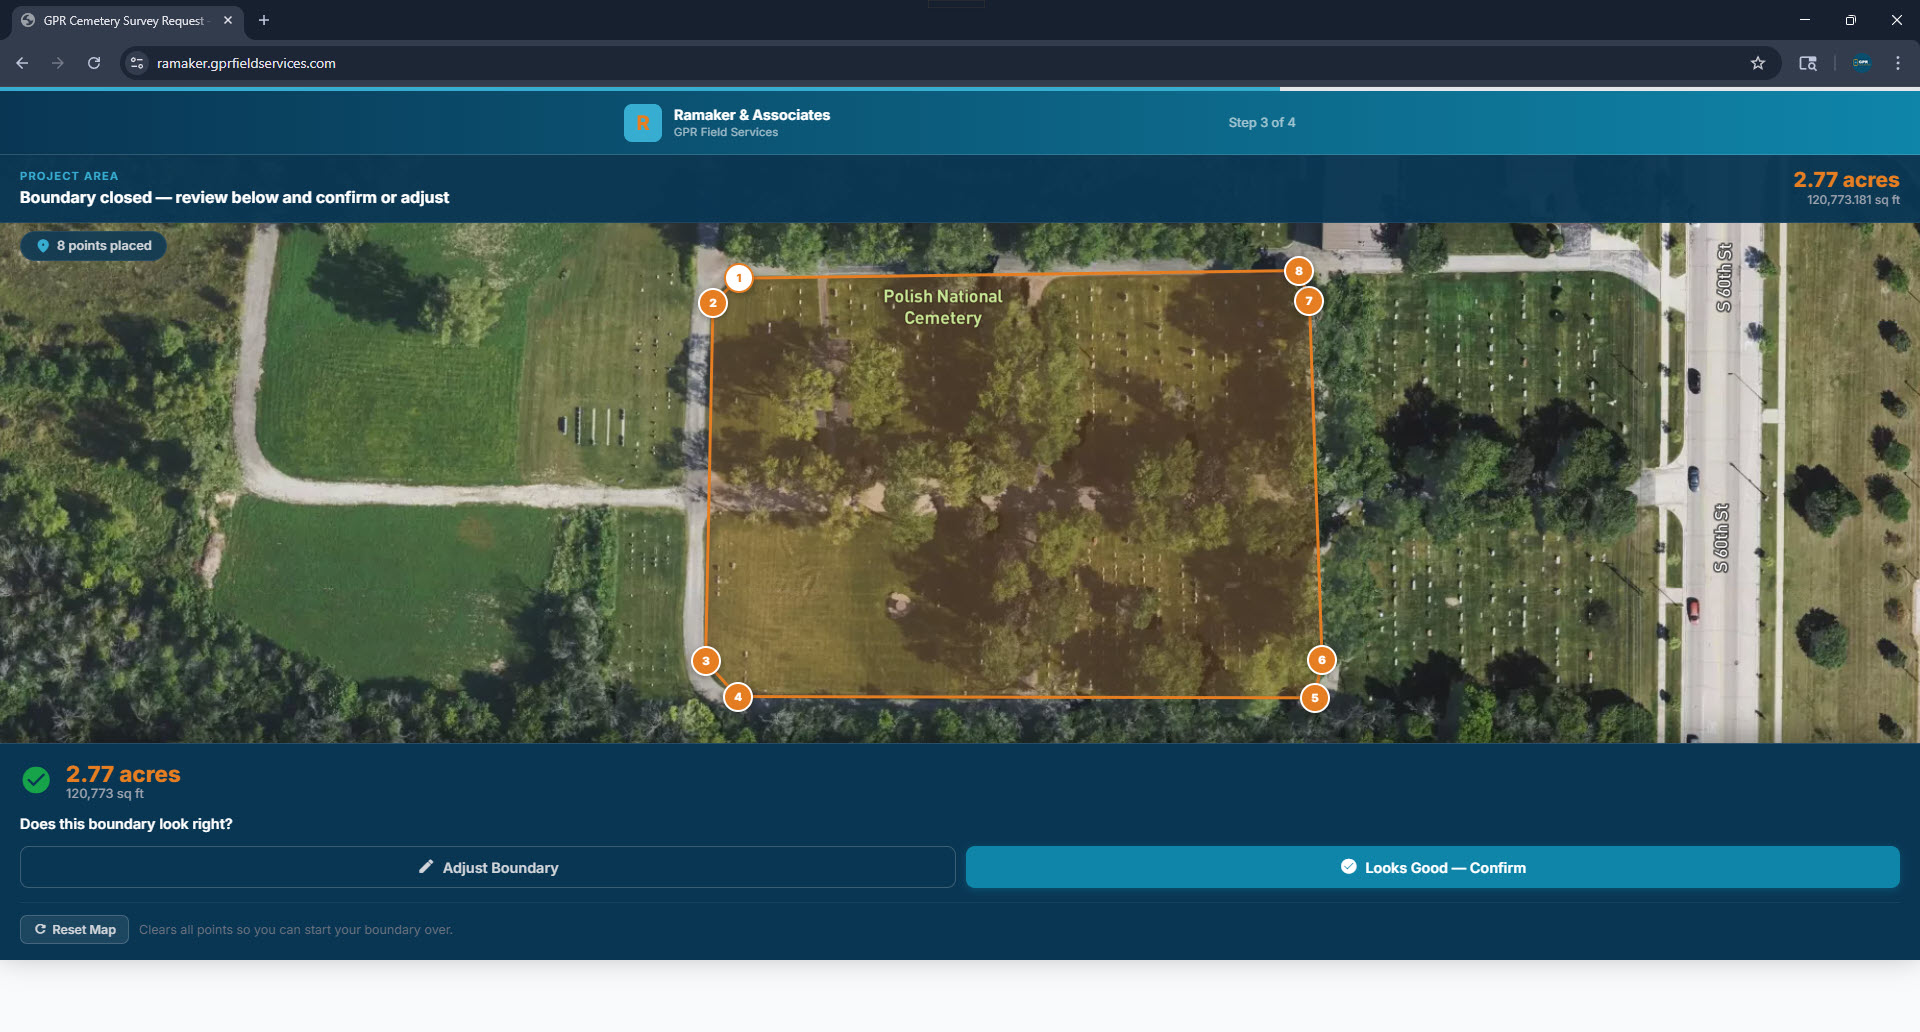
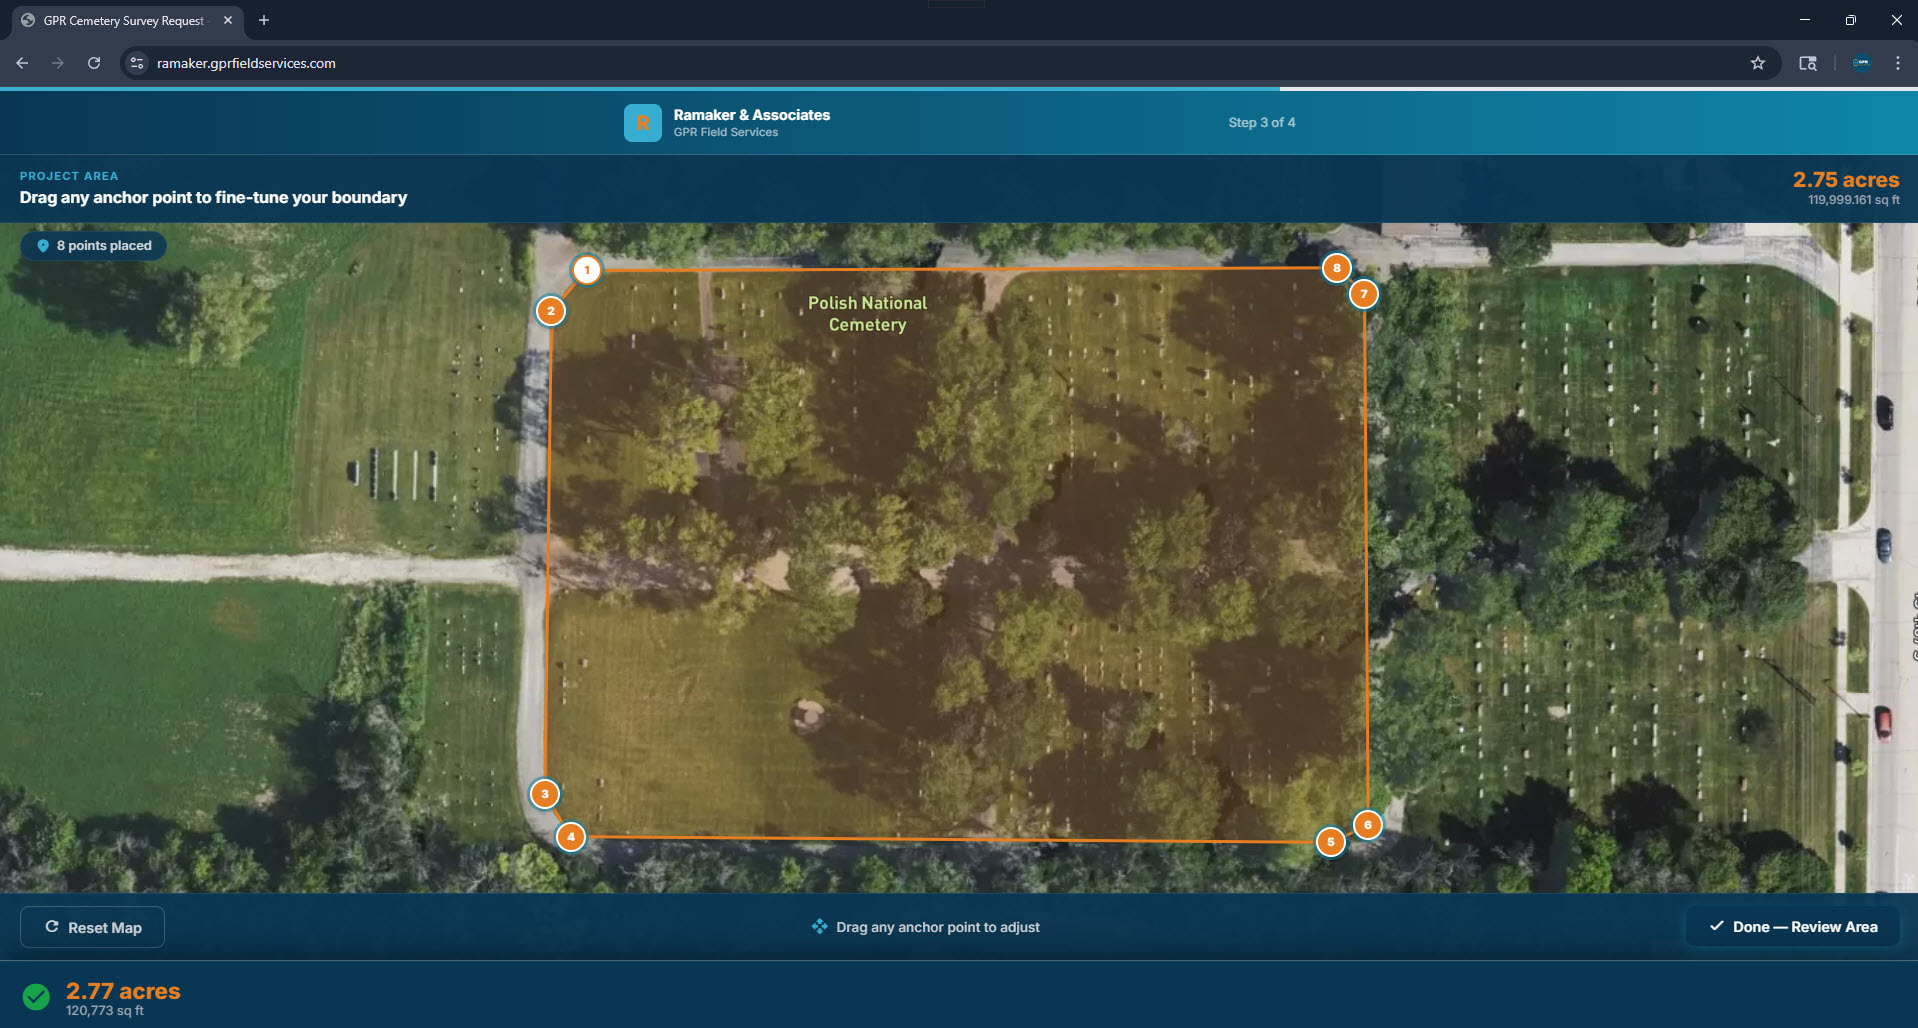
Step 2 — Map the Project Area

A satellite map opens centered on the cemetery address you entered. Your job is to draw a polygon around the project boundary to measure the total acreage.

Tutorial modal — how to use the map
Map tutorial step 1
Tutorial modal — placing anchor points
Map tutorial step 2
Tutorial modal — closing the boundary
Map tutorial step 3
Live satellite map — boundary drawn
Map with polygon drawn
1
Place your first anchor point Click anywhere on the map to drop your first point. Start at a corner of the cemetery boundary.
2
Continue clicking around the boundary Click each corner of the cemetery to trace the project perimeter. An orange line connects each point.
3
Close the polygon Click back on your first point (it glows orange) to close the shape. The area fills in teal.
4
Adjust if needed After closing, you enter Adjust mode — drag any point to refine the boundary, then click Generate Quote.
Polygon closed — adjust mode
Polygon in adjust mode
Boundary confirmed — ready to price
Boundary confirmed

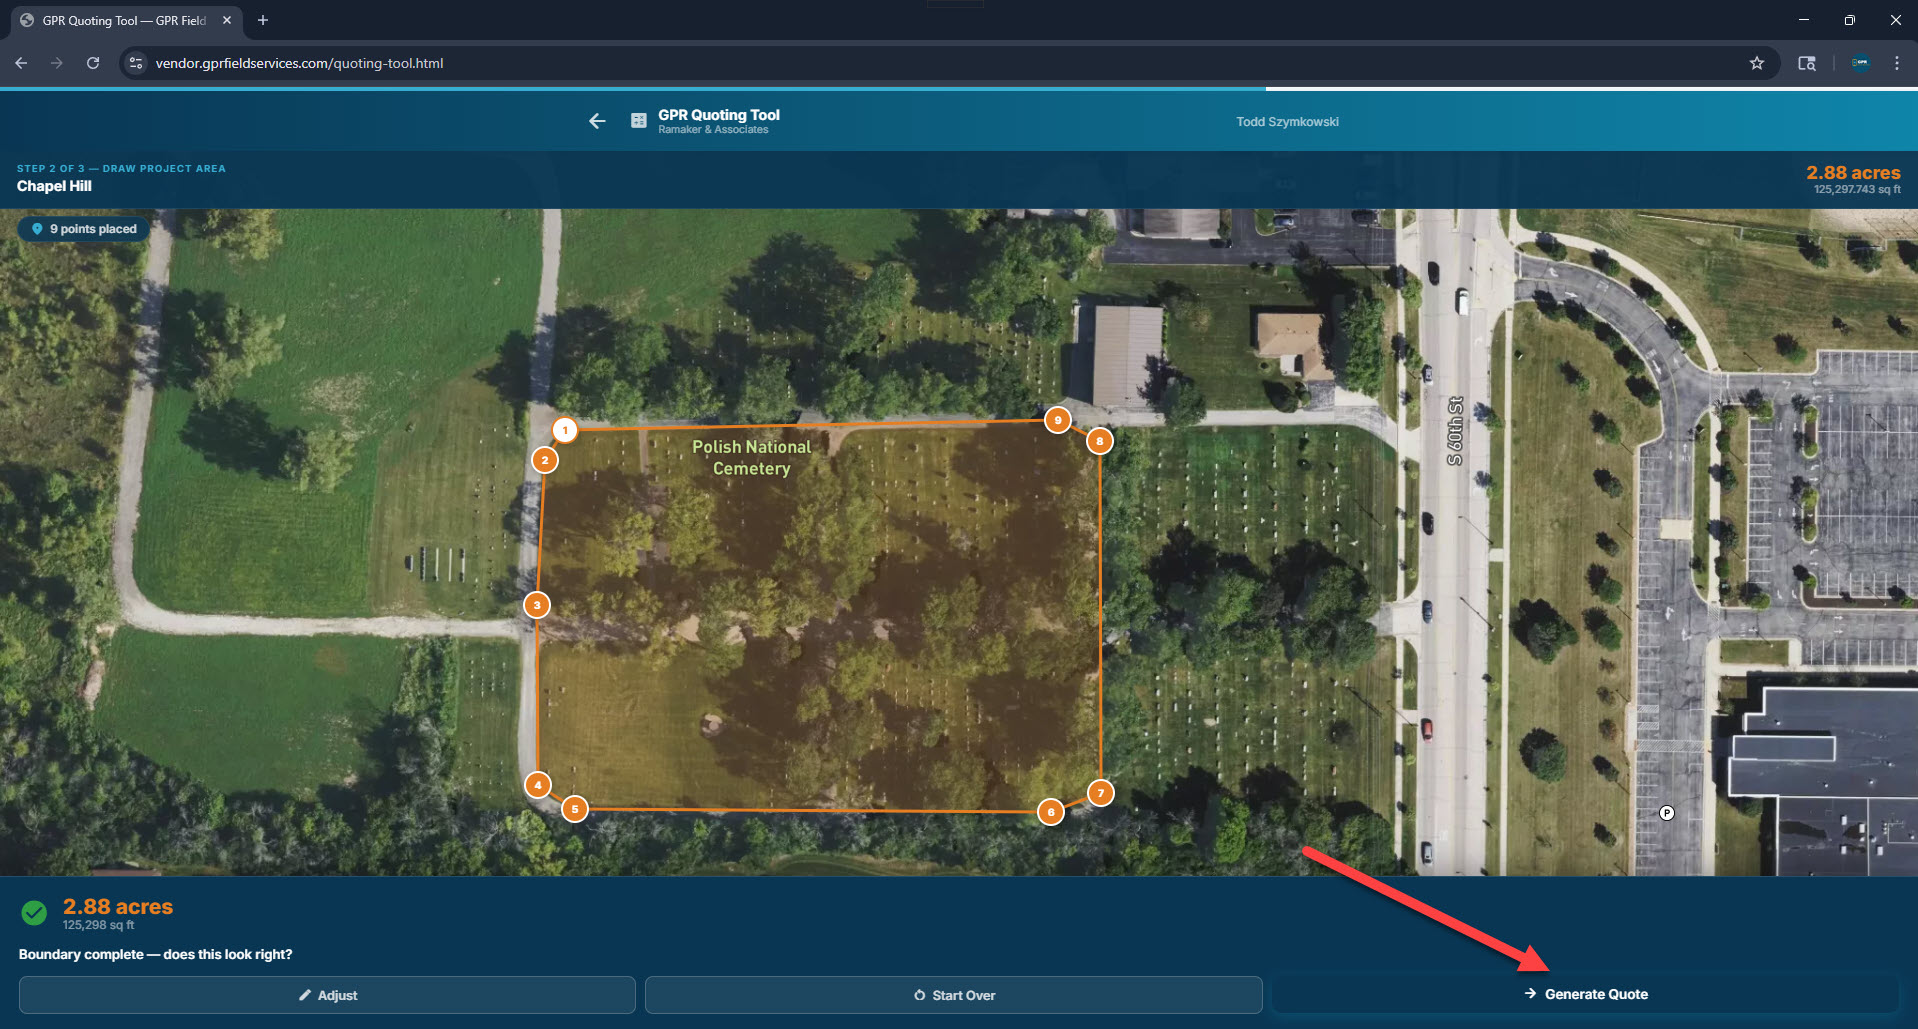
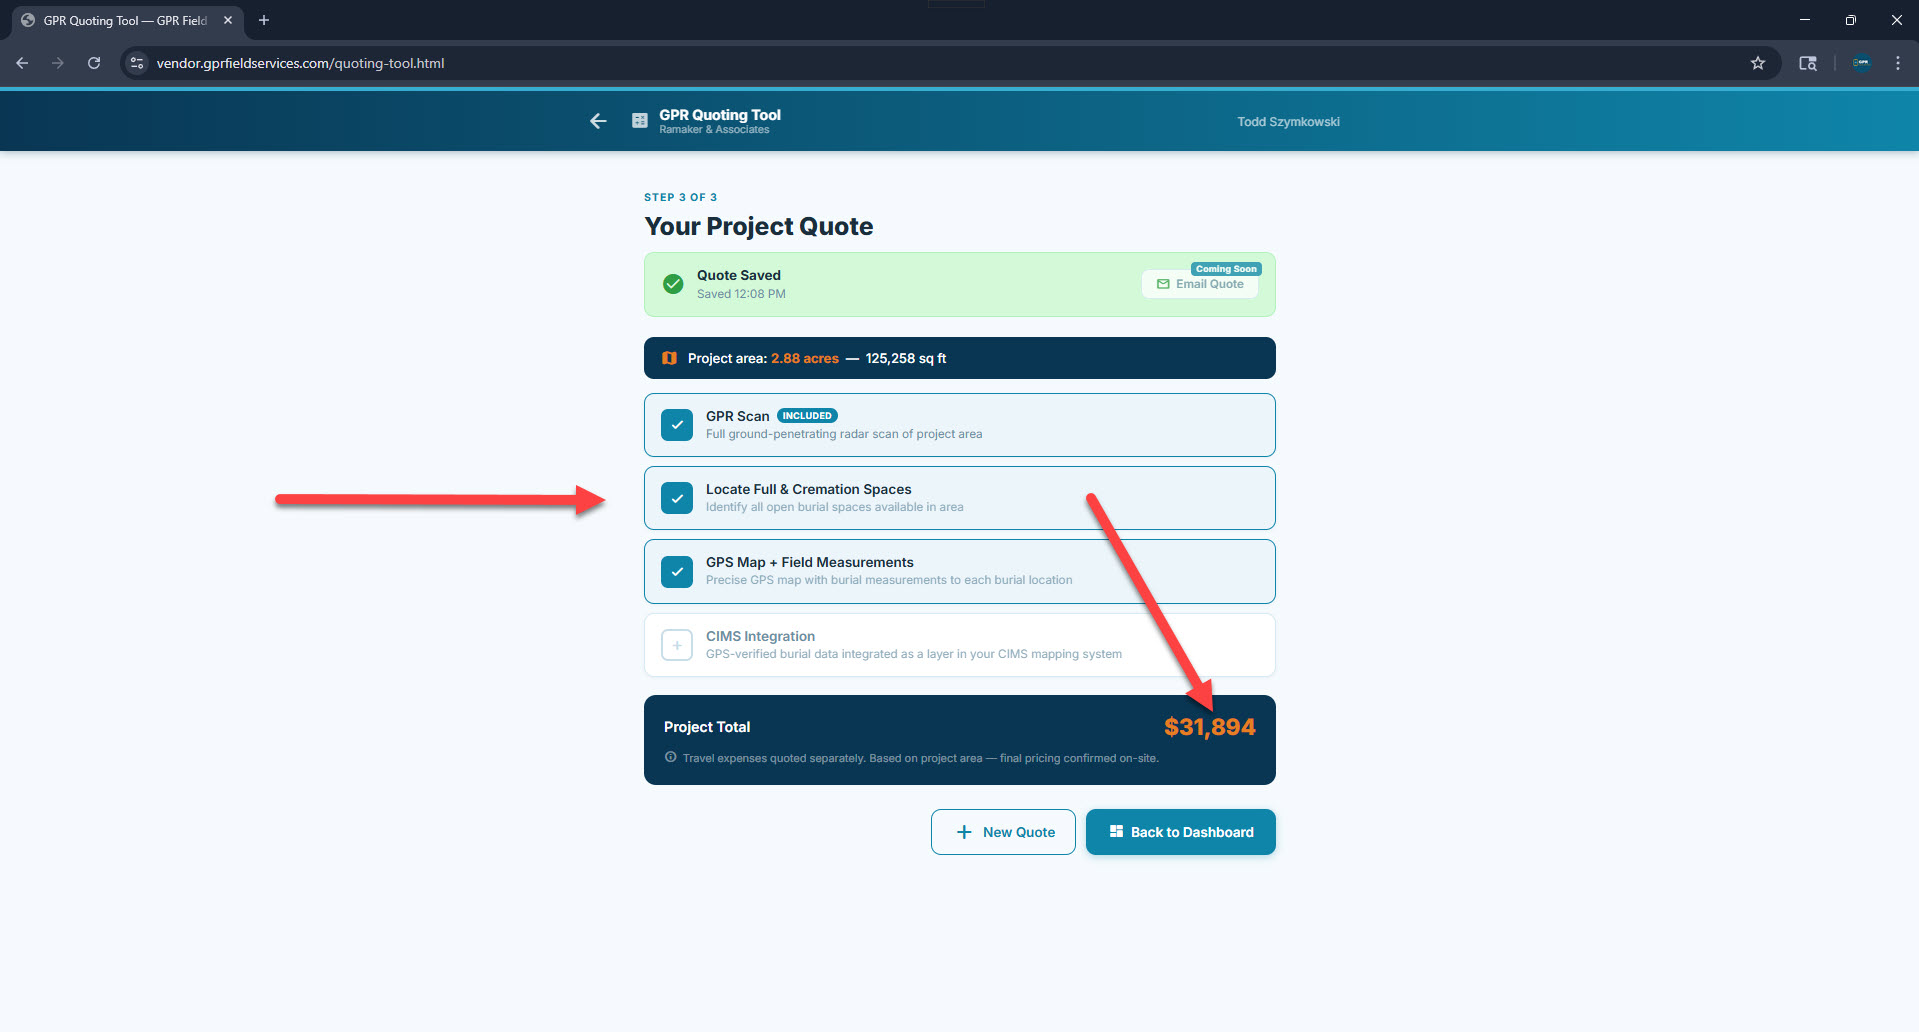
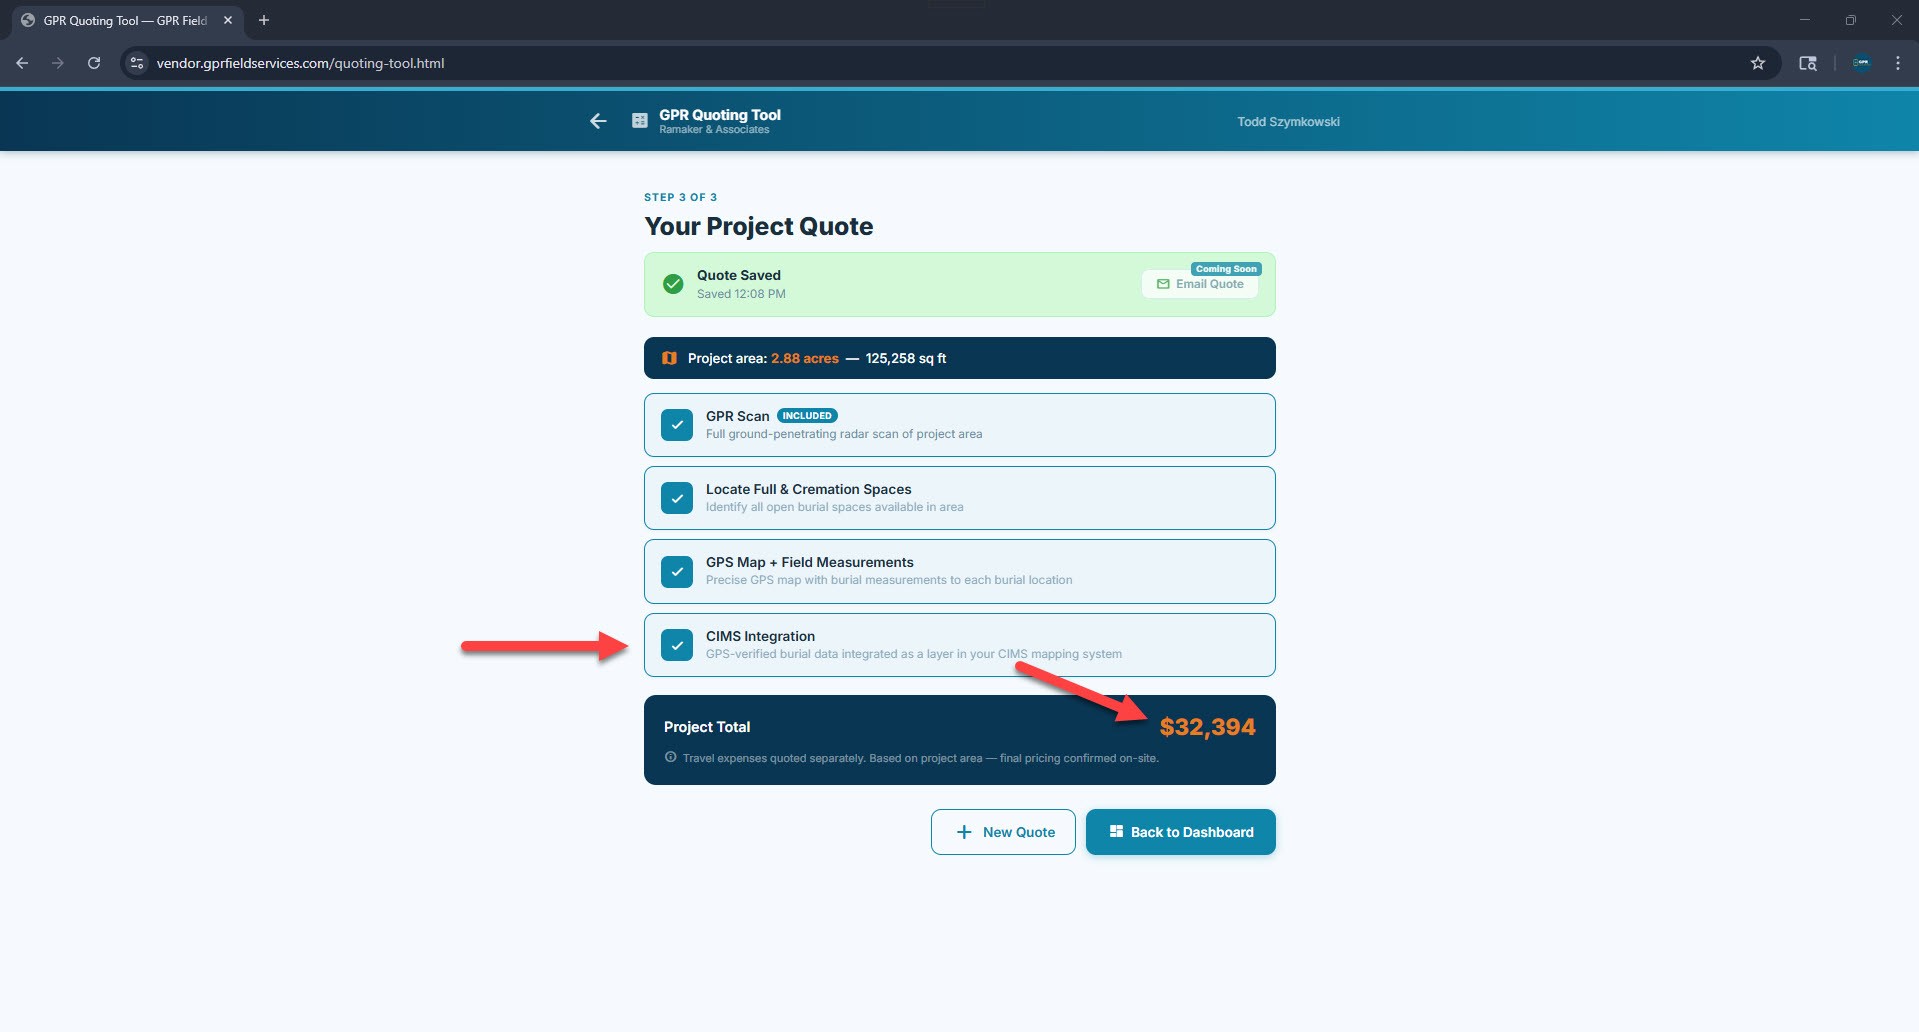
Step 3 — Your Project Quote

The pricing screen shows the measured acreage, all available services, and calculates the project total. Select the services the prospect needs — the total updates instantly.

Step 3 — Quote without CIMS
Quote step 3 - without CIMS
Step 3 — Quote with CIMS Integration added
Quote step 3 - with CIMS
GPR Scan

Full ground-penetrating radar scan of the project area. Always included in every project.

Locate Full & Cremation Spaces

Identifies all open burial spaces available in the area — full and cremation.

GPS Mapping & Field Measurement

Precise GPS map of the cemetery boundary and features, including field measurements to each burial location. Field Data collection is bundled in.

CIMS Integration

Optional add-on. GPS-verified burial data integrated as a layer in the cemetery's CIMS mapping system.
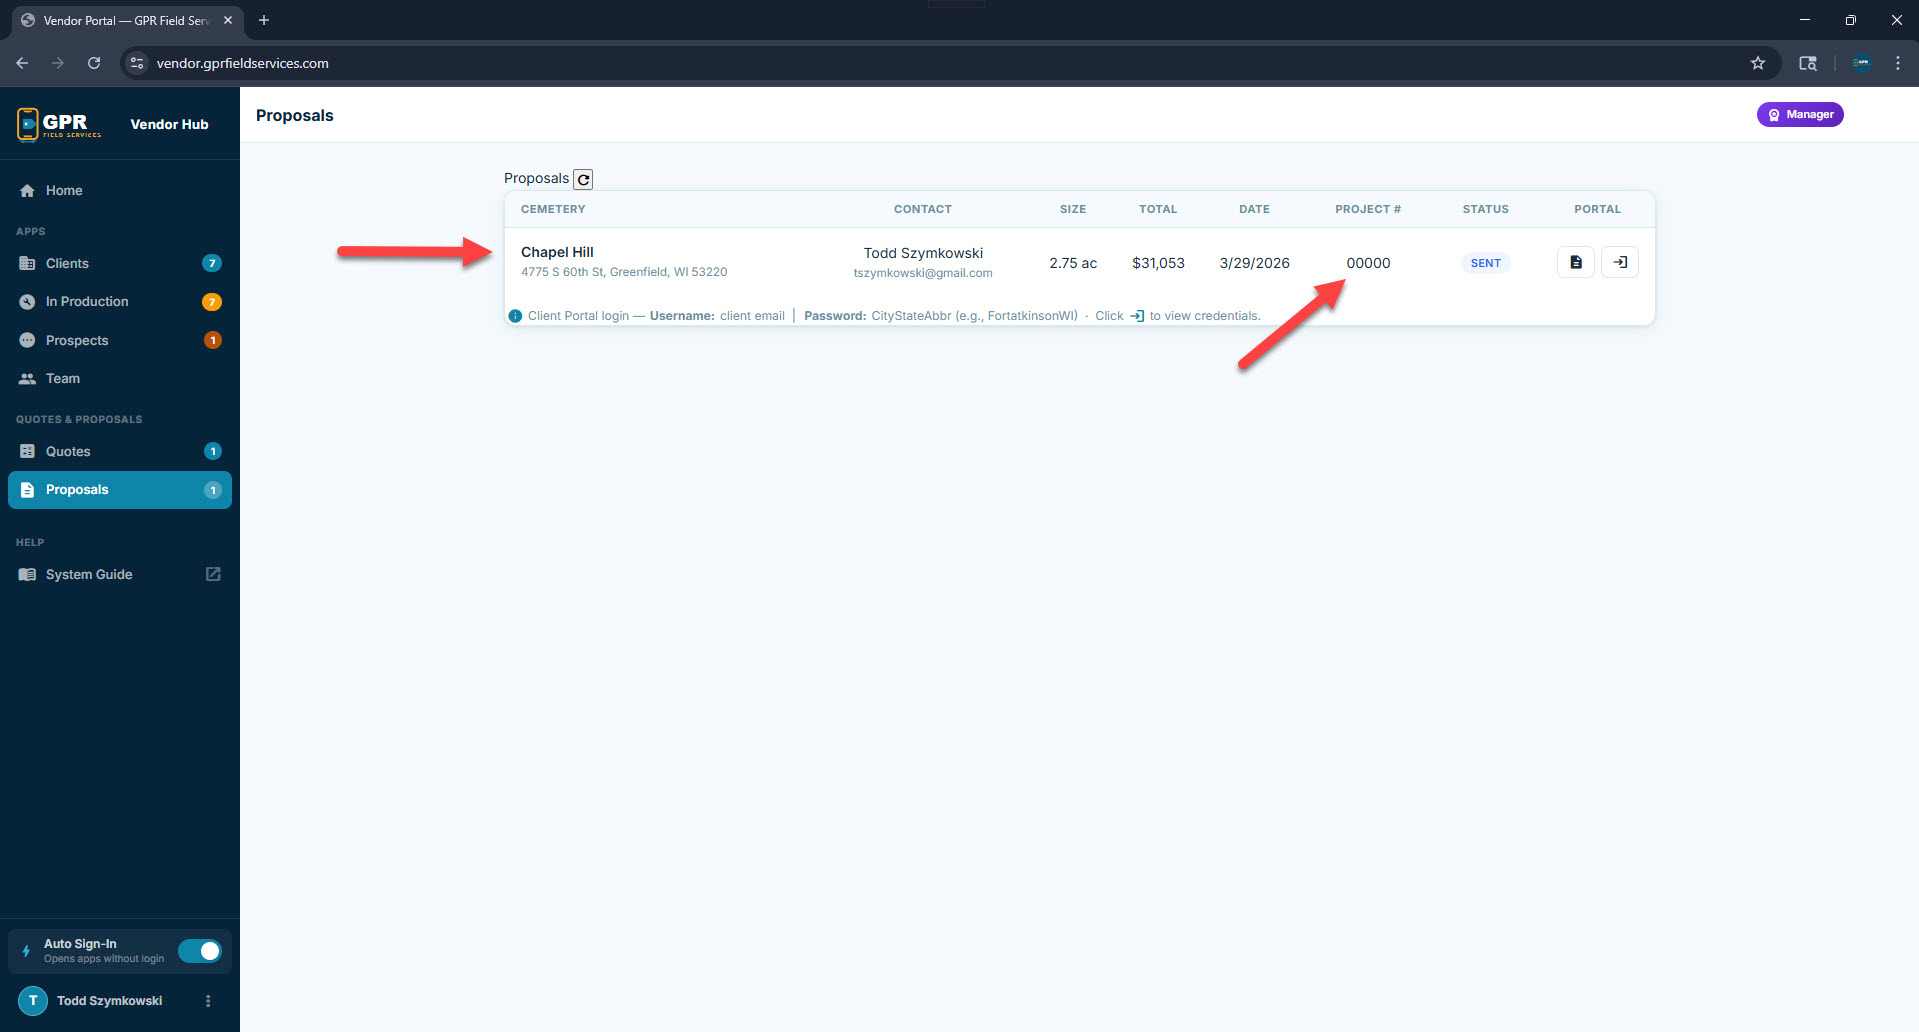
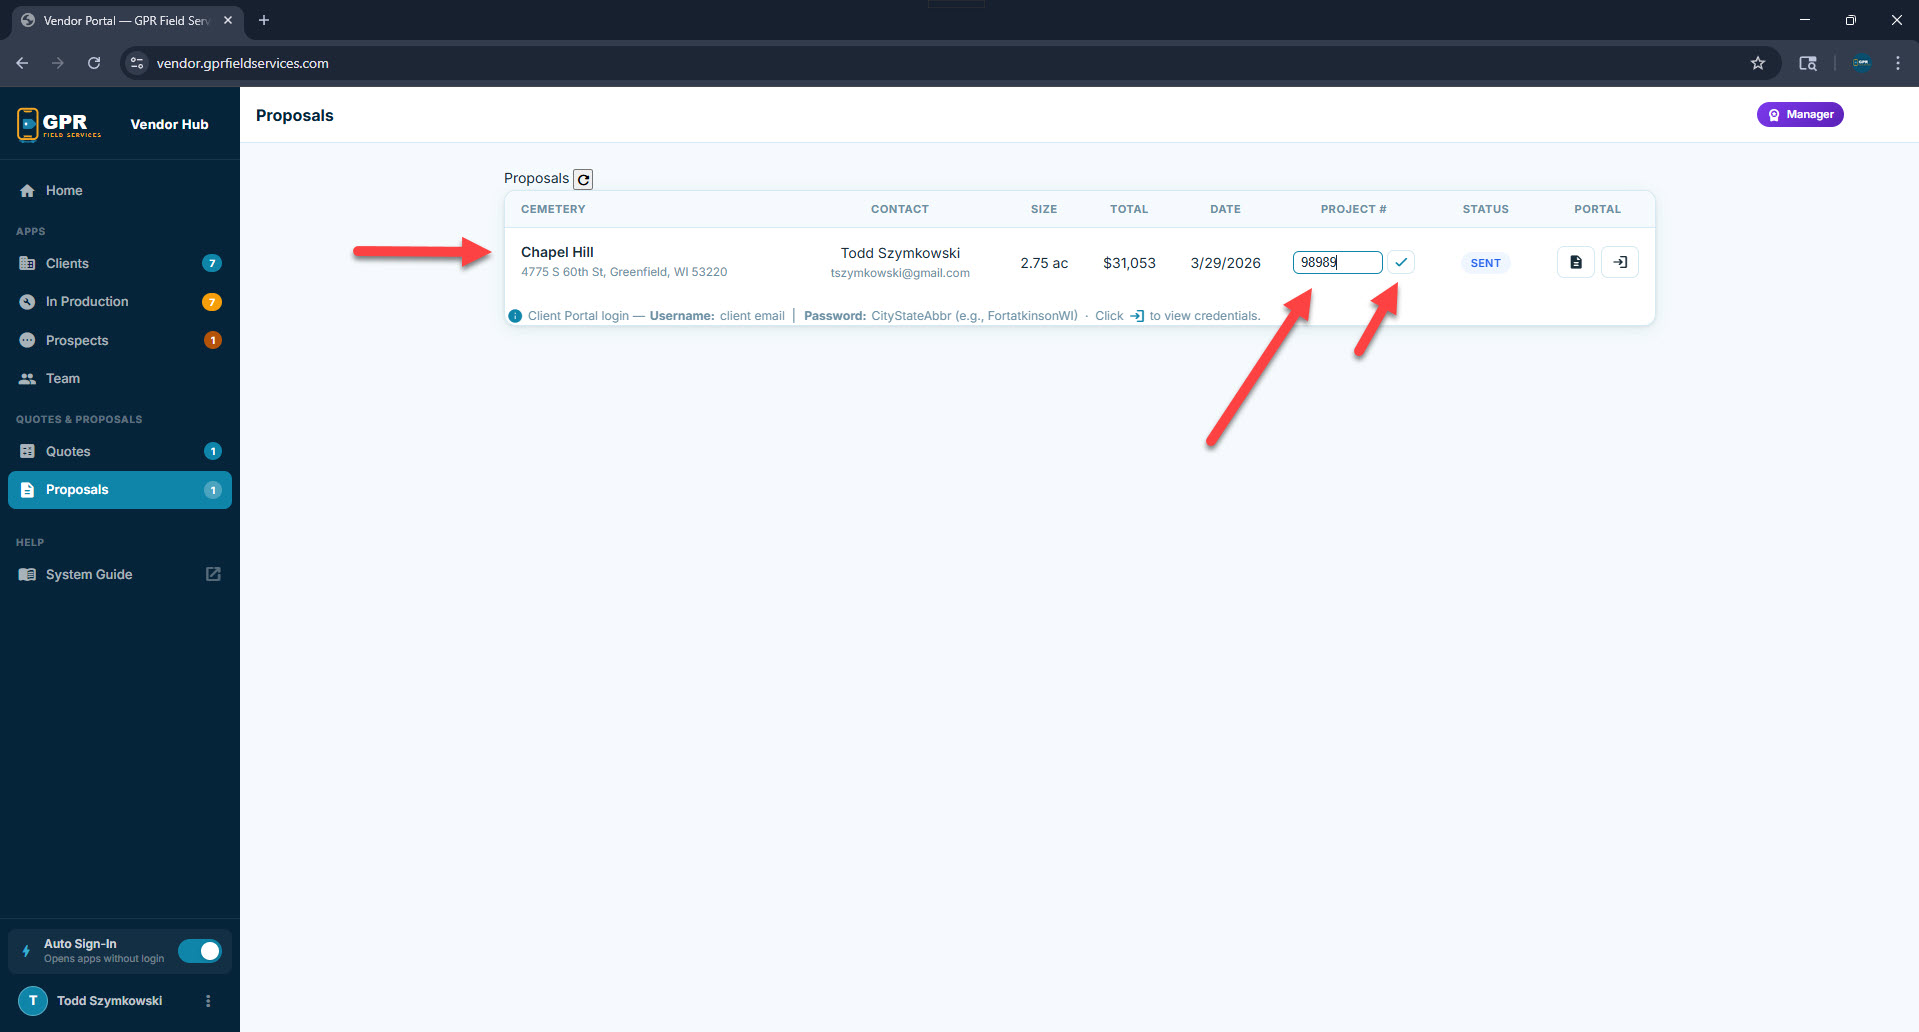
📈
Pricing is calculated per-acre based on the measured project boundary. Travel expenses are quoted separately and confirmed on-site. Final pricing is always confirmed before project start.
Adjusting a saved quote: Use Edit Map from the ⋮ menu on any quote row to re-open the quoting tool with that quote's boundary already drawn. You can drag anchor points, re-draw the polygon, or adjust the selected services — then the total updates automatically. The saved quote is updated in place.
8
Proposal Management

Proposals Panel

The Proposals panel shows every formal proposal that has been generated and sent to a prospect. Each row includes the cemetery name, project details, current proposal status, and a link to the client portal where the prospect views their proposal.

Proposals panel — account dropdown view
Proposals panel
Proposal Status

Track each proposal: New → Sent → Viewed → Accepted → Won / Lost.

Portal Credentials

Each prospect gets a unique login to the client portal. View their username and password from the credentials icon on each row.

Project Number

Assigned by the admin when a prospect converts to an active job. Displays on the proposal and in the client portal.

Portal Link

Open the client's private portal — where they log in to view the proposal HTML and download the PDF.

📄
Proposals are generated automatically from the quote + cemetery data. A PDF version is created within 60 seconds of proposal submission and becomes available for download in the client portal.
9
Client Experience

Proposal Walkthrough

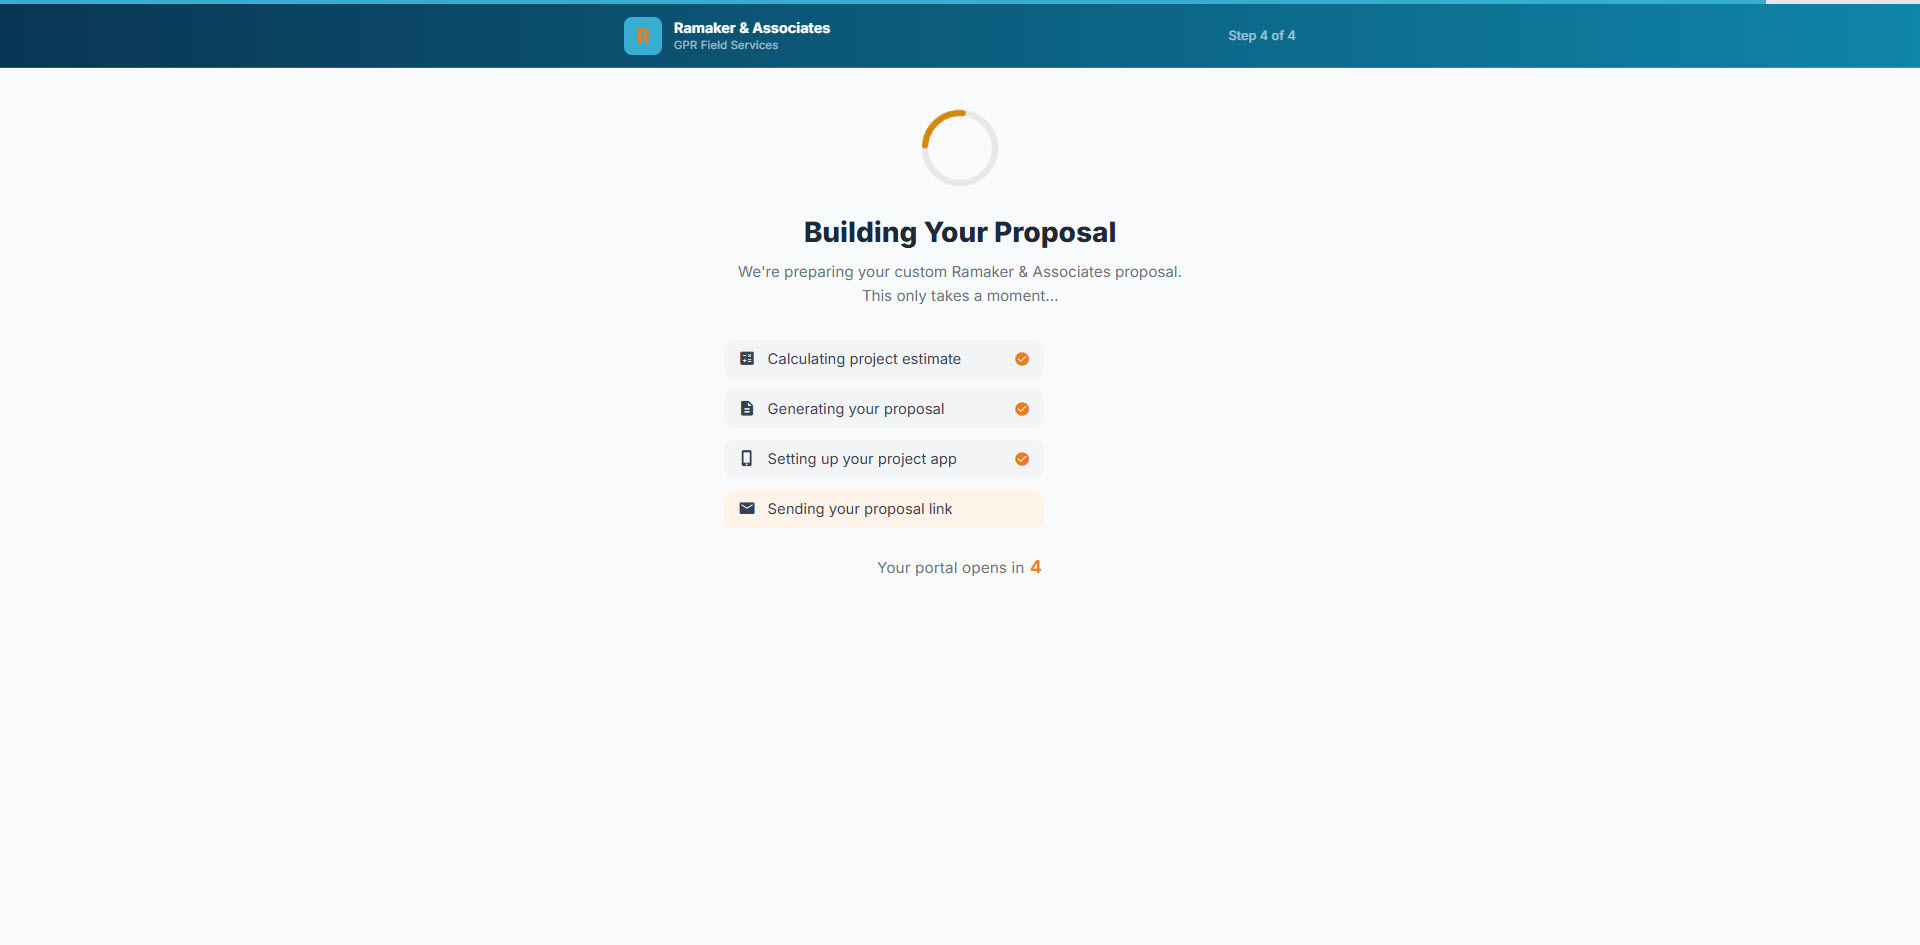
This is the full end-to-end experience — from a cemetery filling out the request form, to receiving their proposal email, logging into their client portal, and receiving a finalized proposal with a project number assigned.

📄
Sample Proposal PDF — View a complete generated proposal for Chapel Hill Cemetery.
📄 Download Chapel Hill Sample Proposal

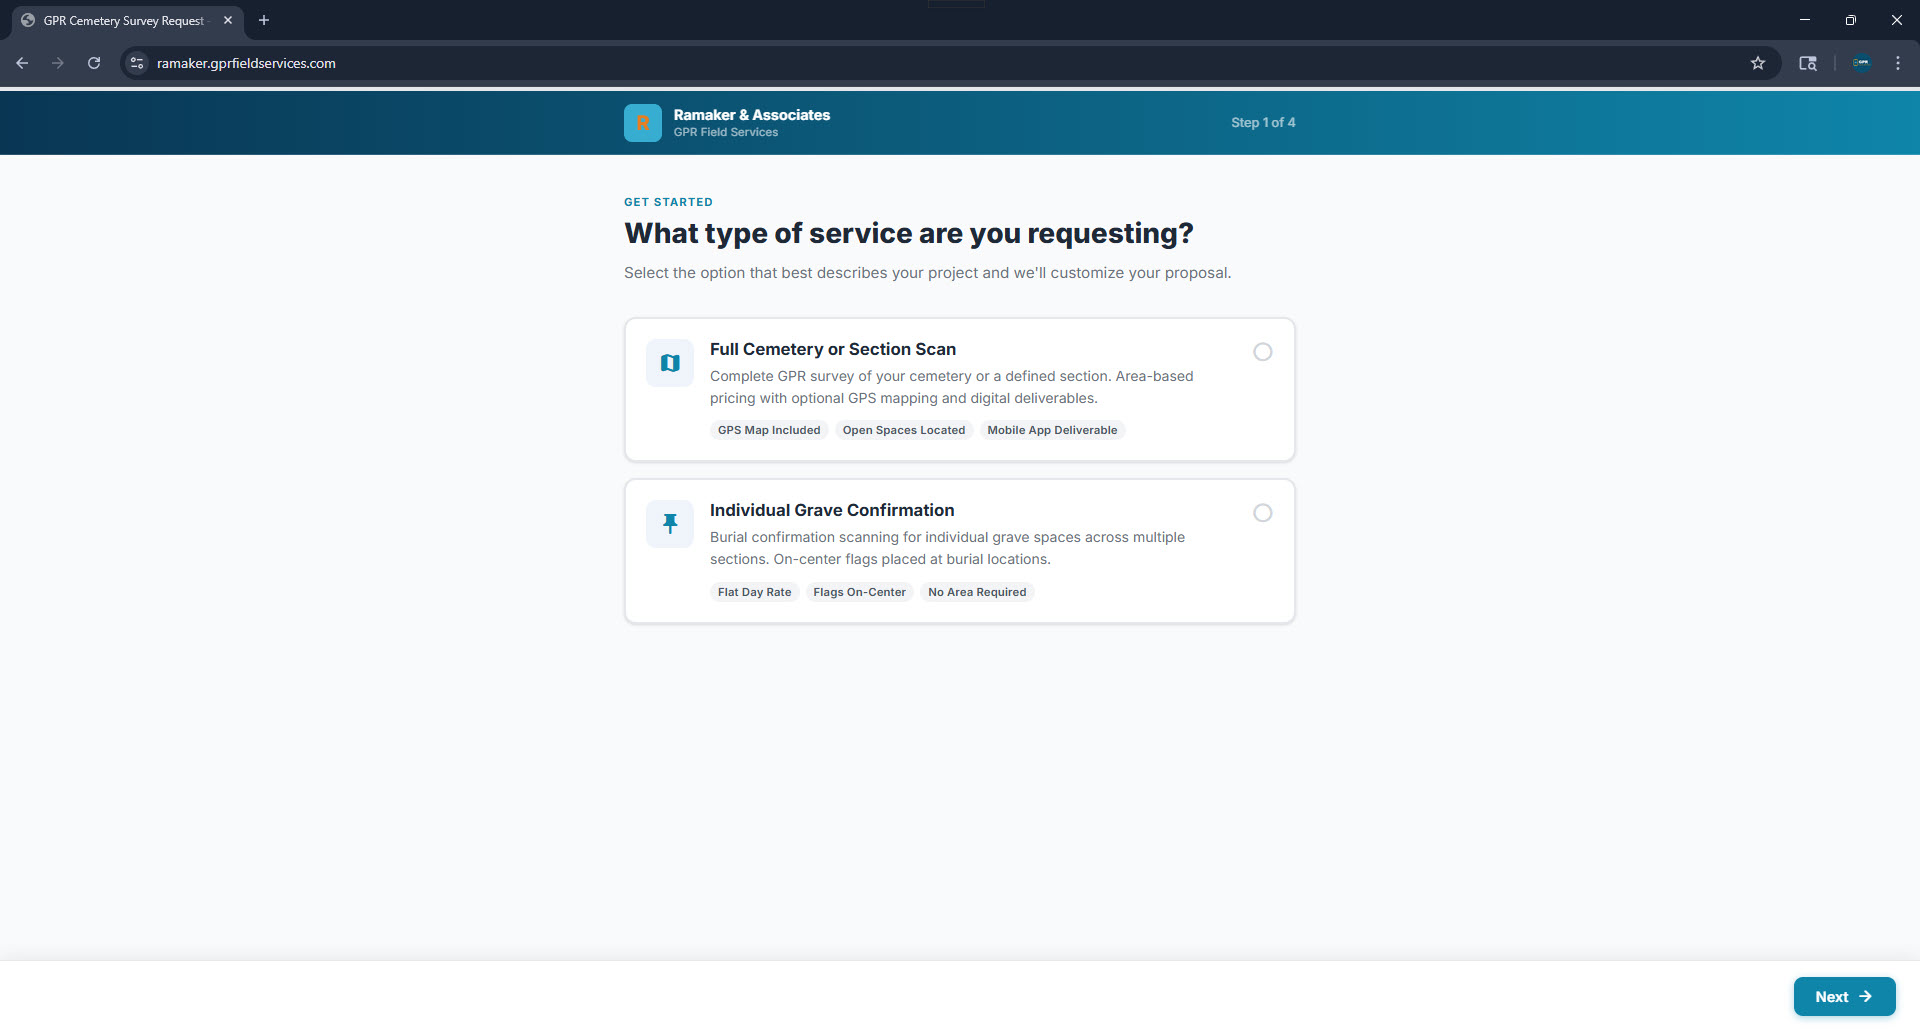
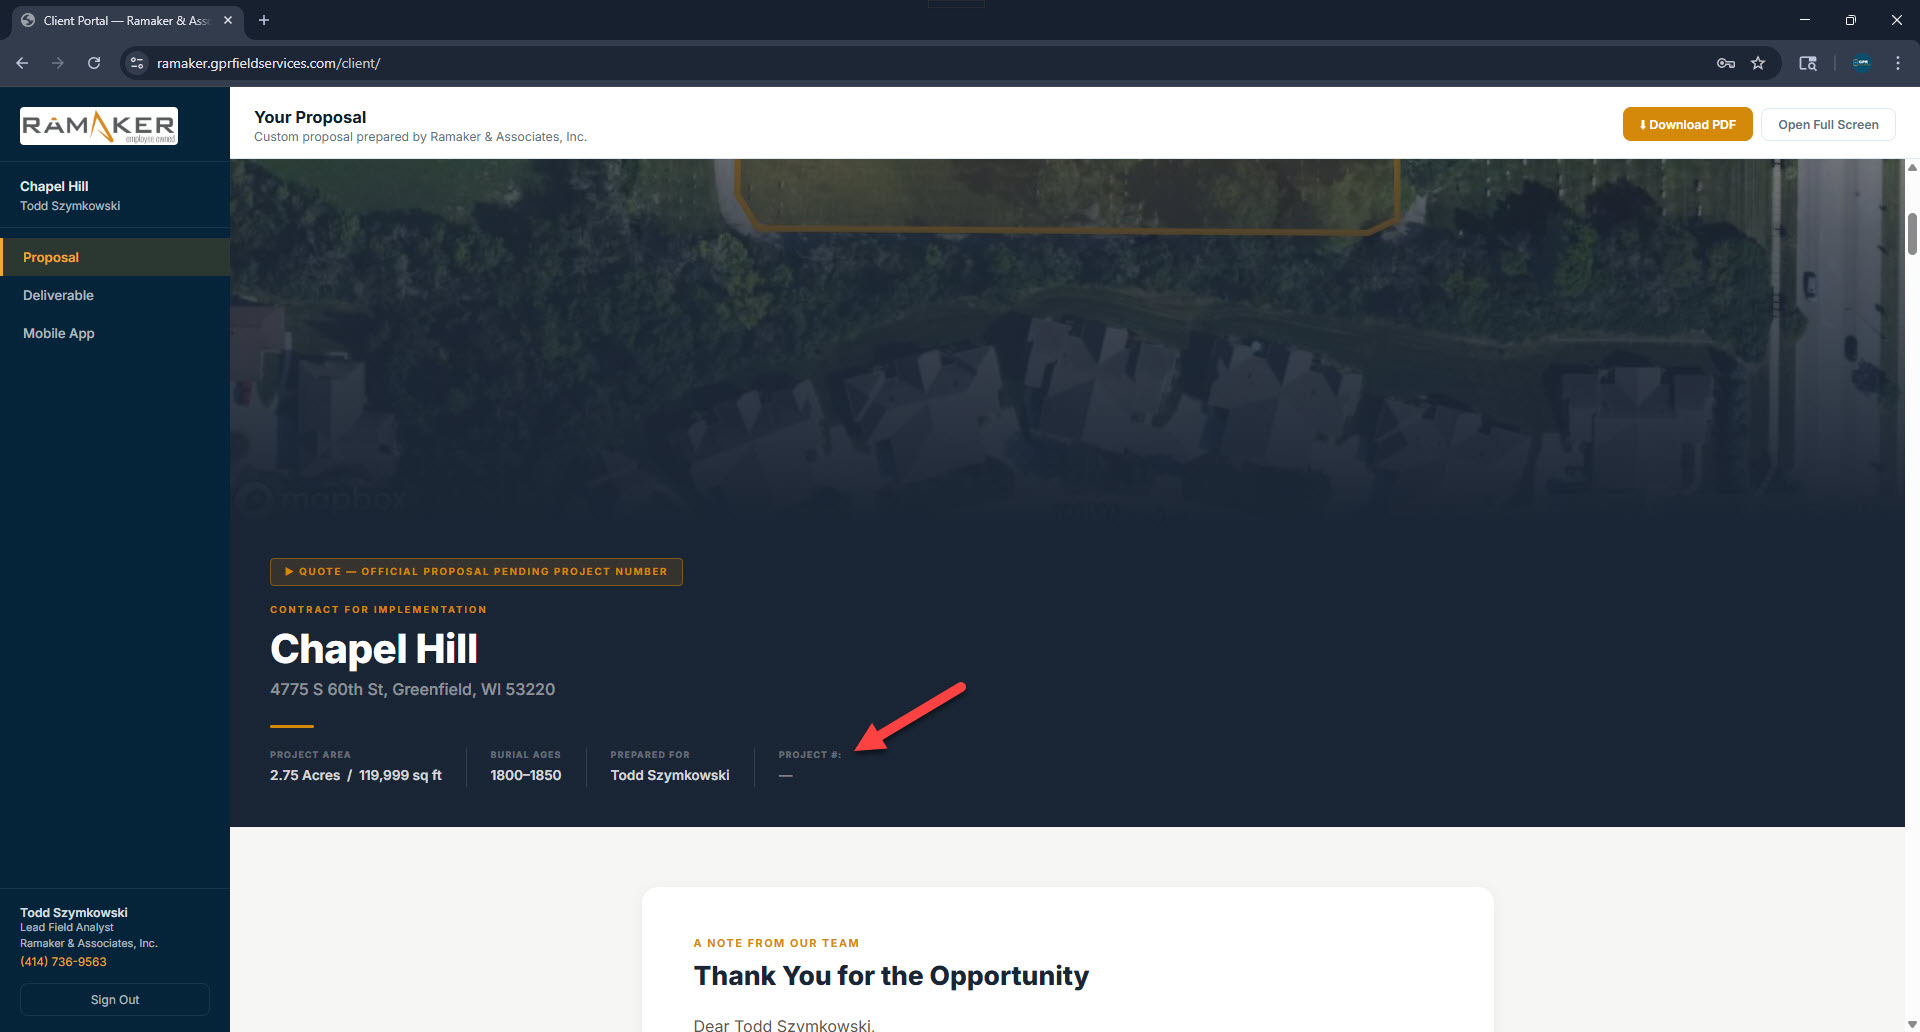
Part 1 — The Request Form

Prospects visit ramaker.gprfieldservices.com and fill out a 4-step request form. This is the public-facing intake form for all new GPR survey requests.

1
Choose service type Full Cemetery or Section Scan — area-based pricing with GPS mapping and mobile app deliverable. Or Individual Grave Confirmation — flat day rate, flags placed on-center, no area measurement required.
Step 1 of 4 — Service type selection
Service type selection
2
Cemetery & contact information Name, address, city/state/ZIP, contact name, email, and phone. This information populates the proposal automatically.
Step 2 of 4 — Cemetery and contact details
Cemetery and contact info form
3
Map the project area A satellite map opens centered on the cemetery address. The prospect traces the boundary using anchor points to measure exact acreage. A 4-screen tutorial walks them through the process.
Map tutorial — project area intro
Map tutorial step 1
Map tutorial — placing anchor points
Map tutorial step 2
Map tutorial — closing the boundary
Map tutorial step 3
Map tutorial — navigation tips, then Let's Begin
Map tutorial step 4
Boundary drawn — confirm or adjust
Boundary drawn and confirmed
Adjust mode — drag points to fine-tune
Adjust mode
4
Project details questionnaire Age of oldest burial, soil composition, topography, project timeline, and any additional notes. These details help Ramaker plan their approach and are included in the proposal.
Step 4 of 4 — Project details
Questionnaire top
Step 4 — Timeline & Submit
Questionnaire bottom - submit button
▶️
Clicking Submit & Generate Proposal triggers everything — proposal creation, client portal setup, and the welcome email — all within seconds.
Building Your Proposal — live progress
Building proposal animation
Your Proposal Is Ready!
Proposal ready confirmation

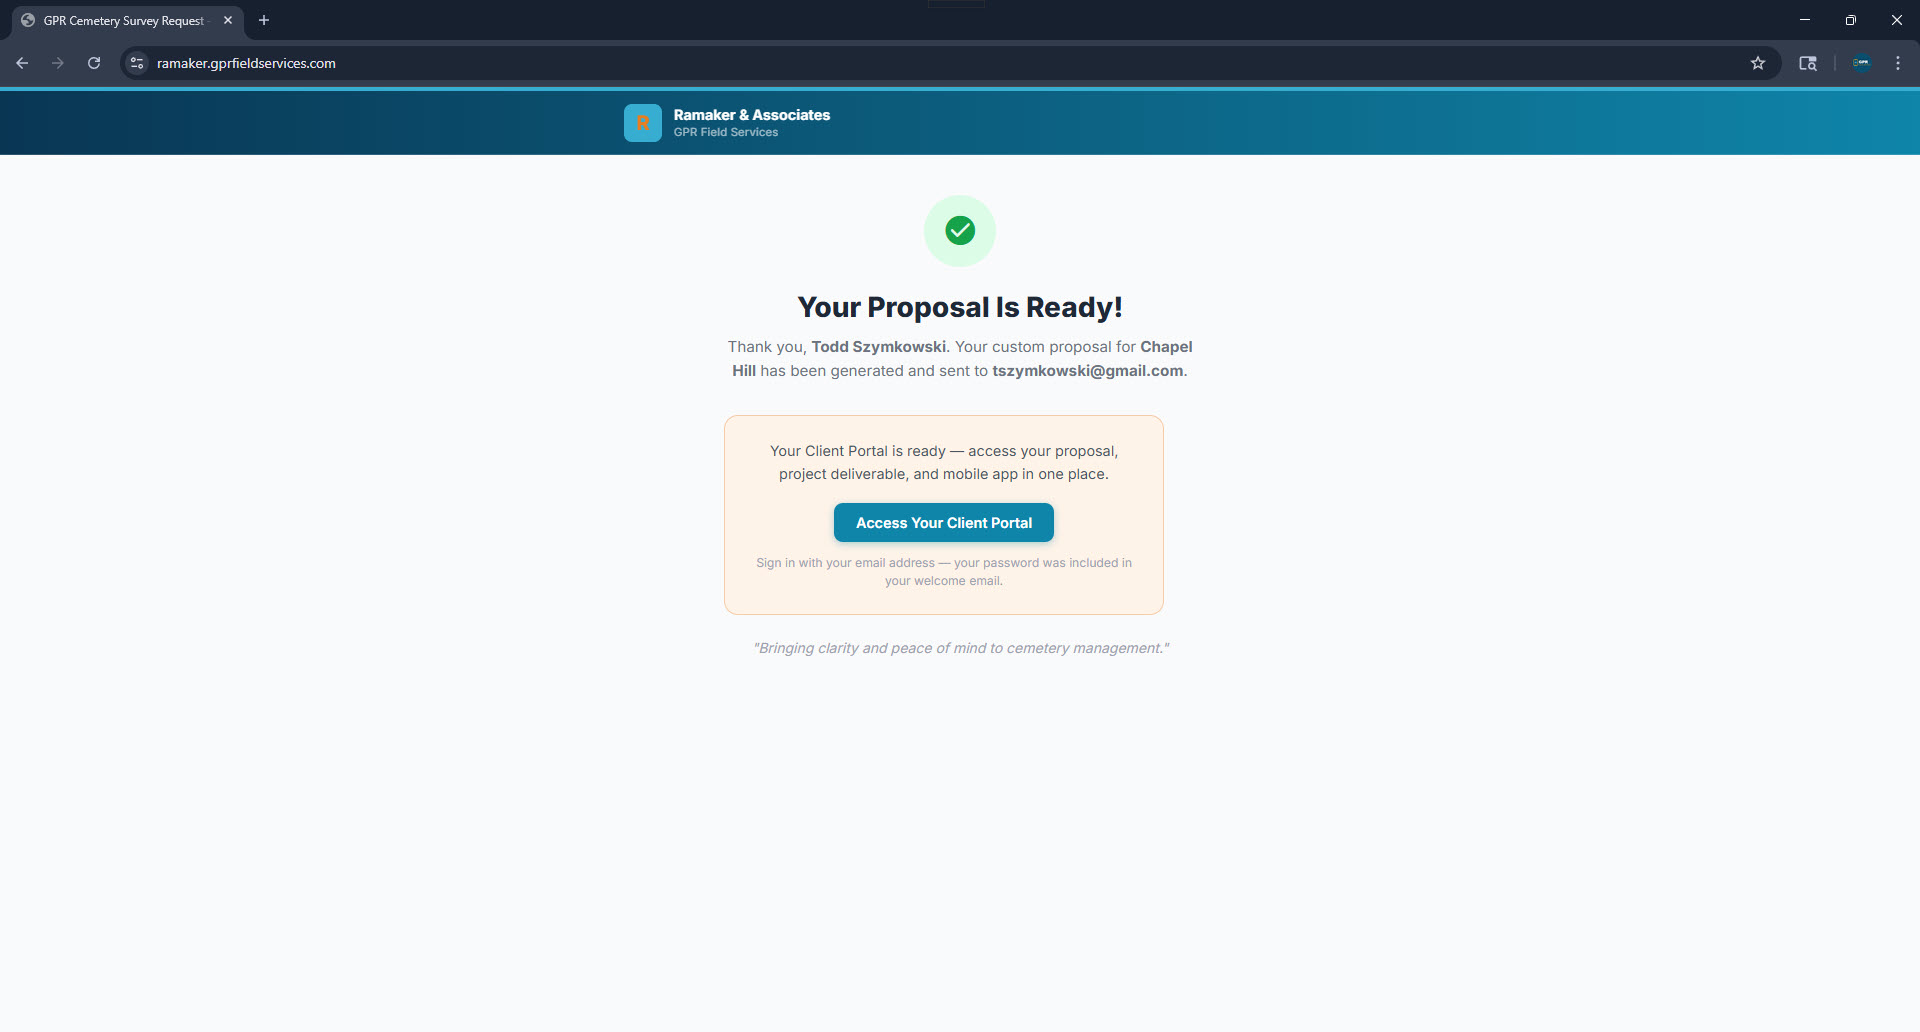
Part 2 — Email & Client Portal

Within seconds, the prospect receives a welcome email with their proposal and login credentials for the Client Portal. Everything they need is in one place.

Welcome email — proposal ready with login credentials
Welcome email with credentials
🔒
Login credentials are automatically generated from the cemetery's city and state — no account setup required. The prospect clicks Access Your Client Portal directly from the email.
Client Portal login — ramaker.gprfieldservices.com/client/
Client portal login screen

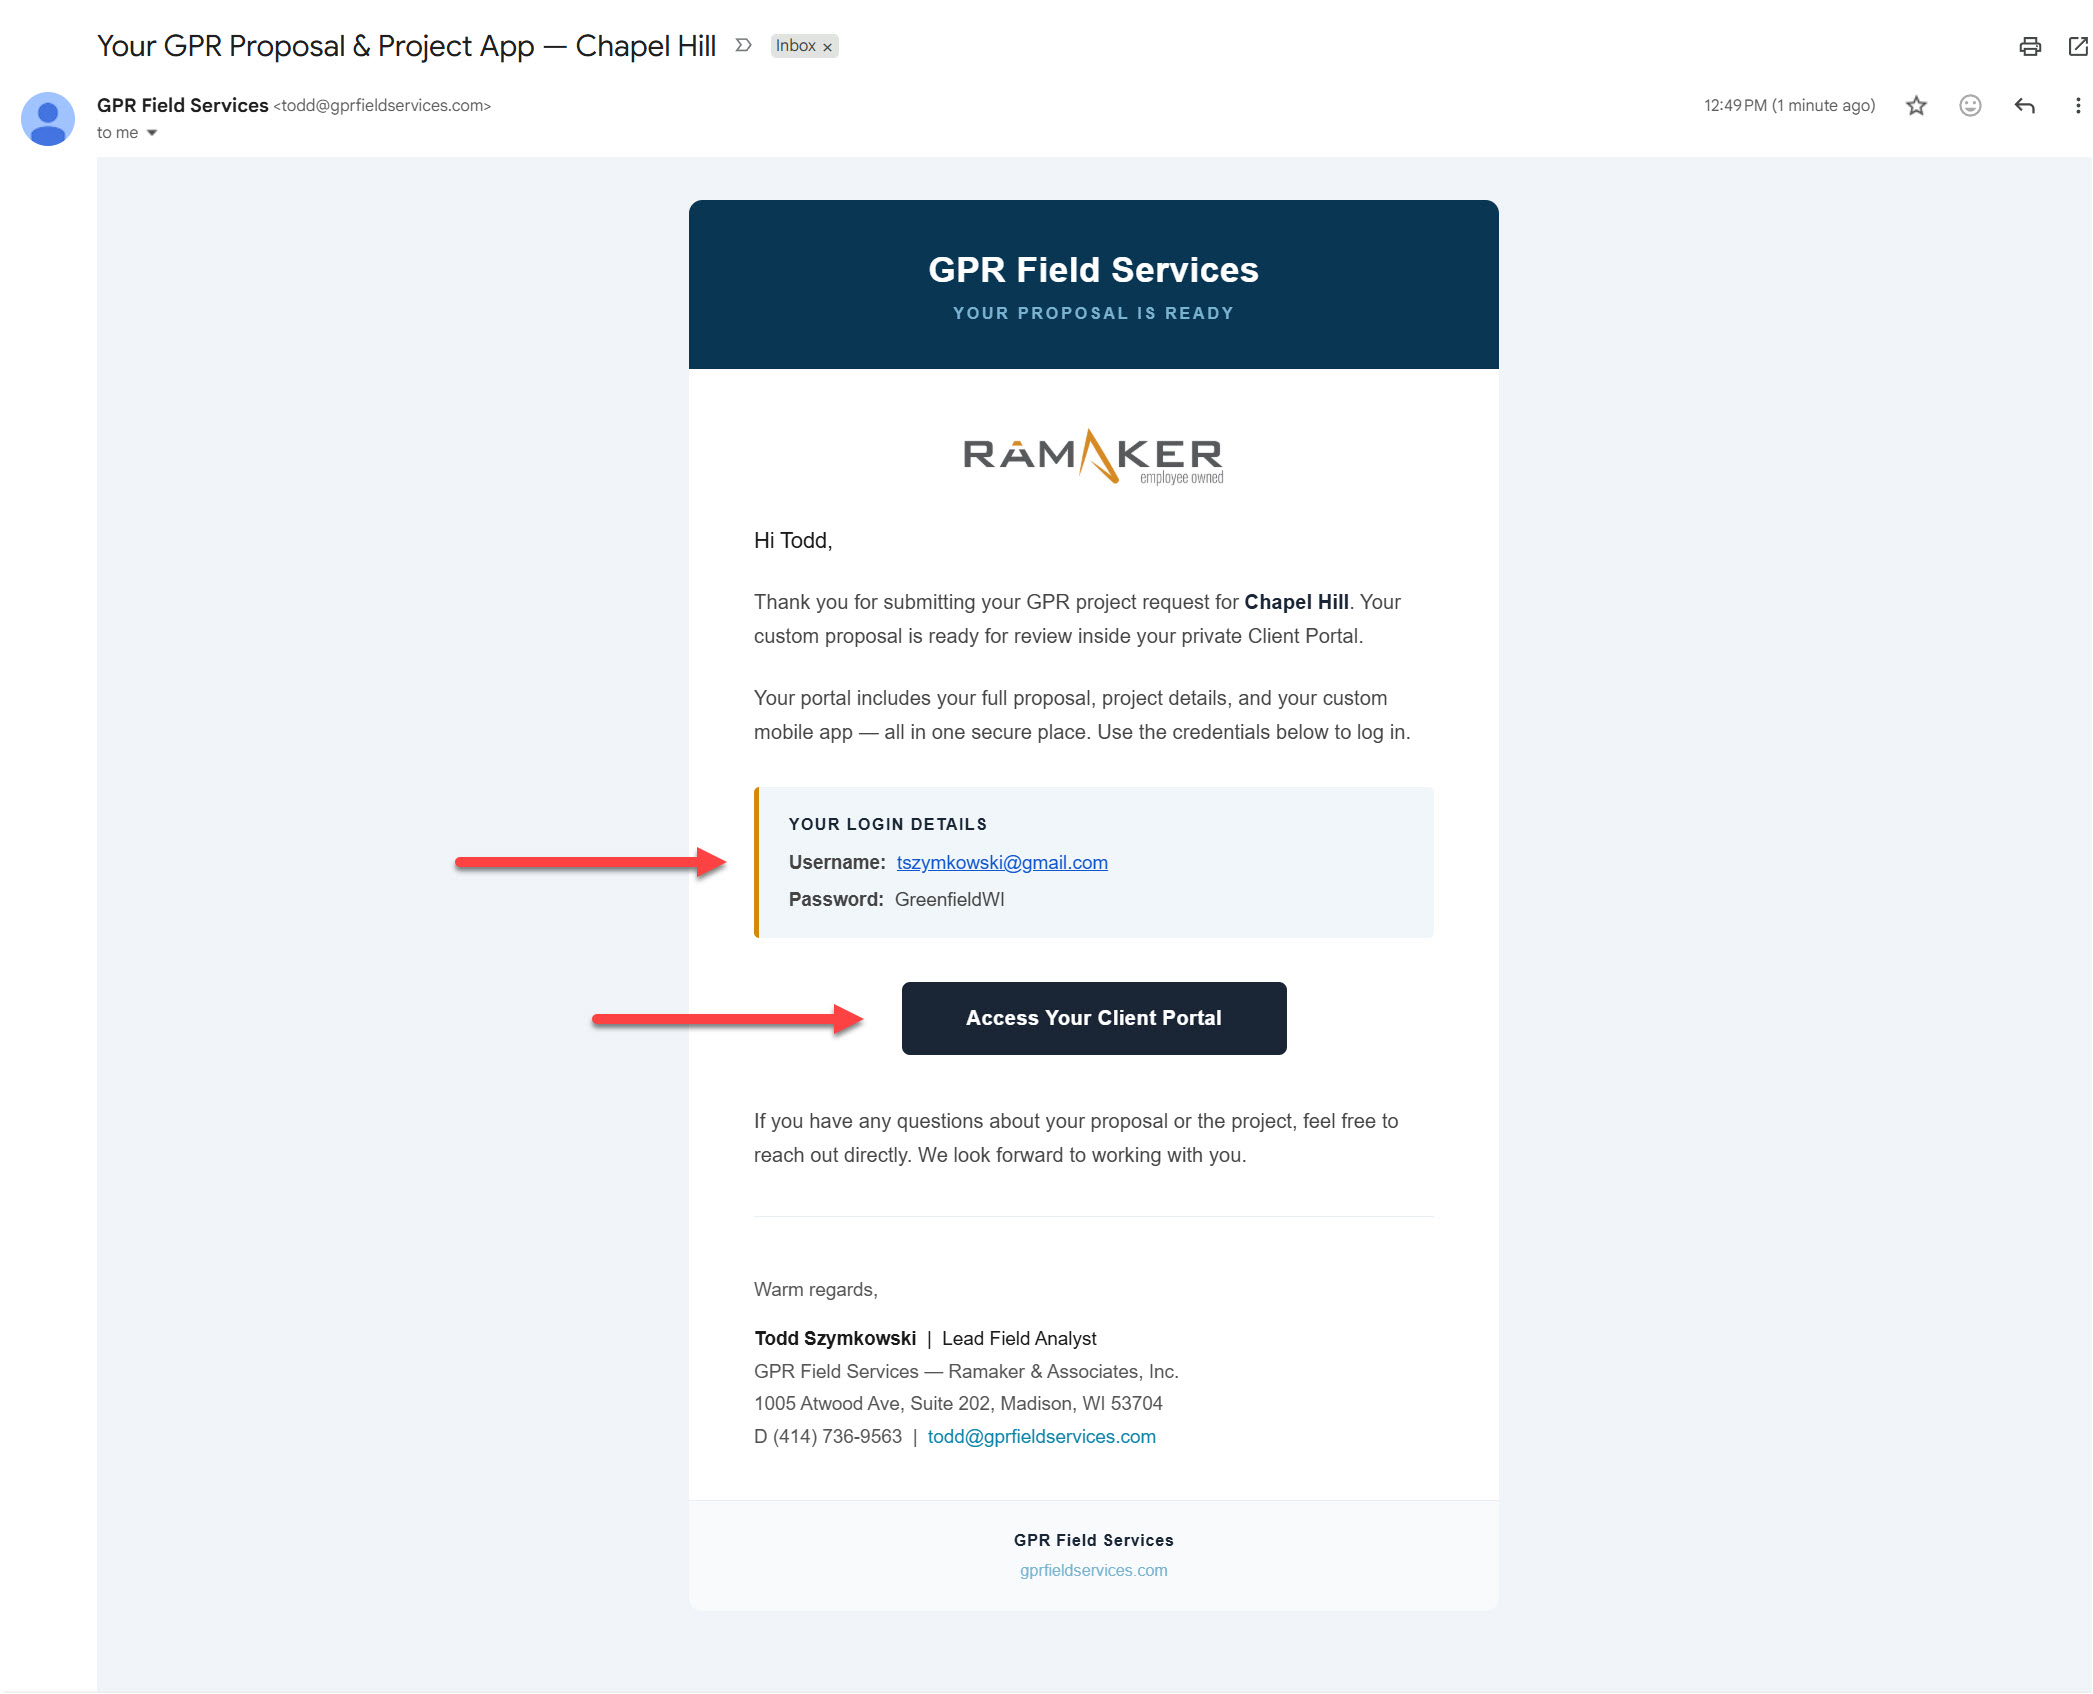
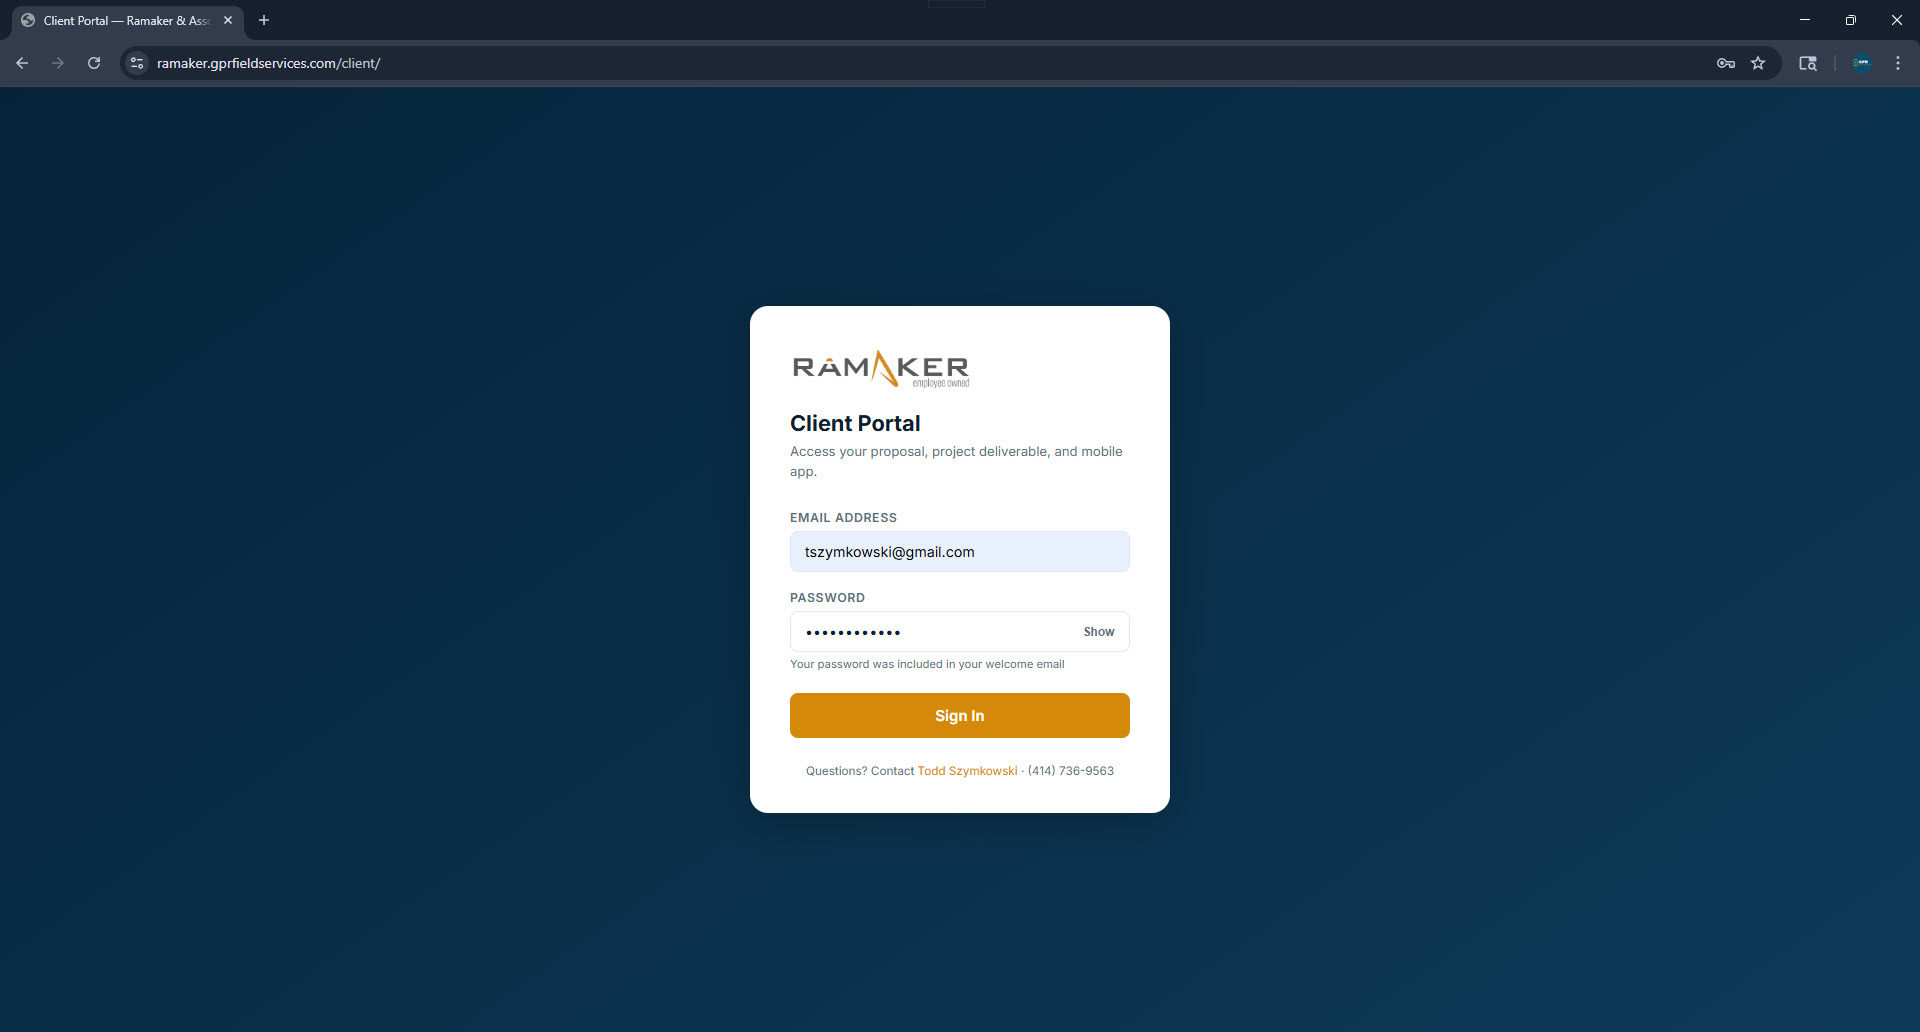
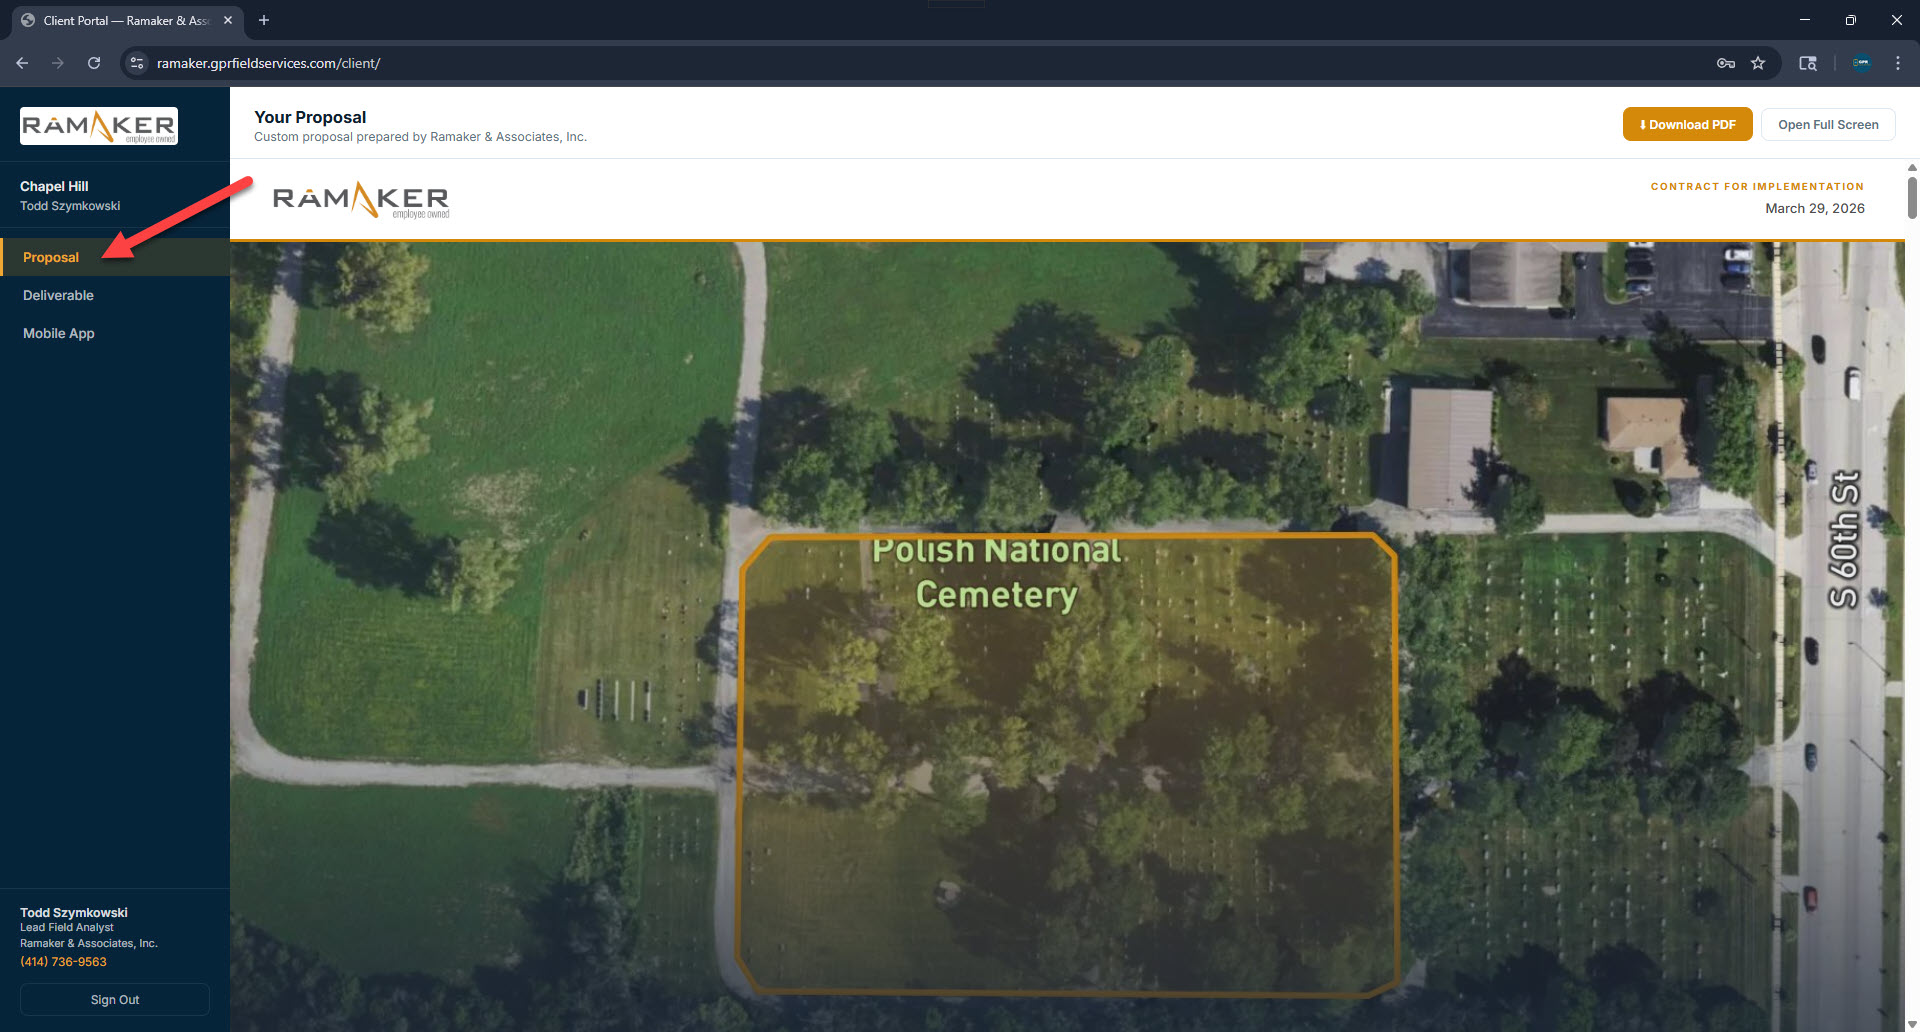
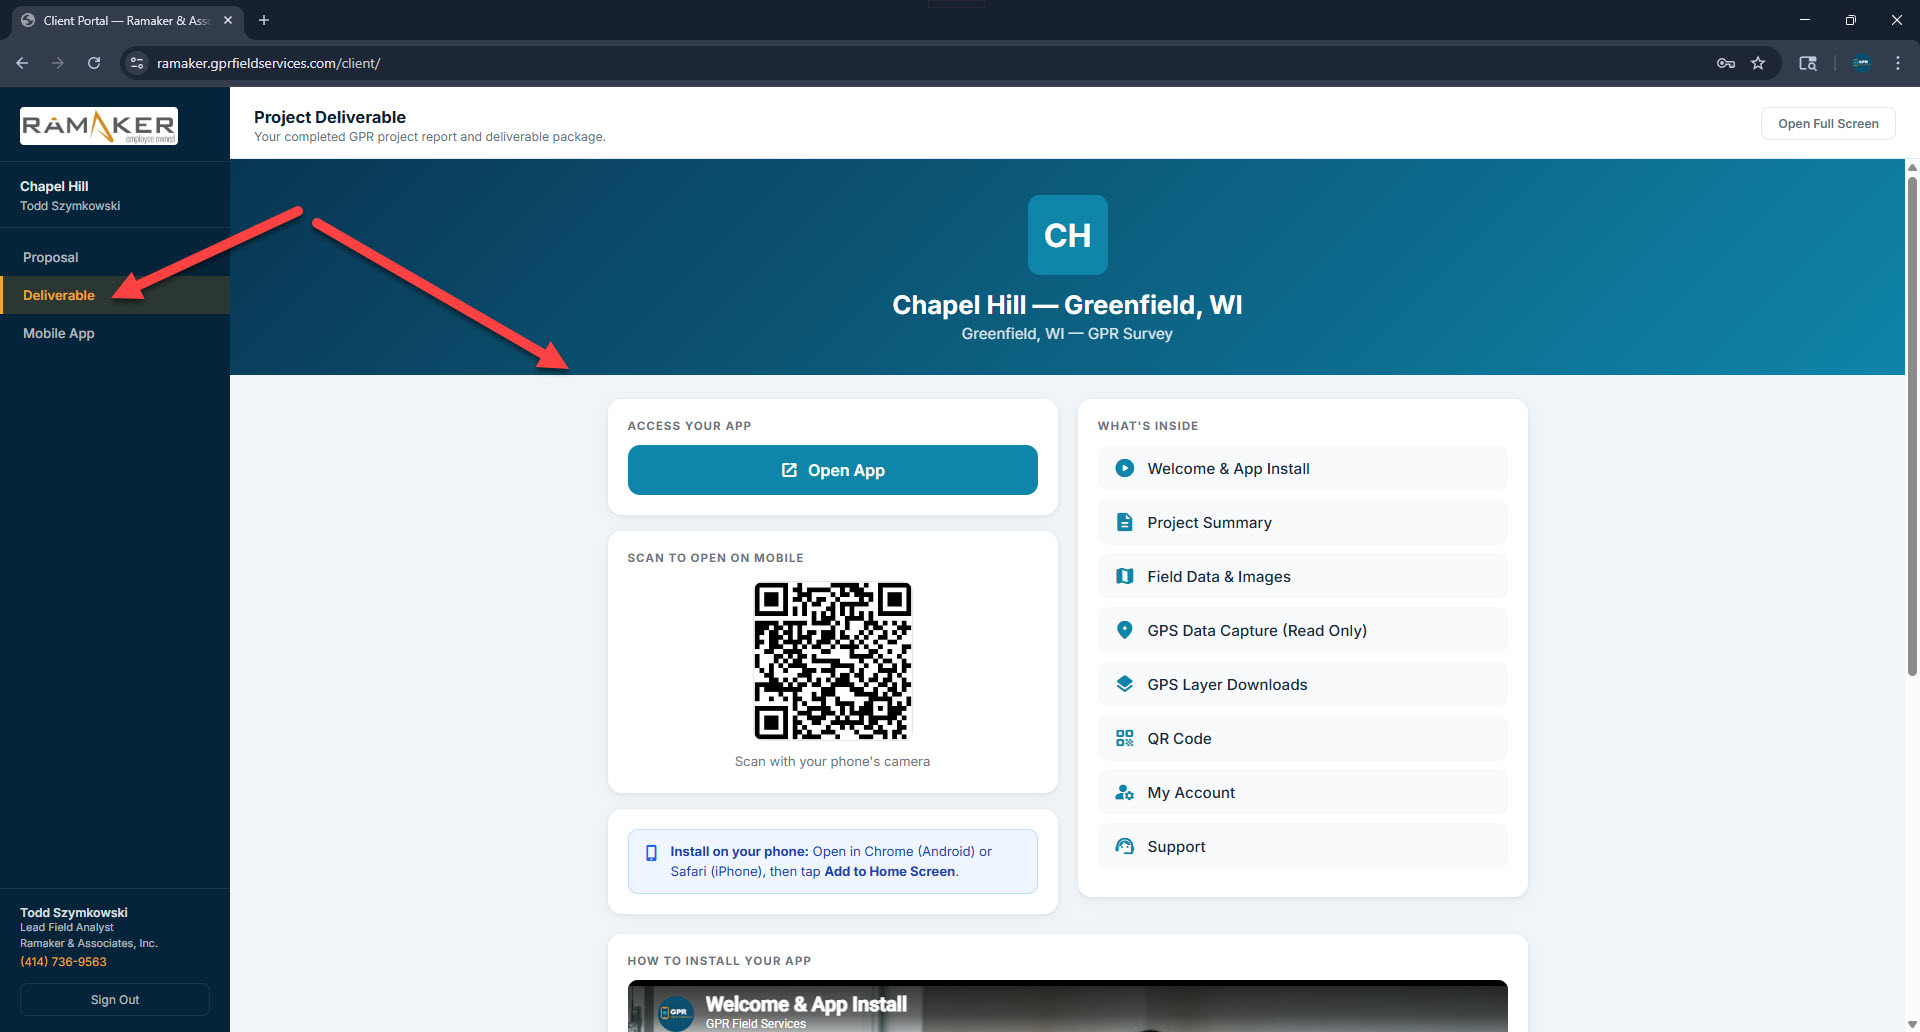
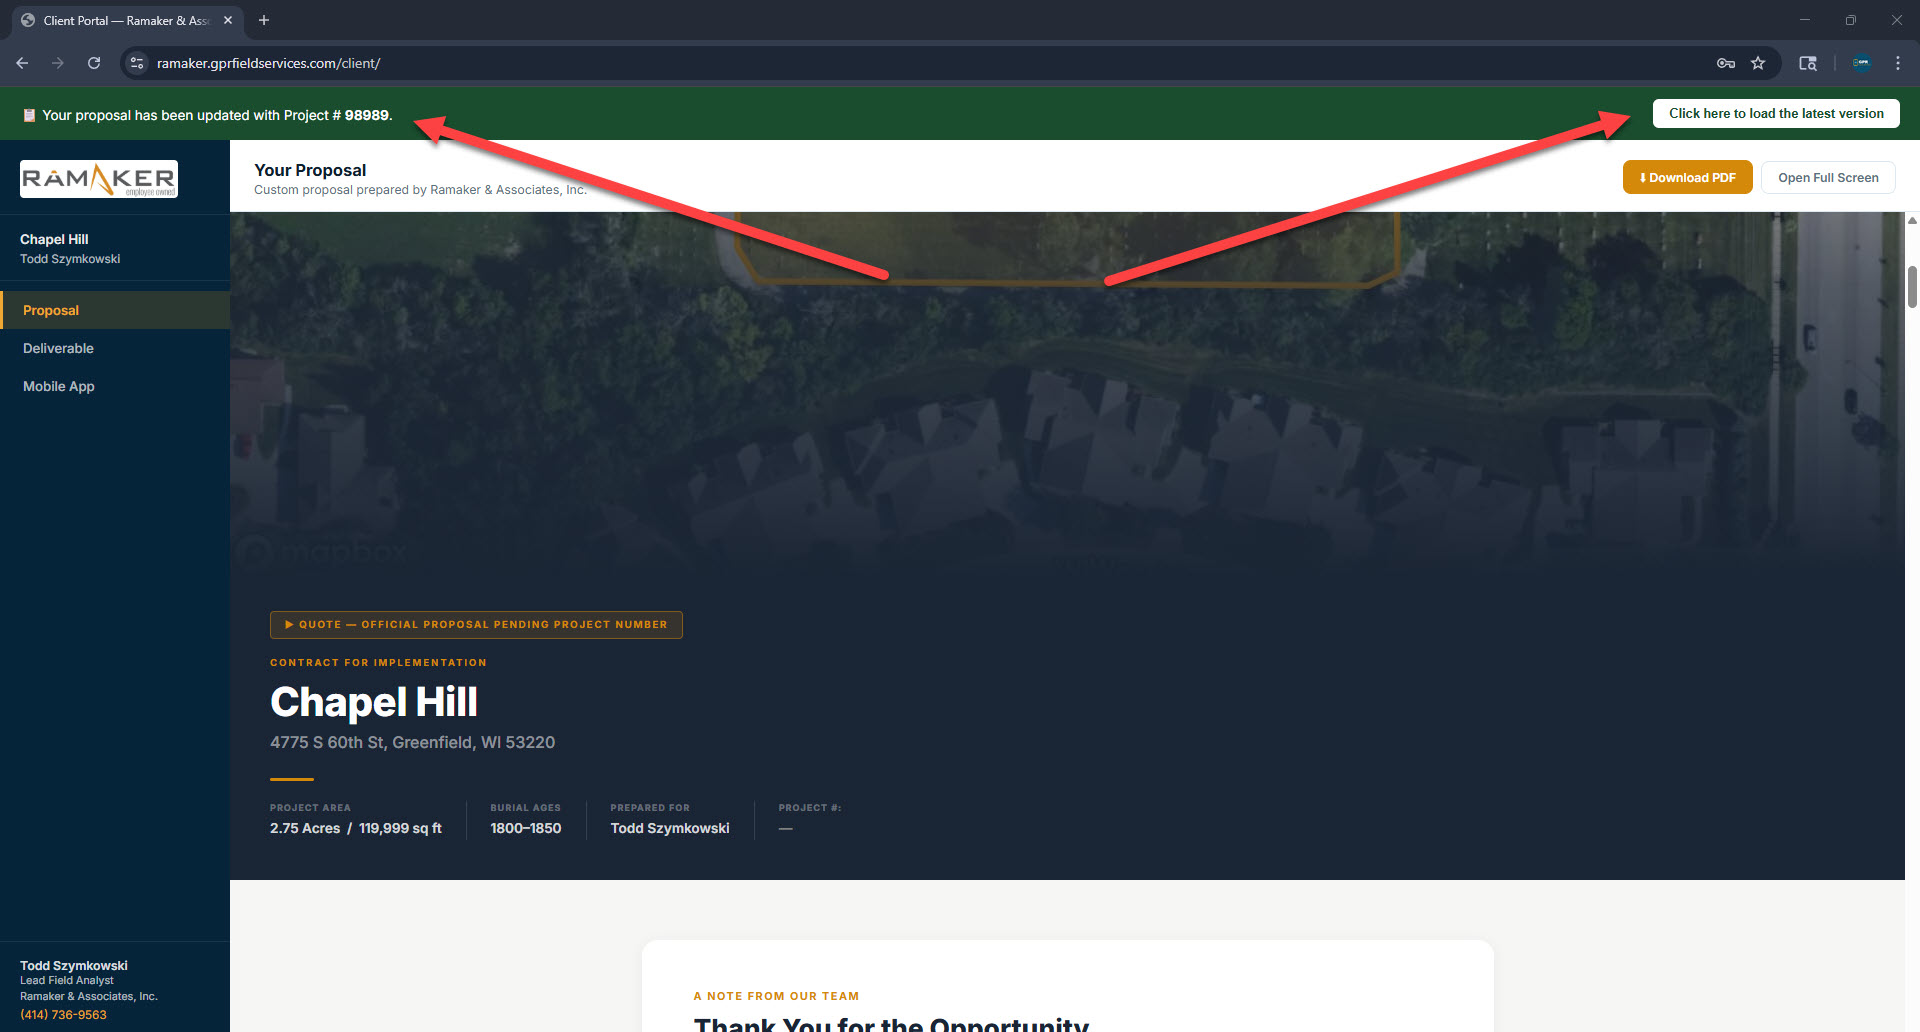
After logging in, the portal has three sections accessible from the sidebar: Proposal, Deliverable, and Mobile App.

Proposal tab — satellite map + download PDF
Portal proposal view
Deliverable tab — project app + QR code
Portal deliverable tab
Mobile App tab — app credentials
Portal mobile app tab
Proposal view — pending project number
Proposal pending project number
📋
When a proposal is first submitted, it shows "Quote — Official Proposal Pending Project Number" until a Ramaker manager assigns one. The PDF download and full proposal text are available immediately.

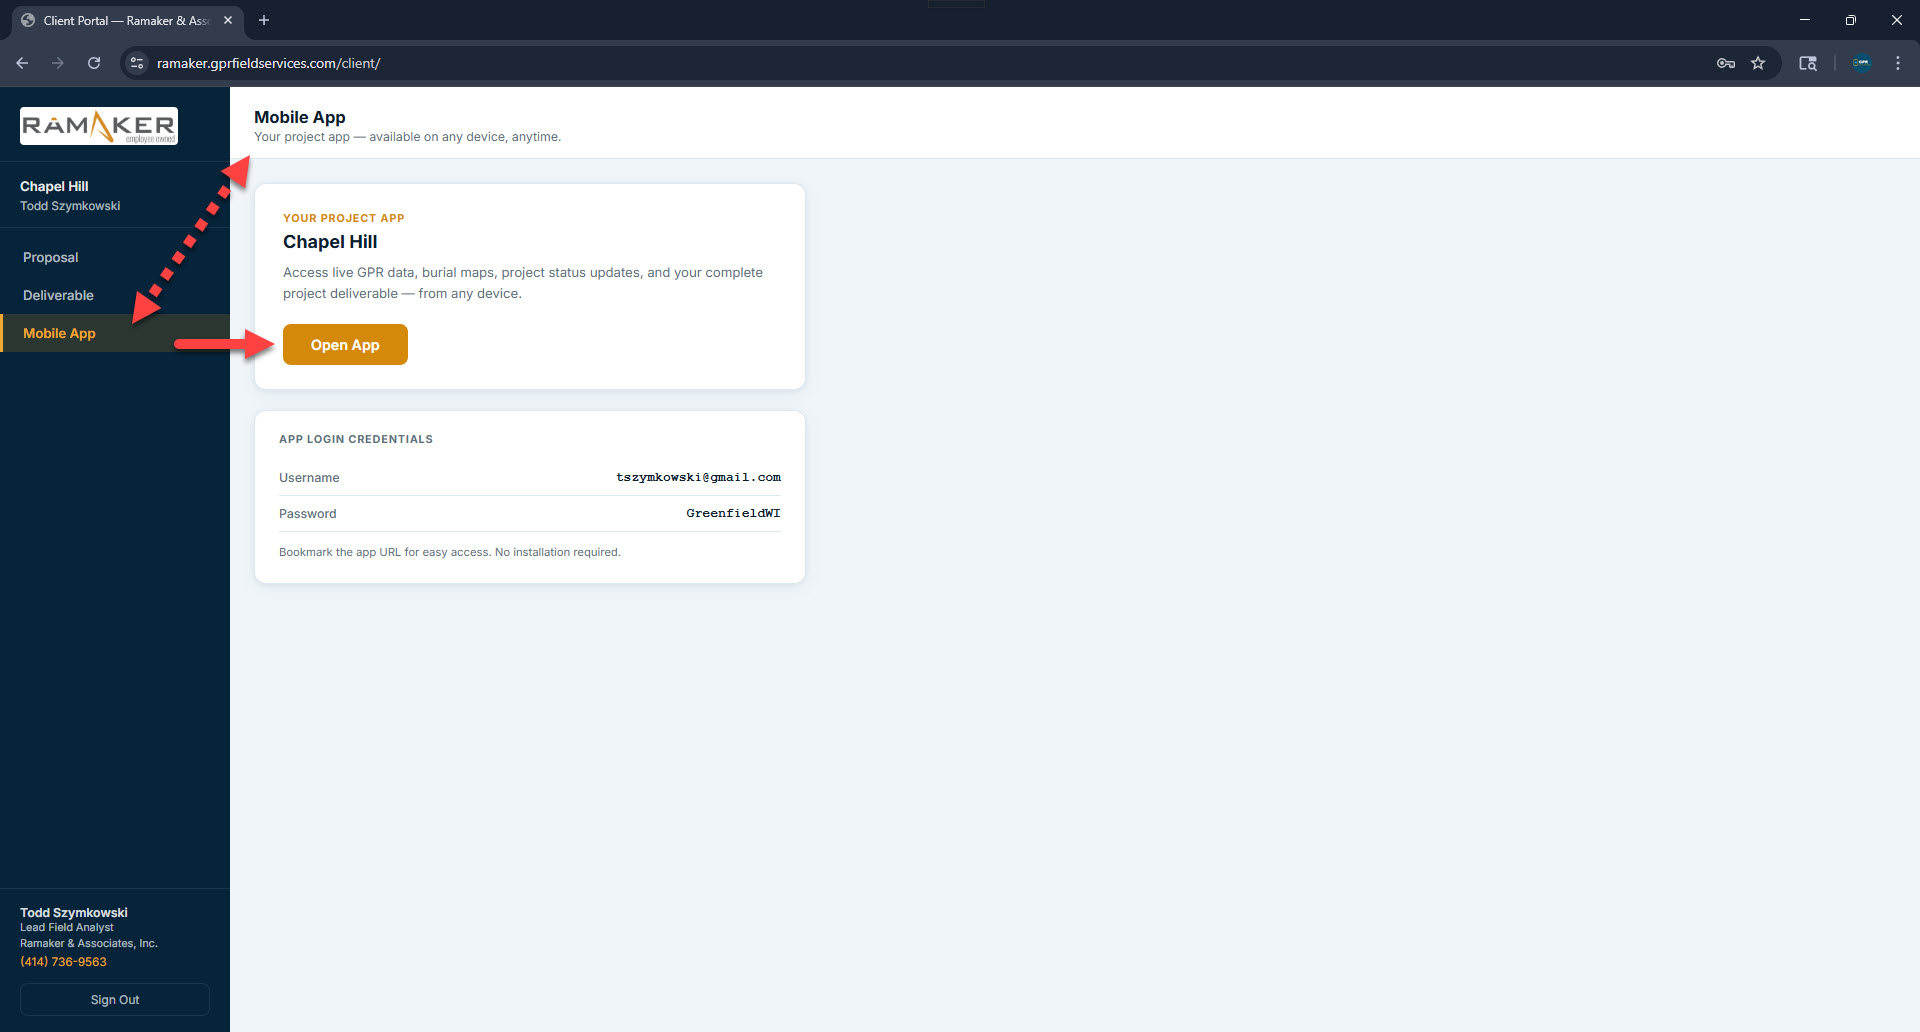
Part 3 — Assigning a Project Number

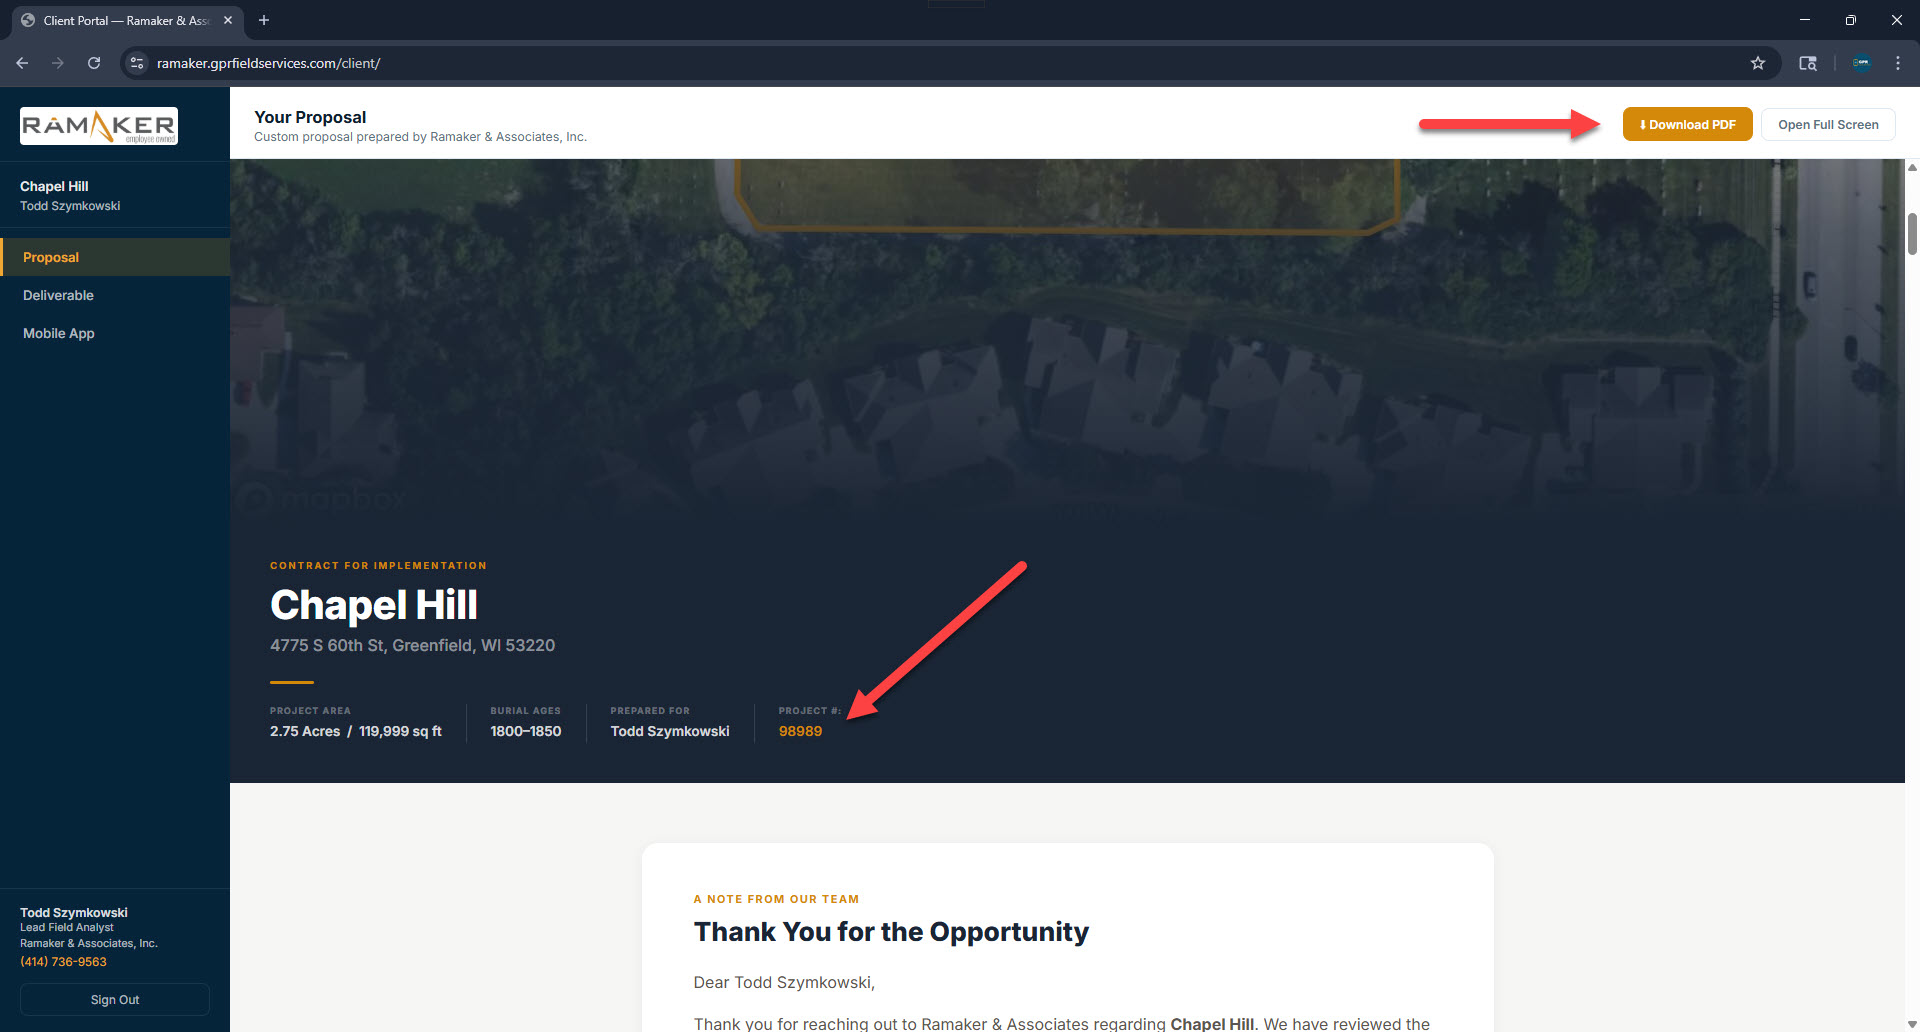
Once Ramaker decides to move forward, a manager logs into the Vendor Hub and assigns an official project number directly in the Proposals tab. This triggers an update email to the prospect and regenerates the proposal with the number embedded.

VH Proposals — proposal appears immediately after submission
VH Proposals tab showing Chapel Hill
Manager types project # — checkmark to save
Typing project number in VH
Prospect email — "Your GPR Survey Proposal is Updated — Project # Assigned"
Project number assigned email

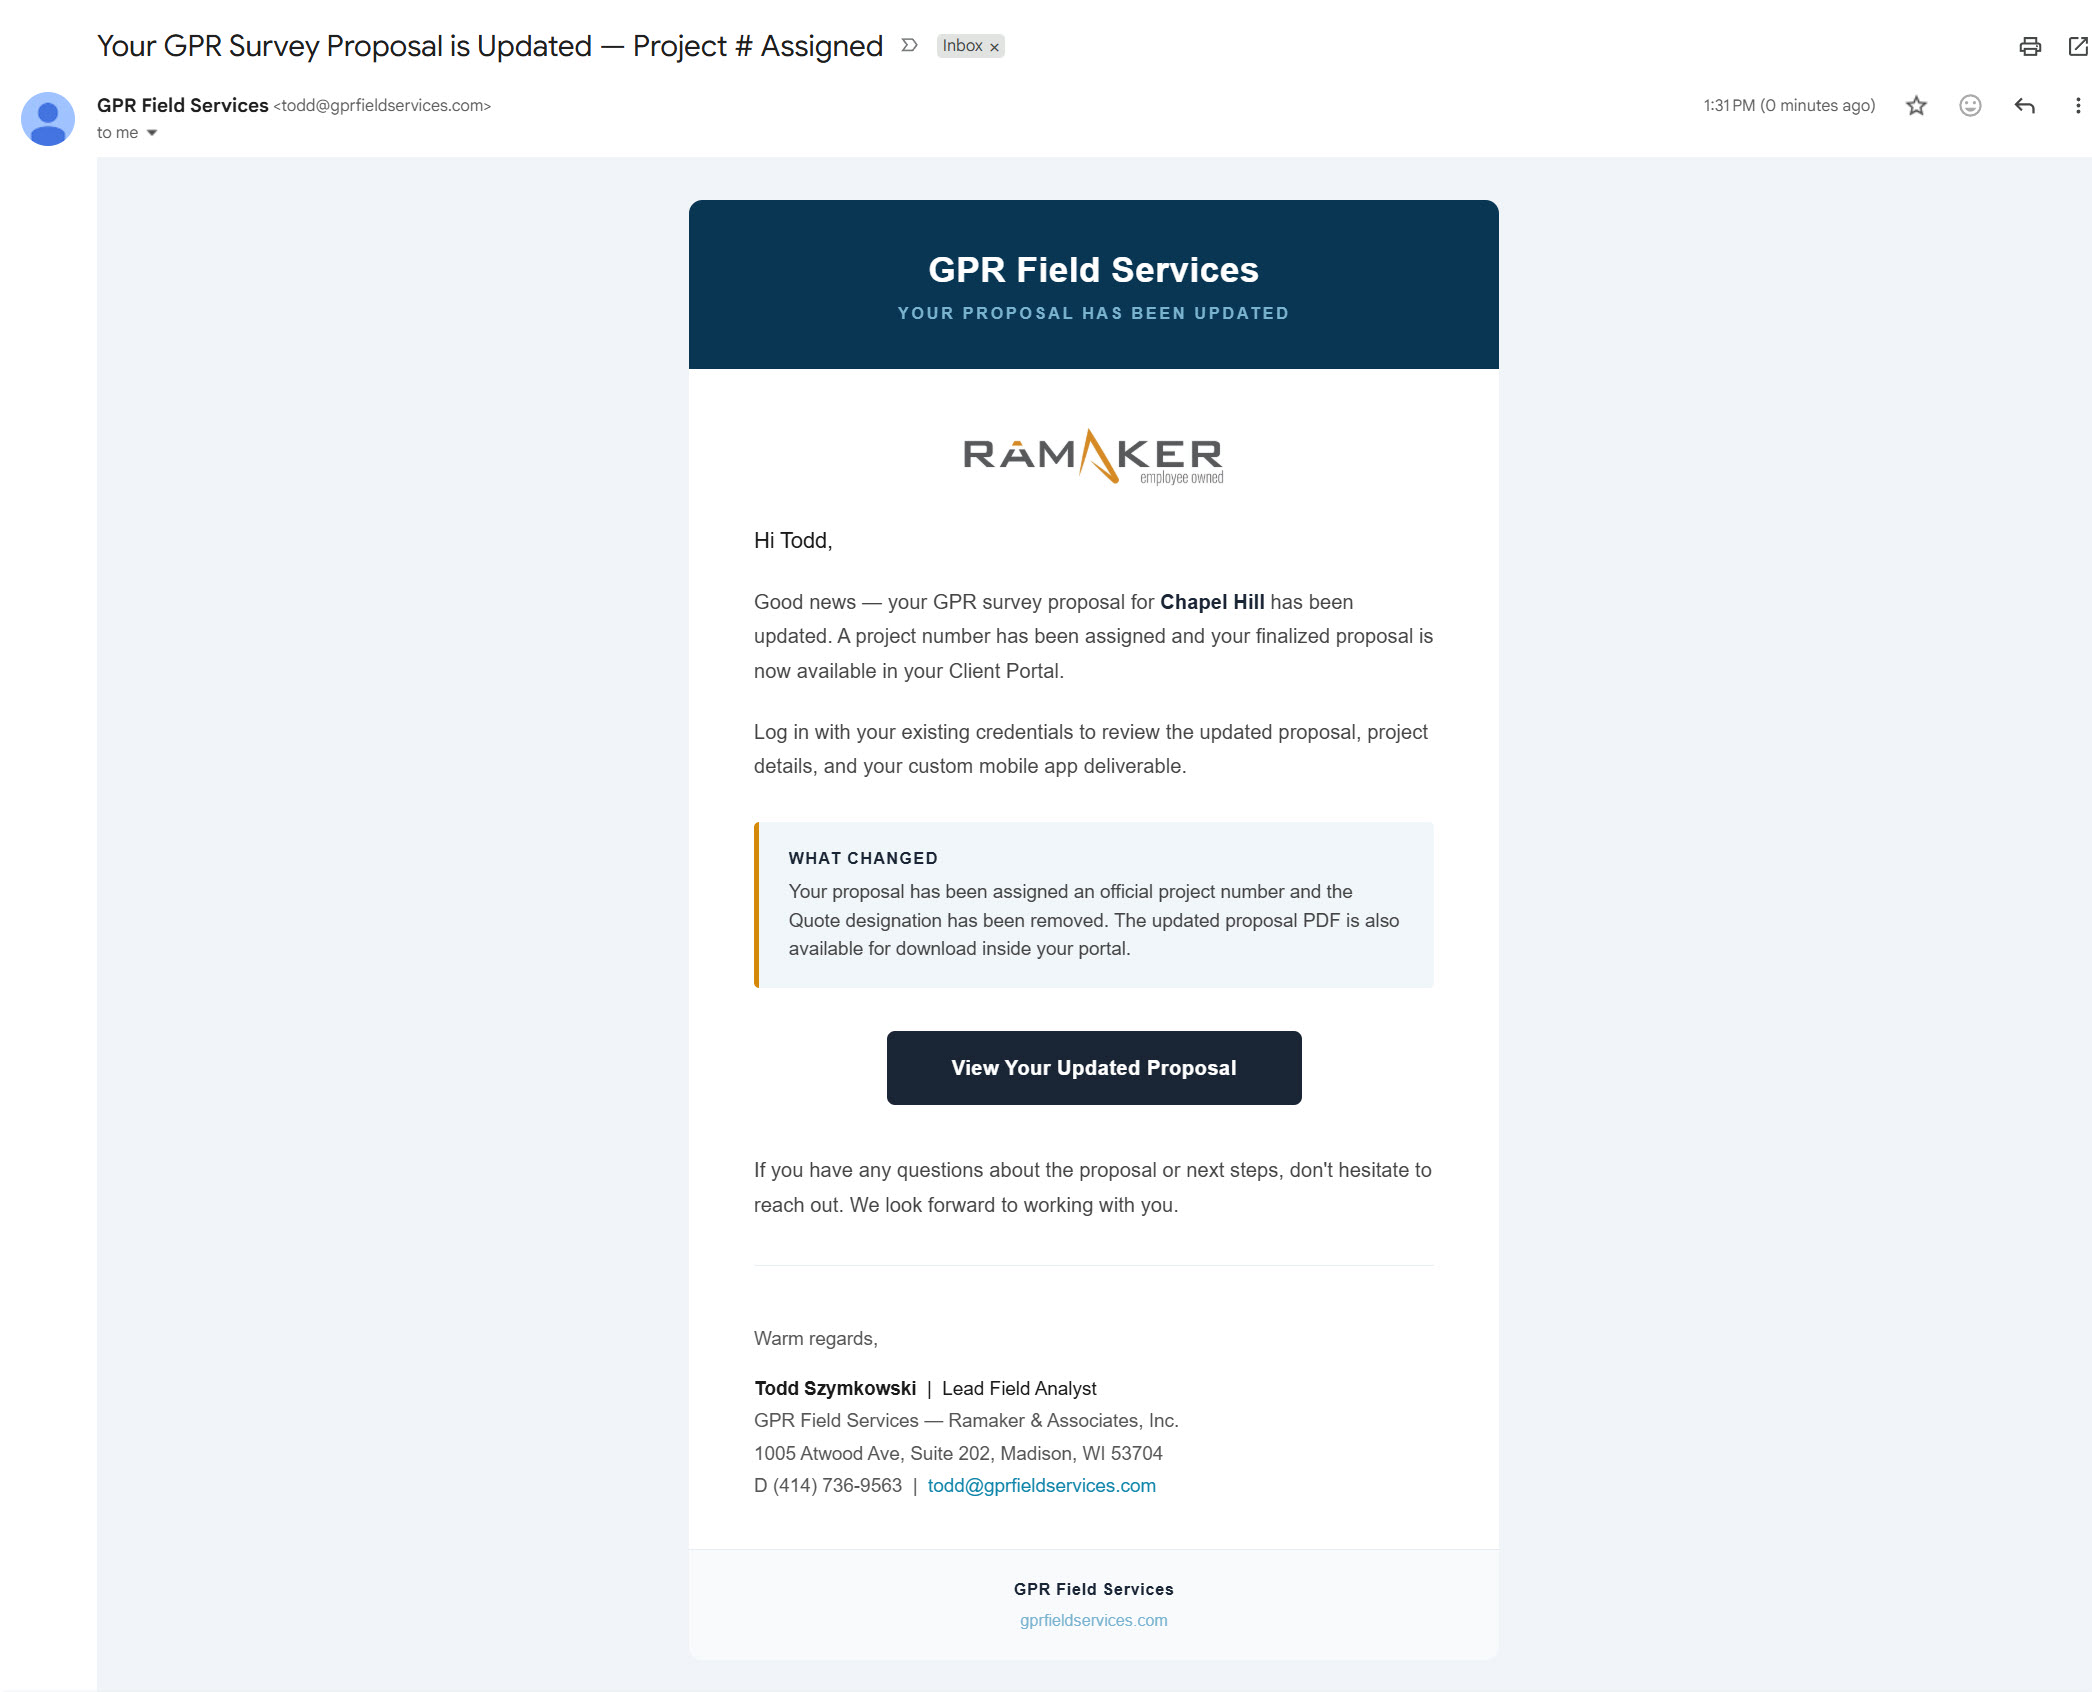
The prospect logs back into their portal and sees a notification banner at the top. Clicking it reloads the proposal with the official project number now displayed.

Portal — update banner with reload prompt
Portal update notification banner
Proposal — project number now displayed
Updated proposal with project number
Downloaded PDF — project number printed on the cover page
PDF with project number on cover
The proposal PDF is automatically regenerated when a project number is saved — the updated version with the official number is available for download within about 60 seconds of assignment.
10
Settings

My Account

Click your name at the bottom of the sidebar to open the account menu. From here you can change your password or sign out of the Vendor Hub.

Auto Sign-In

Toggle in the sidebar footer. When on, your personal access token auto-logs you into client apps — no separate password needed.

Sign Out

Always sign out when finished, especially on shared devices. Your session is secure but signing out is best practice.

⚠️
If you ever believe your credentials have been compromised, contact your manager immediately to have your password reset.